Bleeding Brakes (VTX 1800)
Posted by Bare | Last Updated May 27, 2014This is a walk-through for bleeding the brakes on the VTX 1800 – the process should be identical regardless of the model. I see riders on all makes/models with clutch and brake fluid which is dark brown like Coca-Cola. I can only assume many of them don’t realize that this is a sign of old fluid which needs to be replaced. The performance of hydraulic fluid degrades slowly, so most people don’t realize how bad the fluid is until they replace it via a bleed. Sometimes replacement with fresh fluid is all you need to get the brakes feeling good and solid again.
Before you start this job, consider buying a vacuum pump as an alternative to a one-man bleeder kit. You can get these from Harbor Freight, Sears or most auto stores for about $30. If you plan to bleed your own clutch and brakes on the bike it’s well worth it. If you think you might use it on your friend’s bikes or to bleed the brakes on your car/truck/etc then it’s only more of a bargain. Since I bought mine I’ve used it more times than I can remember and each time is a reminder of how much easier it is versus the old hand pump method. Also if you ever plan to change your lines to braided stainless steel or do a break-down and rebuild of your hydraulic systems, a vacuum pump will help get air out of the lines that a regular bleed won’t easily get.
Keep in mind that if you’re rebuilding your brake hydraulic system or replacing your lines with braided ones and the system is completely dry it will take longer to bleed and will require more fluid. You must also be careful to get all the air out of the system or you can have problems such as poor braking or trouble getting into or out of gear with your clutch. You’ll have to do a combination of vacuum and pump bleeding in order to get all the air out of the master cylinders and banjo bolts. It’ll require some skill, some tapping on things and some patience to be certain you get all the air out because it likes to “hide” in these parts.
As with all projects undertake this at your own risk. This is a fairly simple process if you take your time and are careful. Don’t forget that brake fluid eats paint, so when you’re preparing remember to have a lot of rags handy to protect your paint!
What makes brake/Clutch fluid turn brown?
In its pure (fresh) form brake fluid cannot be compressed (unlike air and certain liquids) and it is designed to have extremely high boiling points. This makes it ideal for a brake and/or clutch system. Over time air slowly makes its way into your brake and clutch hydraulic system – this air contains small amounts of water vapor. Brake fluid absorbs this moisture from the air and the contaminants in the water discolor the fluid. This is why brake fluid containers are always labeled “only use fluid from a sealed container.” The water vapor and contaminants that infiltrate your hydraulic fluid lower its boiling point and make it slightly less effective. This results in that “spongy” pedal or lever you can feel with old fluid.
Synthetic fluid is designed to resist water absorption and therefore lasts much longer between bleedings. This is why I recommend and use Valvoline Synthetic DOT3 & 4 fluid. Another plus is that it’s clear so you can easily see when it’s time to replace it (it turns brown). It’s also readily available at most auto stores and only costs about 5 bucks per quart making it a great choice.
If you’re interested to learn more about brake fluid including the differences between DOT 3/4 fluids and DOT 5 you can read Biglry’s informative post in this thread.
How a bleeder screw works
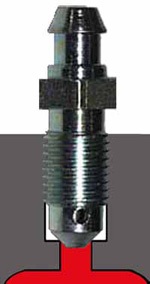
The bleeder screw is what allows us to bleed a hydraulic system. The gray area represents what the bleeder is threaded into, whether it is a brake caliper, a clutch slave cylinder, etc. The red represents the fluid which is backed up behind the bleeder.
The hole in the side of the bleeder is connected inside the bleeder screw to the hole you see at the top of the bleeder. The top hole is where you attach the rubber hose when bleeding.
The taper on the end of the bleeder helps make a tight seal when the bleeder is snugged down. The area the taper sits on in the caliper, slave cylinder, etc is called the “seat”.
When you loosen the bleeder screw it allows fluid to flow past the seat, through the small hole on the side of the bleeder and out the top of the bleeder into the attached hose. Based on how this works you can see how important it is to be careful not to obstruct the hole in the bleeder near the seat. This is especially important if you’re removing the bleeder to put teflon on the threads.
Required tools/Materials
- 5mm allen
- Phillips head screwdriver
- 8mm and 10mm wrench – it must be a wrench, a socket won’t work
- LOTS of rags to protect your paint and to catch spills. I also use an old sock to catch spills at the reservoir
- 1 quart of fresh (sealed) DOT4 brake fluid (a pint if you’re just flushing the system) – I use Valvoline Synthetic DOT3 & 4
- Mity-vac or other brake bleeding kit
- (Optional) bungee cord
Process
Before you start, COVER YOUR TANK!!!
Brake fluid eats paint so make sure you have sufficient protection in case you spill any fluid.
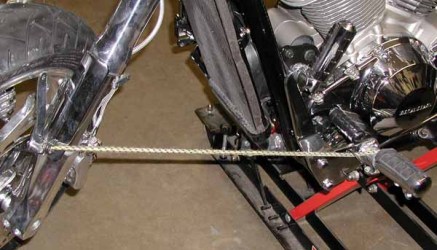
You can do this project on the sidestand or on a lift, but decide in advance. If you’re doing it on a lift you will need to bungee or tie the front wheel at full lock to the left side like this:
The last thing you want is to bump the wheel or have the wheel swing with the reservoir open and sling brake fluid (which eats paint) all over your bike. If you want to work on the bike on the ground then swing the wheel all the way to the right and the tire should provide enough friction (on level ground) to hold the reservoir level. If you’re still uneasy then I would recommend tying the wheel just to play it safe.
The key reason for doing all of this is to get the reservoir as level as possible. With most bars at full lock to the left you get this. If you have adjusted your bars so that the reservoir won’t level out this way, then you may need to break the riser clamps loose and rotate your bars so the reservoir sits level. Remember that if you break the clamps loose you have to snug the clamps tight once the bars are rotated or you might ding your tank and spill brake fluid everywhere – always better safe than sorry.
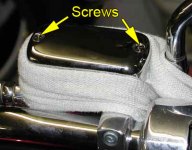
With the reservoir level, wrap a sock or a towel around it to protect against any spills. I like old socks because they wrap nice and snug around the reservoir. With the sock/towel wrapped around the reservoir, use a phillips screwdriver to remove the 2 screws holding the cover in place.
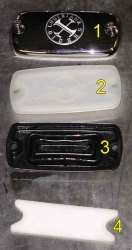
With the cover off have a rag handy to remove the “internals” under the cover. If you have a chrome cover with chrome screws you can use a piece of heavy plastic (like most parts ship in) between the screwdriver and the screw to prevent nicking the chrome. The parts come out in the order they are shown in the picture. Set a rag aside and lay these parts on the rag while you bleed the system.
With the reservoir open, soak up the old fluid with paper towels and throw them away. Rather than pull this dirty stuff through the hydraulic system it’s better to clear it out now. With the reservoir empty, check the bottom because sometimes crud settles here and forms sludge. You can remove this sludge and clean the reservoir bottom with a few Q-tips. With the old fluid gone, top off the reservoir with fresh fluid before you start the bleeding process.
At this point you have to choose which type of bleeding you’ll be doing, vacuum bleeding or pump bleeding. After making your choice, click down to the appropriate header in the walk-through and proceed from there.
Vacuum bleeding
Keep in mind that a vacuum bleeder sometimes creates such a strong vacuum that you experience air leakage around the threads of the bleeder screw. This leakage results in tiny air bubbles in the fluid during the bleeding process (they resemble foam). This is normal when using a vacuum bleeder and should not be mistaken as a sign of trapped air in the system. If you are concerned about this inhibiting your progress then remove the bleeder screw and wrap it with teflon tape (like you use on plumbing fittings). The teflon tape helps seal the threads and prevents these tiny bubbles from occurring during bleeding. You should note that this is not mandatory to ensure a good bleed.
Before you proceed, read the entire bleeding process below until you understand it. This will prevent having to figure out what you’re doing half-way through the process and possibly making a mistake which could make your work harder.
Bleeding the brakes using a vacuum pump requires a balance of:
- Making sure you maintain pressure on the vacuum pump
- Making sure you don’t run the reservoir on the handlebars or behind the front exhaust pipe empty
- Making sure you don’t spill brake fluid on anything
- Making sure you don’t fill the entire vacuum pump reservoir
|
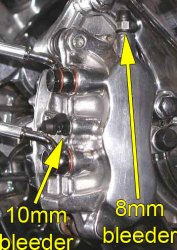
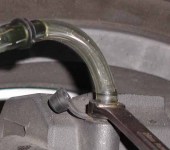
Remove the little rubber cover on the 8mm (top) bleeder screw on the right front caliper (left pic). Place the 8mm wrench on this bleeder with enough space to swing the bleeder open about 1/4 to 1/2 turn and then firmly place the hose for the vacuum bleeder onto the bleeder screw (right pic). |
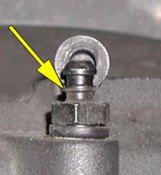
If you look closely there is a little ridge below the top of the bleeder. Make sure the hose gets over this ridge as it helps provide a good seal when you put the system under pressure from the pump. With this done, pump the vacuum until you have built up pressure. The manual for the pump specifies a PSI, but I just pump the crap out of it and it works fine.
Using the 8mm wrench, crack the bleeder open 1/4 to 1/2 turn so that fluid starts to be drawn into the vacuum pump reservoir. At this point you want to keep a close eye on the handlebar reservoir. When the fluid gets close to the bottom of the reservoir, close the bleeder and top off the reservoir with fresh fluid from the container. Make it a habit to grab a rag when you pour so you can prevent spills and drips.
With the reservoir topped off check the pressure in the vacuum pump and crack the bleeder open again so fluid starts flowing. Keep an eye on both the reservoir and the fluid coming out of the bleeder. The idea is to make sure there are no air bubbles coming out from the bleeder. As you flush the old fluid out you should begin to see fresh clear fluid coming out at the bleeder. Once you feel there is no more air in the system and you can see fresh fluid coming out at the bleeder then close the bleeder and move onto the other side.
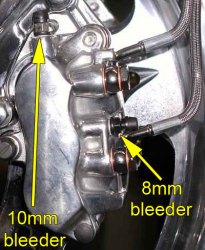
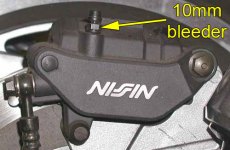
Repeat the exact same process on the left front caliper – on this side the top bleeder is 10mm.
As you flush the old fluid out you should begin to see fresh clear fluid coming out at the bleeder. Once you feel there is no more air in the system and you can see fresh fluid coming out at the bleeder then close the bleeder and squeeze the brake lever a few times – it should feel solid not spongy.
If it feels spongy, then bleed a little more to see if there is air trapped in the system. It may help to pump the brake lever a little and tap the banjo bolts where the line attaches to the reservoir and calipers. Sometimes air likes to “hide” in the banjo bolts. Keep at it until you have fresh fluid throughout the system and a solid feeling brake lever. This may mean switching from the left caliper to the right caliper a few times to get all the old fluid and/or air out of the system – just remember that you’re bleeding from the TOP bleeders, the bottom bleeders are for the linked brakes and you’ll get to those next.
Now that you understand the process and you’re finished with the bleeding portion of the front brakes – skip down (past “pump bleeding“) to “finishing front brakes“.
Pump bleeding
Before you proceed, read the entire bleeding process below until you understand it. This will prevent having to figure out what you’re doing half-way through the process and possibly making a mistake which could make your work harder. The process of pump bleeding your brakes is a simple one that just requires a little coordination.
- Pump the brake lever a few times to build pressure – on the last pump squeeze and hold the brake lever
- Loosen the bleed valve 1/4 to 1/2 turn until fluid starts to flow from the bleeder and into the rubber hose
- When the fluid has stopped flowing (or slows down) close the bleeder – do NOT release the brake lever until the bleeder is closed!!!
- Release the brake lever slowly
- Check the level of fluid in the reservoir and top it off if necessary
- Repeat all of the above
|
Remove the little rubber cover on the 8mm (top) bleeder screw on the right front caliper (left pic). Place the 8mm wrench on this bleeder with enough space to swing the bleeder open about 1/4 to 1/2 turn and then firmly place the hose for the vacuum bleeder onto the bleeder screw (right pic). |
If you look closely there is a little ridge below the top of the bleeder. Make sure the hose gets over this ridge as it helps provide a good seal to prevent leaks. If you don’t have one of those little “one man bleeder kits” then place the other end of the hose into a container to collect the fluid as you bleed the system.
What you are doing is building pressure in the system using the brake lever and releasing that pressure through the bleeder screw. You have to hold the brake lever until the bleeder is closed or else the release of the lever will draw air into the system from the bleeder – I mentioned earlier why you don’t want air in the system.
Keep repeating the steps above until you get fresh fluid coming out of the bleeder and you feel there is no more air in the system. Keep a close eye on the handlebar reservoir – when the fluid gets close to the bottom of the reservoir close the bleeder and top off the reservoir with fresh fluid from the container. Make it a habit to grab a rag when you go to pour so that you’ll have it handy to help prevent spills and drips.
The idea is to make sure you have no air bubbles coming out from the bleeder. As you flush the old fluid out you should begin to see fresh clear fluid coming out at the bleeder. Once you feel there is no more air in the system and you can see fresh fluid coming out at the bleeder then close the bleeder and let’s move to the other side.
Repeat the exact same process on the left front caliper – on this side the top bleeder is 10mm.
As you flush the old fluid out you should begin to see fresh clear fluid coming out at the bleeder. Once you feel there is no more air in the system and you can see fresh fluid coming out at the bleeder then close the bleeder and squeeze the brake lever a few times – it should feel solid not spongy.
If it feels spongy then bleed a little more to see if there is air trapped in the system. It may help to pump the brake lever a little and tap the banjo bolts where the line attaches to the reservoir and calipers. Sometimes air likes to “hide” in the banjo bolts. Keep at it until you have fresh fluid throughout the system and a solid feeling brake lever. This may mean switching from the left caliper to the right caliper a few times to get all the old fluid and/or air out of the system – just remember that you’re bleeding from the TOP bleeders, the bottom bleeders are for the linked brakes and you’ll get to those next. Keep at it until you have fresh fluid throughout the system and a solid feeling brake lever.
Now that you understand the process and you’re finished with the bleeding portion of the front brakes you can move on to “finishing front brakes“.
Finishing front brakes
Remove the bleeder hose making sure not to spill any fluid. Tighten the bleeders snug but don’t really wrench on them, they only require 4.3 ft/lbs to seal – hand tight with the wrench will suffice. Place the little rubber cover back on the bleeder.
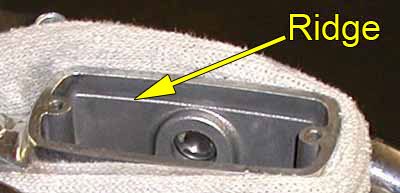
With the bleeders closed go ahead and close the reservoir so you don’t have any spills. Fill the reservoir with fresh fluid to the ridge inside:
|
Now slowly and carefully reinsert the inner parts in the reverse order you removed them. Carefully drop the float (4) into the reservoir, slide the diaphragm (3) into place and the set plate (2) should slide right into the diaphragm. With everything in place install the cover (1) and snug the screws down – these are hand tight as well only requiring 1.1 ft/lbs to seal. If you have a chrome cover with chrome screws remember you can use a piece of heavy plastic to prevent nicking the chrome. |
Bleeding the linked brakes
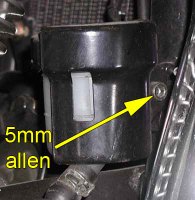
Now that you have the experience of bleeding the front brakes you can move onto bleeding the linked brake system on the VTX. Refer to the same methods you chose above. You’re just bleeding different locations this time and using a different reservoir for fluid. Rather than dealing with a reservoir on the handlebars, this time you’re dealing with the reservoir that is behind the front exhaust pipe (see pic to right).
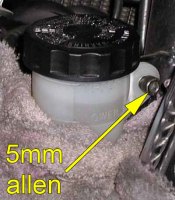
Remove the 5mm allen bolt and then remove the metal reservoir cover (not the plastic cap) and set it aside. Reinstall the 5mm allen without the cover to hold the reservoir upright and in place (see pic below). Wrap some rags around the reservoir to protect the bike from spills – don’t forget that brake fluid EATS PAINT!
With the reservoir bolted back to the frame without the metal cover, remove the cap. You’ll have 3 parts inside (pic below). Remove all of these parts and set them aside.
| (3)diaphragm
(2)diaphragm plate (1)cap |
With the reservoir open, soak up the old fluid with paper towels and throw them away. WIth the reservoir empty, clean the bottom and remove any sludge with a few Q-tips. Top off the reservoir with fresh fluid before you start the bleeding process.
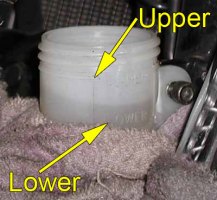
Now you’re ready to start bleeding so you’ll need to monitor the fluid level in the reservoir as you bleed. Look at the upper and lower level marks on the reservoir and get used to monitoring them as you progress.
At this point refer back to the bleeding process you chose above (pump or vacuum) remembering that you’re using the right side foot brake this time instead of the right handlebar brake lever as part of the pump bleed process. Also remember that this time you’re using the lower bleeders on the front brakes and the only bleeder on the rear brake. It is important to bleed this system in a set order (especially if you’re bleeding a completely dry system) to make certain you get all the air out.
Bleed in this order!!!
| FIRST Right front brake lower 10mm bleeder |
SECOND Left front brake lower 8mm bleeder |
THIRD Rear brake 10mm bleeder |
With the exception of adding the rear brake to the process you are using the exact same steps as above, just using the lower bleeders on the front and adding a 3rd caliper to the process.
Once you feel certain there is no more air in the lines and there is clean fluid coming out of all the bleeders you can move on and finish up. Like before tighten the bleeders snug but don’t really wrench on them, they only require 4.3 ft/lbs to seal – hand tight with the wrench will suffice. Place the little rubber covers back on all bleeders.
Top off the reservoir to just below the “upper” line (see pic to right).
Reinstall the diaphragm, diaphragm plate and cap (pic below).
Remove the 5mm allen bolt, reinstall the metal cover and then replace and tighten the 5mm allen bolt. The torque spec for the 5mm allen is 9 ft/lbs but hand tight with a wrench is fine.
Clean up any fluid you might have spilled, remove all the rags you put down and if you bungee’d the front wheel, undo it.
That’s it – you’re done – congratulations!
Afterthoughts
This is a relatively easy job once you have the experience of doing it a few times. Once you understand the bleed process and the order to bleed all the calipers in it can become like second nature. It is ideally something you should do as regular maintenance about once a year depending on how many miles you log on the bike. By using a clear fluid like Valvoline Synthetic you can tell with a quick glance at the sight glass when it is time to replace it. If you bleed your brakes and clutch at the same time you’ll even be able to tell which you use more often by which discolors sooner.
It’s easy to overlook your hydraulics because they degrade so slowly that you don’t really notice a difference until you have new fluid in the system. I challenge you to try this if you haven’t replaced your hydraulic fluid in over a year. You might think your brakes or clutch are doing just fine, but after replacing the old fluid you will notice a drastic difference in the feel of the lever. It’s hard to realize how much braking force you’ve lost until you do this.
Video courtesy of Big Bad
These videos are intended to give you an idea for the kind of things you’ll see and do during this job. They are not intended to replace the above instructions for anyone except experienced mechanics because the text above contains important details.


Thanks for a great site! Instructions are flawless. Couldn’t find a vaccume anywhere so used the pump method. For the record, one needs 3/16 inch ID vinyl tubing for the bleeder screw.
Great instructions!!! Thanks for the hose size
Simply said: What an amazing site!
Awesome write-up. Used it after installing Hoggone’s reservoir kit.
Thanks bud!
Axel
See post above Item #7 – The hole in item #7 goes over the hole in the bottom of the reservoir bowl with the little feet (3 of them) pointing up. Push it down all the way so the hole in part # 7 is flush with the bottom and fits over the hole in the reservoir. Done deal. Fill it up with fluid and ride.
Also it helps to put a platic tie on the bleeder hose, so it does not suck air when using a vacume pump.
awesome site, just completed flushing the brake system, clutch, and doing the PAIR system and desmog removal using this site on my new to me vtx1800f. Everything is a simple walk thru and made it really easy to follow.
Excellant instructions. I am repairing a VTX for a friend and had to re install a caliper that had been removed after the accident by a previous owner. The lines were dry. I tried on my own at first. And after the frustration of not getting the rear to pump up I found this site. I would have never figured out the sequence on my own. Thanks
[…]what you want to do is create a constant vacuum on the bleeder[…]
1 hour start to finish using the $25 brake bleeding tool from Harbor Freight! Thanks for the info!
Thanks I haven’t tried it yet but don’ think i will have any problem with such great instructions Thanks again
I have not tried to do my brakes yet but don’t think i will have any problem with such great instructions thank you.
[…] 1800 brake bleeding has a very specific procedure. […]