Gas Tank Removal (02-04 VTX 1800)
Posted by Bare | Last Updated February 20, 2013This procedure only applies to the ’02-’04 model VTX 1800’s. The newer (’05 and later) models have an external fuel pump which mounts in front of the rear tire and requires a slightly different process to remove. If you have one of these newer models let me simply advise that you siphon all the gas out before attempting to remove the tank – it will be a messy process and you will curse Honda for the design.
Getting back to the task at hand – removing the tank on the ’02-’04 models with the internal fuel pump – it’s not a bad idea to run the tank down as low on fuel as possible. If you’re concerned about making a mess spilling fuel, then siphoning may not be a bad idea either. I can tell you that over the years I’ve gotten pretty good at this. As long as the tank is a little less than half empty I haven’t had much trouble with major spills.
Required tools/Materials
- Tools to remove seat
- 5mm allen
- 17mm socket or wrench
- Two 10mm wrenches or sockets
- Pliers or channel locks
- Shop towels for soaking up spilled gas
- Bungee cord
- (Optional) 1/4" hose clamp or fuel line quick disconnect
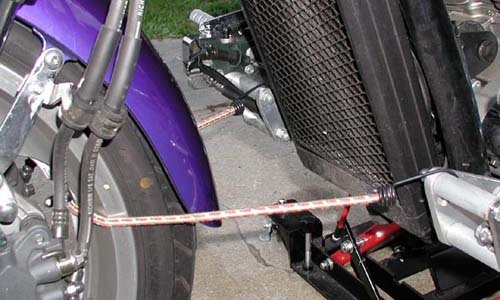
First remove the seat. Then use a bungee cord to secure your front wheel. This will prevent the handlebars from flopping side to side and dinging the tank.
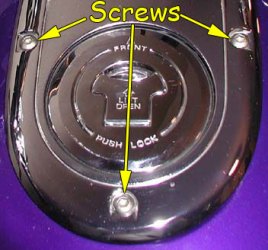
Next, using the 5mm allen wrench, remove the three lowest bolts holding the console. Make sure when removing these bolts that you don’t lose the little plastic washers that go under them. These plastic washers help prevent the dash from rattling. Do yourself a favor and keep the gas cap on until these are removed so you don’t drop them in the tank.
With the bolts removed, take the gas cap off and pull the console forward to remove it. While removing the console, be careful that you don’t pull off the rubber cover that sits on the mounting tab at the front of the tank. Once the console is removed, put the gas cap back on. I wrap the console in a heavy towel and let it hang along the side of the bike, it usually rests on the right side foot controls just fine. You can do whatever you want with the dash to keep it out the way, just be sure not to knock it around and scratch it up.
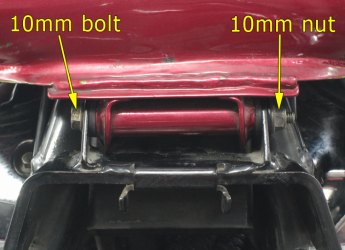
Next, remove the rear tank bolt that secures the tank to the frame. Do this using two 10mm wrenches, sockets, or whatever – it’s a 10mm nut and bolt.
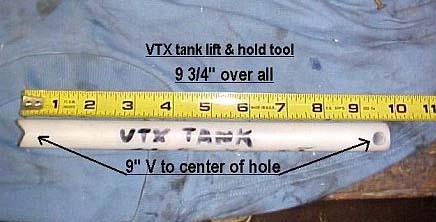
Now that the rear tank bolt is removed, let’s disconnect all the hoses and wires. Do yourself a favor and drape a towel over the tank as an extra precaution to protect against anything hitting or damaging the tank. Grab the tank at the front and back and pull it towards the seat and slightly upward. At this point you should be able to get the tank propped up using a tank prop:
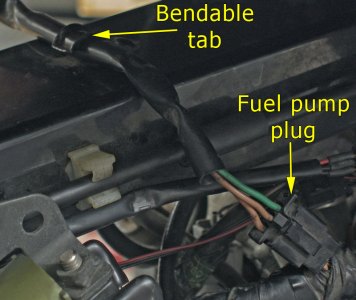
With the rear of the tank propped up, find and disconnect the plug for the fuel pump. Also, slightly bend up the tab holding the wire on the backbone of the bike and pull the wire from underneath it.
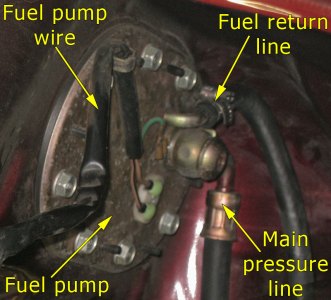
Continue looking under the tank and you’ll see the small tank vent tube and the larger fuel return line. The smaller vent line is attached just below the pump in this picture. There are no clamps holding this vent line in place, so it should slide right off of the barb it is on, but sometimes it will need a little twist to get it to break loose. Disconnecting the larger fuel return line is the most difficult part of this entire process. It is held on by a spring style hose clamp which is a real pain in the butt. Depending on what pliers you have available, just keep trying until you find one that works well. I’ve used regular pliers, needlenose pliers and channel locks with varying degrees of success. A flashlight will help tremendously in seeing what you’re doing. The best thing you can do is squeeze the clamp and slide it down the hose, then you can concentrate on just getting the hose itself off the barb. Like the vent line before, it may require a little twist to get it to break loose from the barb.
When you go to put the tank back on the bike I strongly recommend replacing this spring clamp with a regular hose clamp (like in the picture) or a fuel line quick disconnect coupler. ’02-’04 models can find their disconnects here and ’05+ tank owners can find their disconnects here.
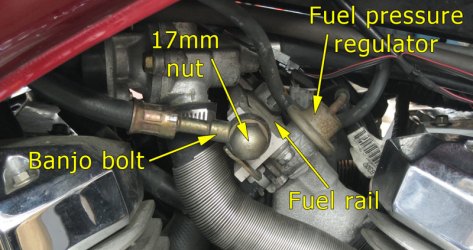
With that return line and vent disconnected, you’re down to the last part of this task. Find this 17mm nut where the main fuel line attaches to the fuel rail. Put a rag under this fitting and break it loose, but be prepared to catch the gas that spills from the fuel rail and the hose (it will only be a few tablespoons). When the gas stops flowing, remove the 17mm acorn nut, but be careful not to damage the crush washers that are on either side of the banjo fuel fitting. Remove the outer crush washer and then remove the banjo fitting itself. To keep from losing the crush washer I put it back on the fuel rail and spin the nut on top to keep it in place until I’m ready to reinstall the tank.
With that last line disconnected, the tank is ready to come off. Grab the tank and carefully slide it backwards to remove it from the front rubber mounts. Remove it from the bike and set it aside somewhere safe. I also cover the tank with towels to give me an extra level of protection against anything that might get dropped on or near the tank.
Reinstalling the tank is as simple as following these steps in reverse order. The torque spec for the 17mm nut that attaches the banjo fitting to the fuel rail is 16 ft/lbs.
That’s it – you’re done – congratulations!
Afterthoughts
While this task may seem daunting to those who have never tried it, I can assure you that the more you do it, the easier it gets. Removing the tank makes several other projects easier – and if you install the fuel line quick disconnects, this job a becomes piece of cake.
One more time for reference sake – ’02-’04 models can find their disconnect info here and ’05+ tank owners can find their disconnect info here.

Do I have to take off the dash if I just want to raise but not remove the tank ?
Yep, if you don’t it’ll hit the handlebars.
hoi thx for the help…
Thanks! I have an ’05 R and the instructions are good enough that I had NO PROBLEM in removing my tank. I am changing the thermostat and while I have the bike this far undone I am also desmoging at the same time. Thanks for all the helps!!!
“The torque spec for the 17mm nut that attaches the banjo fitting to the fuel rail is 9 ft/lbs.” – is this right?
Manual for VTX 1800 R 2002 say:-“Fuel hose sealing nut (throttle body side) – 22 Nm or 16 lbf*ft”.
Who’s wrong?
Thanks for the heads up on this. I’m usually very meticulous about checking this stuff, but when I cut/pasted the formatted text (red w/ italics) from another article I overlooked changing the number. Honest mistake, thanks again for bringing it to my attention.
Ok, man! You’ll do a big work and your articles are very helpful/ Thanks!
It is a good idea to support the fuel rail when you remove/replace the acorn nut on the fuel line. Soft jaws or an adjustable wrench will do. This fuel rail can twist and the hose connected on the bottom (you can make it out in your above photo) which has another of the unique spring clips on it. If you think the return line hose clamp is a “pain in the arse” to re-use, this larger very hard to get to clamp is even worse.
Thanks for the informative article, I had to replace the fuel pump on my 2003 1800c, it was a big help. FYI the Bosch 69496 pump is a perfect fit into the stock assembly if you don’t feel like paying big bucks for the oem. $62.31 on Amazon and its USA made.
For what it is worth, I have a pair of pistol grip needle nose pliers from Home Depot that made that clamp not as big of a problem. This was so helpful though, thanks for posting it!
I am still with a doubt; why is necessary to remove the gas tank if the pump is at the bottom left of the motorcycle
Any response to my email will be greatly appreciated. I will replace my pump as soon as the new arrives. Nice and clear instructions. Thank you very much.
It is year specific …. 2003/2004 VTX1800C had internal fuel pump, 2005+ external.
Just in the process of replacing mine on my 2003 as it quit working and this thread was so incredibly helpful … thank you.
Can anyone help me I have a 2004 1800C and I need the part number for the main pressure fuel line the line with the banjo bolt. Thanks
Hi, have 2002 vtx 1800 c model that i bought with hyper charger & long shot pipes. last time bike ran fuel came out of exhaust pipe, shut down bike and went into storage 4 years ago with about a 1/2 quart of gas in tank, rest was drained out. just replaced fuel pressure regulator per your trouble shooting instructions, install new battery, new spark plugs, oil change. now bike cranks over but won’t start? can hear fuel pump prime ok when key is turned on. also, when key is turned on there is a red light on top row of dash. when i push start button and engine is cranking there is a red lite more like sputtering than blinking on bottom row of dash Lites next to green neutral gear lite. I don’t have manual for bike but remember yellow low fuel, blue high beam, green neutral, yellow turn signals. don’t know what red Lites mean??? What are my next steps / repair to get bike running. Also, when removing fuel line Bango bolt from fuel rail there was only 1 crush washer, is there suppose to be 2 washers??