VTX1800 Fuel Pressure Regulator
Posted by Bare | Last Updated March 15, 2015With the recent outbreak of fuel pressure regulator (FPR) failures on the early model (02-04) VTX 1800’s, I decided to throw this together and expand a little bit on the problem. This problem only occurs on VTX 1800 models with the internal fuel pump that resides inside the gas tank. This typically means 02-04 1800 models and a mix of the 05’s. If there is any confusion look between the cylinders on the left side of the bike. If you have a coolant reservoir there, then you have an external fuel pump and none of this applies to you.
Biglry from the California VTX Riders addressed this problem years ago here. You’ll recognize some of the pictures in this article from that link, they’re here courtesy of Biglry. This tech article is intended to expand upon what Biglry has already written on this subject.
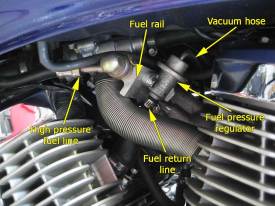
Let’s start by explaining where the fuel pressure regulator is, what it does, and how it works. Look under the tank between the cylinders on the left side of the bike and you’ll see what’s in the top picture to the right.
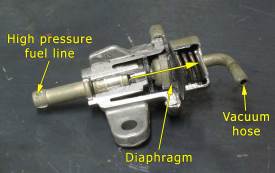
The VTX fuel pump pushes fuel through the high pressure line and into the fuel rail at a little more than 50 PSI. Depending on the engine’s fuel needs this pressure will fluctuate. It is the FPR’s primary job to stabilize the fuel pressure and prevent these fluctuations. This is accomplished by a spring loaded diaphram inside the FPR (see bottom pic to the right). When the fuel pressure in the rail exceeds 50 PSI it pushes against this diaphragm (in the direction of the arrow) opening a valve that allows fuel into the return line and back into the tank, therefore reducing pressure in the fuel rail.
It is important that the pressure in the fuel rail remain as consistent as possible since there is no sensor to provide feedback to the computer. The computer must be able to assume consistent pressure in order to calculate injector pulses and the like so everything runs as efficiently as possible. The design of the FPR also allows it to function as an emissions control device via the use of the vacuum connection. During deceleration the increased vacuum pulls the FPR diaphragm valve wide open (in the direction of the arrow) to reduce pressure in the fuel rail. The reduction in pressure means less fuel gets injected during deceleration and therefore less emissions.
Signs that you may have a bad fuel pressure regulator:
- Decreased fuel mileage
- Rough running engine or an engine that won’t hold a steady idle
- Liquid fuel dripping from the throttle body/intake
- Strong raw fuel smell and/or thick black smoke coming from the exhaust
- In a very bad FPR failure you can actually have liquid gas dripping out of your exhaust
Tests to check if you have a bad fuel pressure regulator:
- Remove FPR vacuum hose, if liquid fuel drips out the FPR is bad
- Remove FPR vacuum hose. Hold your finger over the nipple where the vacuum line was and turn the key on (with the kill switch in the on position) so you can hear the fuel pump prime. If the FPR is bad liquid fuel will come out of the vacuum nipple when the pump primes the fuel rail
Replacement:
If you determine the FPR is bad then order a new one from Honda (OEM# 16740-MCH-013). A brand new FPR comes with a new O-ring so there is no need to order that separately. The FPR does come shipped with a small rubber plug to protect it and hold the O-ring in place so don’t expect the O-ring to be floating around in the parts bag.
Required tools/Materials
- New Honda fuel pressure regulator OEM #16740-MCH-013
- 1/4 drive ratchet and 10mm socket OR
- 3/8 drive ratchet, universal joint, 6″ (or more) extension, and 10mm socket
- Pliers
- Flathead screwdriver (optional)
- a rag to catch a small amount of spilled gas
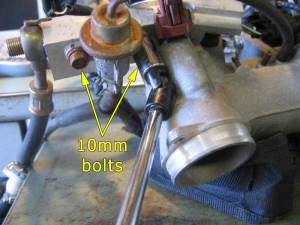
When you have the new FPR in hand head out to the bike with your tools. Pull the vacuum hose off the top of the FPR. Use the pliers to open and slide the spring clamp down the fuel return line and then remove the fuel return line. Sometimes a light twist with pliers or a flathead screwdriver between the FPR and fuel line will help break the line loose. Now use your ratchet and 10mm socket (and u-joint and extension if necessary) to break both 10mm bolts loose before removing them entirely. The picture at the right of an FPR and fuel rail removed from the bike may help you see where the “hidden” bolt is located if you have trouble finding it. Once the bolts are both out remove the FPR making sure you remove it’s o-ring at the same time. It will pop right off but sometimes needs a tap if it’s stuck to the rail. Pop open the new FPR, remove the little rubber plug, make sure the new o-ring is properly in place and bolt it back on. If you have trouble getting the O-ring to stay in it’s groove use a tiny drop of grease to “glue” it in place. Obviously you can’t pinch or damage that O-ring or you’ll be leaking fuel all over! Snug the 10mm bolts down but don’t overdo it – these are steel bolts in an aluminum rail! Re-attach the vacuum hose and fuel return line making sure you replace the spring clamp in the process. If the spring clamp gives you trouble just replace it with a screw type clamp (like I did in the picture at the top of the page.
Now fire the bike up and see if your problems are fixed. If they are then it’s time to change the oil in the bike. This is absolutely imperative and an often overlooked step. When the FPR goes bad it allows the vacuum line to siphon raw fuel directly into the throttle body. This floods the engine with so much gas that it washes the cylinder walls and slips past the piston rings down into the oil sump. This dilutes your oil with gas reducing it’s viscosity which severely inhibits it’s ability to lubricate your motor. In turn, as this oil/gas mix gets pumped through the bike by the oil pump it washes out any grease or lubrication that is in the bearings throughout the motor. Ignoring this simple step can result in fixing the FPR problem but still doing significant damage to your motor.
After changing your oil you should also check your intake housing. If too much gas gets into your oil not only does it dilute, but it overfills the oil sump. Since part of what the crankcase breather vents is the sump, extra oil/gas can be blown out of the motor through the crankcase breather which vents into the intake. In very advanced FPR failures I have found a half a quart of oil/gas sloshing around inside the intake housing!
That’s it – you’re done – congratulations!


Very good instructions…Pix helped a lot. I did it under 30 min and took my time. I only removed the seat to see better.
THX.
John
Yes Docc is still alive LOL. Another excellent write up thanks to Biglry and you..
I just did major service and replaced regulator at 70K miles.. Slowed done a lot after back issues,,mostly in my Hot Rods..now.. Still love the X.and my other bikes..
Thank you for your help. I’m not sure if my pressure regulator was bad or not but after all the internet postings and talking to other VTX owners something is going on with MPG’s.on the VTX’s. Some people are getting low 30″s while others are getting low 40″s. I figured if it cost me $40 to change the pressure regulator then why not, so I did. The only problem that came about is when I disconnected the fuel return line gas came out in a steady stream and did not stop until I plugged it. I don’t know if this is suppose to happen or not’ if it was then it would have been nice to known. Now I will see what type of mileage I’m getting. Will let you know when the weather breaks and I get a few tanks ran out.. Thank you for the tech support.
Thanks, very good info!
Just did the fpr and changed oil. One thing not mentioned is the spark plugs. Changed them today, and they looked terrible. Bike only has 23400 miles and looked like plugs had 100k.
Thanks to the guys running this site for so much great information. After FPR replacement, Also dumped the new oil after 500 miles, changed again due to the fact that oil still smelled like gas.
Can this be done with the tank in place or do you need to raise up the gas tank?
Yes.
2003 VTX1800c will not ride far, 10 to 20 miles and then starts to bog, or jerk at steady mph. Occasionally will not even idle and then quits running. I’ve immediately loosened the gas cap to check if tank vent is plugged, does not make a difference so it is not pulling a vacuum. Allow the bike to cool down a bit, with the bike stand down and it will restart, run at speed and so far I’ve managed to get home but the engine kicks back, coughs, bogs, backfires through the exhaust then smooths out for a bit. Being fuel injected, can’t imagine a vapor lock condition. On first start up when engine is cool, bike runs perfectly sometimes can ride 25 or so miles before the bog, engine coughing and backfire begins, along with a heavy jerk. The normal stuff, plugs, fuel pump, intank filters, vacuum hose check on fuel regulator, electrical cables, air cleaner, oil, water, etc. are either new or have been checked for damage. Battery is new. Vent hoses are clear, heat, fuel pump, neutral lights on start up function normally and do not come on while riding, even when engine is bogging, backfiring, or limping along while riding. I have checked for loose wires, grounds, broken terminals, bare wire insulation, fuses battery connections, etc..,even the kickstand wires. All seem to be in factory order.
I’m real short of ideas. Any help or suggestions may solve this engine issue.
I found the problem for the snap, crackle and pop of the engine described above. The green ground wire under the tank is a blade clip fastener. The female side of the connection slips over the male blade, which is anchored by the factory to the plate which is part of the internal fuel pump assembly. The factory anchors the wire harness with a press/squeeze type fastener to the gas tank. I found that the wire harness for the fuel pump is mounted without excess slack for the green ground wire once clip together. While riding, the “bridge” of the wiring from the main harness to the tank fuel pump has enough slack to move up and down, which eventually tugs enough on the tight green wire ground to spread the female side of the ground wire and this creates a loose terminal, which actually causes the internal fuel pump to lose partial ground, causing the internal fuel pump to loose fuel pressure. Hence the engine stumbles. Even though it appeared to be a tight connection, and it was at first, I found the ground terminal very loose. The cure was to cut the factory female clip off the green wire and replace this with a new clip. I also released the pinch clamp holding the wire harness to the tank, and pulled another inch of wire harness closer to the ground wire terminal, giving the green ground wire a half inch or more of additional slack. This eliminated the tight green wire ground connection and relaxed the tension on the terminal blade and fastener. Lesson learned.
Bike runs like new now, finally.
Greetings and salutations! Long time reader first time writer. I’ve been slowly dipping my hands into the repair my own bike club. Currently riding 2003 Honda VTX 1800 R(The Queen). She’s definitely been risen hard and put away wet before. I do have a question about installing this 2nd bolt. What magical instruments or tools are you all using to get that thing back in its proper place. It’s going on day 2 for me and I’m seriously contemplating buying a new bike. Your help is greatly appreciated.
Les comento, tengo un vtx 1800c en un viaje, la moto comenzó a ahumar blanco y azulado, se me apago y comenzó a salir gasolina por el tubo de escape cuando la apague, bueno en el sitio la desarme y le mande a limpiar los inyectores y persiste la misma falla, fue cuando observe este artículo y si este pequeño moustro era el problema, lo cambie y volvió a la vida el motor sin problema. Todo el aceite se llenó de gasolina y salió recambio. Gracias por este artículo mil gracias . Saludos a todos.
I have a 03, vtx1800. I can run a hot lead to the fuel pump and it will run. I can even jump across the relay and make it run. But otherwise I get nothing. It ran great for awhile after I cleaned the tank out full of rust, replaced the ground on the pump inside the tank. I just cannot figure out what is causing the fuel pump not to come on with the ignition switch. I bought a new relay and that is not the problem. This is a beautiful bike, and I’m not trying to short cut it I really could use some help. Thanks
Bad computer or broken wire between computer and the relay.. also could be a bad relay. That’s all it could be.
Dank u voor deze nuttige informatie, De reparatie stelt niet zo veel voor, ieder die een beetje handig is gaat het lukken. Nogmaals thanks
Shout out to you guys for this article. My ’02 C didn’t want to idle so I tried this fix and it’s running like new! Ty again!
Thanks for the info! Quick and easy fix. Bike was put up for 4 years while abroad. Was getting 24 mpg and having to feather the throttle at stops to keep it from stalling. This fixed it. Will change oil and plugs next.
I have a 2006 VTX1800C1 and my fuel pressure regulator is not on my fuel bar like shown in your pictures. Could you tell me where else it might be located
2nd gen VTX’s like yours (06+ and a few late model 05’s) have the fuel pump located in front of the rear wheel and you don’t have this kind of FPR. You can see a bit about the external pump here:
https://www.californiavtxriders.com/phpBB3/viewtopic.php?f=26&t=35165
Thanks for keeping this post up. Was struggling with idle problems and misfiring with my 2002 VTX 1800. This was one of only a few places that mentioned the history of failures with the fuel pressure regulator. Replacement solved the problem and the bike runs better than new now!