Replacing Clutch Springs (VTX 1800)
Posted by Bare | Last Updated May 27, 2014This is a walk-through for changing the clutch springs on the VTX 1800. I originally did this to swap to the stiffer Barnett MT114-6 springs to stop my clutch from slipping. This is a pretty simple job which requires a few basic tools and a torque wrench. As always undertake this project at your own risk, but with a little common sense this isn’t very hard to do.
Required tools/Materials
- Barnett MT 114-6 clutch springs
- 2 new exhaust gaskets
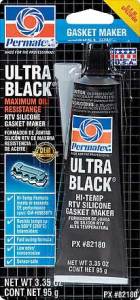
- Black RTV or “Hondabond” liquid gasket maker
- Torque wrench capable of 9 ft/lbs or 108 in/lbs
- 8mm and 10mm socket
- 5mm allen
- Roughly 14″ long piece of wooden dowel rod
- Hammer
- Gasket scraper or razor blade
- If you’re not changing your oil at the same time then you’ll need some 2x lumber, bricks, etc to rest the bike on
- (Optional) B&B heavy duty clutch bolts
Process
Remove your exhaust, this is different from type to type so I’ll just say remove it – remove the old exhaust gaskets too! Once your exhaust is off decide if you’re changing your oil now or not. If you’re changing your oil then drain the crankcase and leave it empty until afterwards. If you’re not changing the oil then put the front and rear tire on a 2x board or other roughly 2 inch block. I did mine by putting just the rear tire on 2 2×6’s but it’s up to you. With the bike on these blocks rest it on its sidestand, trust me it’ll be fine.
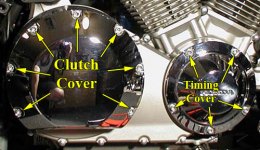
Now looking at the bike from the right side remove the 7 5mm allen bolts holding the clutch cover on and the 5 5mm allen bolts holding the timing cover on. Remove both covers and set them aside in a safe place.
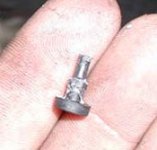
Be careful when you remove the clutch cover, there are 10 little rubber “thingies” that act as vibration dampeners for the cover. Sometimes they stick to the crankcase cover so you have to remove them and reinstall them where they go.
| This is what they look like: |
This is where they go: |
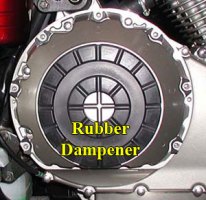
Remove the big rubber dampener from over the clutch cover and set it aside.
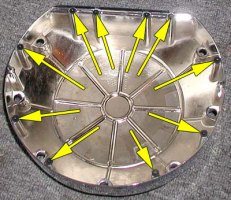
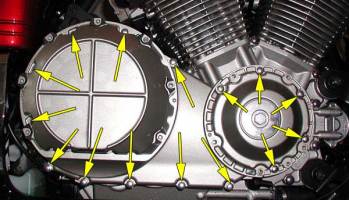
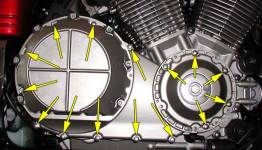
With the covers off it’s time to remove the right crankcase cover itself. This consists of 15 8mm bolts, you can see the locations labeled in this picture.
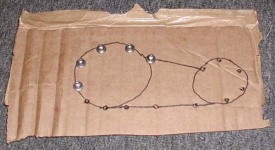
Now keep in mind, there are 3 different sizew of case bolts here, so to make this a little less complicated on reassembly I highly suggest something like this cardboard template for the case bolts.
This idea works great on anything with different sizes of bolts/screws where you need to remember exactly where they go. You can see the holes in mine, but many of the bolts were reinstalled already when the pic was snapped.
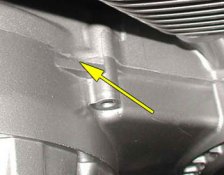
With all the case bolts removed take your hammer and wooden dowel, come from the left side of the bike behind the rear cylinder and slide the rod through until it touches the tab on the right side case (see pic). This picture was taken from the top of the engine looking down at the case where the timing and clutch “circles” meet the “flat” area on top the case.
With the dowel against that tab a couple of light pops with the hammer should break the cover loose. Something else to keep in mind once the case is open is that the edges can be fairly sharp and I know a couple of guys who actually sliced themselves pretty good on them, so be careful! (Thanks to Bill Lage aka Wyandotte Kid for this pointer!)
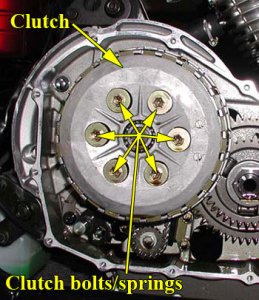
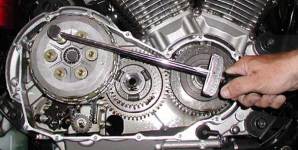
At this point, the manual will tell you to remove all the springs and reinstall them in a criss-cross pattern (like putting lug nuts on a car tire). I swap them one at a time because it’s easier and puts less strain on the bolts (which are notorious for breaking).
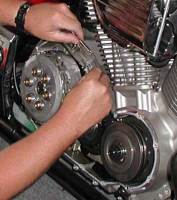
Using a 10mm socket remove and replace one bolt and spring at a time before moving on to the next bolt and spring. As you replace each bolt and spring make sure you torque the bolt down to 9 ft/lbs or 108 in/lbs. Be careful since you’re dealing with such a light amount of torque – many people have posted on the forums about breaking these bolts. I use an “old school” beam style torque wrench because I believe it is more accurate at low torque settings and so far I have never broken a single one of these bolts.
| Beam style torque wrench |
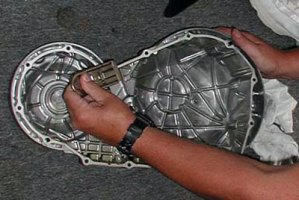
Once all 6 bolts are torqued properly you can begin the reassembly process. Begin by cleaning both the case surfaces using a gasket scraper (available at auto parts stores for a few bucks and well worth it IMO). If you don’t have one, a razor blade will suffice. Scrape all the old gasket off and make sure both surfaces are clean.
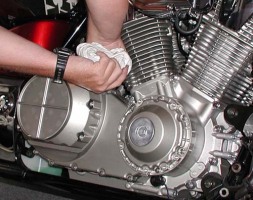
I usually wipe each surface with a little rubbing alcohol and a paper towel after scraping the gasket off, just being careful not to cut myself on the sharp edges. This isn’t completely necessary, but doing this I know both surfaces are good and clean. Now get out the black RTV or “Hondabond” liquid gasket material and run a small consistent bead around the mating surface of the case cover that is removed. You don’t have to use a lot, remember that the cases are going to be bolted together so anything much thicker than a piece of paper is going to be squeezed out as extra. Just put a thin, even layer so that you end up with a nice seal all the way around. I use my finger afterwards to make sure it’s spread evenly and completely over all the edges. If you look closely at the cover you’ll see that it’s not necessary to do the “outer circles” around the timing and clutch covers where it is double-walled as there are small slots there anyway.
With the liquid gasket in place you can slide the cover back onto the case and begin reinstalling all 15 of the 8mm cover bolts again.
| 8mm case cover bolt locations |
Torque the case bolts down to 9 ft/lbs or 108 in/lbs and then you can wipe up any gasket maker you may have squeezed out during this process. If you’re not in a huge hurry then don’t wipe the gasket off now, if you wait until it dries it will peel off very easily.
With the case cover bolted up you can reinstall the big rubber dampener and the chrome clutch cover using its seven 5mm bolts. Then reinstall the chrome timing cover using it’s five 5mm bolts. These only require a few ft/lbs of torque each so just be careful snugging these down normally and don’t wrench on them too hard.
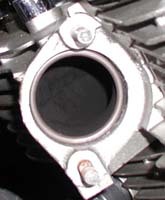
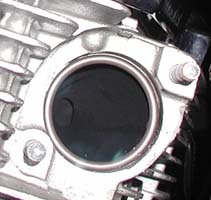
That’s it, you’re done! The only thing left for you to do is to reinstall your exhaust system per whichever set of directions you need to follow, making sure to use new exhaust gaskets (pics below).
| Rear exhaust port |
Front exhaust port |
With the exhaust reinstalled remember to torque the 12mm exhaust nuts to 17 ft/lbs. Go back over them several times as some will “loosen” a bit as you snug the others down. Make sure to re-torque these again after a couple of rides as the heat/cold cycle of riding will tend to loosen things up a little bit as well. If you drained your oil don’t get over-excited and forget to put BOTH your drain plugs back properly (22 ft/lbs), install a new filter, and add 3.9 quarts of your favorite oil.
That’s it – you’re done – congratulations!
Afterthoughts
This is a cheap way to fix the slip that is inherent in the 1800 clutch. Before you dive into this project you should take a few things into consideration though… If your clutch has been slipping for a long time, or if it’s slipping very badly then a simple spring swap like this may not be the answer to your problems. Once you have clutch slip for an extended period of time you will start to burn up the clutch pack (fiber and steel plates) and beyond a certain point just replacing the springs may not be enough. If you think this may be your case, then consider reading about the entire clutch replacement and make a decision on what you’re going to do.
With a friend around to help remove and reinstall the exhaust this isn’t a hard job for even the most unskilled wrench to do. I figure maybe an hour tops total job time NOT including the exhaust removal and reinstall (some exhausts are a little tricky to get on/off).
Video courtesy of Big Bad
This video is intended to give you an idea for the kind of things you’ll see and do during this job. It is not intended to replace the above instructions for anyone except experienced mechanics because the text above contains important details.

Thank you for this write up. I probably would have ordered the entire clutch if i hadnt read this first. Installed new springs today. All plates were in good condition. Clutch grabs much better now with a change of fluid and new springs.
Although I wasn’t experiencing any clutch problems, for the few bucks for the springs (note there is an updated number Barnett #501-53-06114 (Parts Unlimited#1131-0535))and the upgraded bolts, I thought I might prolong the slipping clutch issue. Preventative action was my motive.
My clutch cover took a bit more than a few taps with a wooden dowel as mentioned. But no big deal. Just be prepared to whack it a little harder than in the write up if need be. Overall, a simple procedure. And I concur with the article, the biggest issue for me was putting my exhaust system back on. Not difficult, just a bit time consuming as my arms and hands wouldn’t bend the way that I needed them to. I could have made it simple by removing the rear wheel, but I just cursed and bulled my way through it.
I found the ROL exhaust gaskets #EG24647 at O’Reilly Auto for just under $5 each to be a perfect fit.
I did not notice any improvement in the clutch action but am not surprised. As noted, I wasn’t experiencing any problem.
Thanks for the write up and for all the help provided on the site.
2004 VTX 1800C
21000 miles
thank you for your helpful information
my 2002 vtx 1800c has about 21,000 miles
how often should i do clutch replacement ?
my gears are working fine or it this something that need to be done
thank you
Tommy
[…] Artykuł jest tłumaczeniem oryginału ze strony Bare Ass Choppers Tech:https://tech.bareasschoppers.com/clutch/replacing-clutch-springs-vtx-1800/ […]