Kuryakyn Rear Blinker Install
Posted by Bare | Last Updated July 5, 2011These are directions to install Kuryakyn LED turn signals on the rear of a VTX 1800 C using the rear frame rail bolt as a mount. Kuryakyn sells these in red or amber, halogen or LED so get whatever you prefer as the installation procedure will be the same, the wiring will just be slightly different depending on which type you get. Let me apologize now, this article was done long after I’d added my lights so the pics all show the lights already installed. As a result the pics are not as detailed as some of my other articles are, I couldn’t justify tearing the bike apart again just to snap a few more pictures.
This project affects parts of the electrical system on your bike so if you should decide to undertake this task you will need the proper tools and know-how to pull it off. If you are unsure of what you are doing this project could result in damage to your bikes electrical system. As always, any similar work performed on your vehicle is done at your own risk.
Required tools/Materials
- Aftermarket turn signals (I used Kuryakyn)
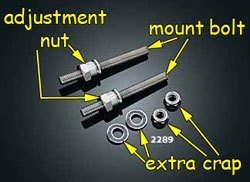
- Kuryakyn bullet light mounting kit (Kuryakyn #2289)
- Motorcycle lift (you need to disconnect the rear shocks)
- 6mm allen
- 11 & 13mm wrenches
- 8mm socket
- Socket wrench
- Hacksaw
- Approximately 4 feet of wire (18-22 gauge) in whatever colors you prefer (the existing Kuryakyn wires are too short)
- Soldering iron and solder
- Heat shrink tubing or electrical tape (optional – liquid electrical tape)
- Crimp on “bullet” style connectors that fit the stock “sleeve” plugs under the right side cover
- (Optional) Dremel tool w/ cut-off wheel if you’re removing the stock license plate bracket
Process
Removing the old
When I originally wrote this article I suggested removing the entire fender to do the wiring and installation of the signals. While having the fender off makes removing the stock turn signals a piece of cake, it poses some issues during reinstallation of the fender with the new lights installed through the rear fender rail holes. After a few more years of experience working on VTX’s I think it’s much easier to do this by keeping the fender on the bike and removing the rear tire or lowering the rear tire and swingarm by detaching the rear shocks. I recommend reading this article and deciding if it’s worth it to you to remove the rear wheel or just lower everything.
At this point, after reading this article and making a decision, either remove the rear tire or read the article on removing the rear fender but only remove the upper 12mm shock bolts so that you can remove the top of the shocks and let the rear tire and swingarm hang down. The tire hanging down should give you enough space to work under the fender unless you have really big hands. I’ve done this job both ways and I would recommend removing the tire, but do whatever you’re level of skill makes you comfortable with.
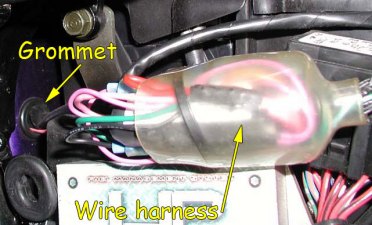
The first thing you need to do is remove the stock turn signals. If you haven’t already, trace the stock turn signal wires through the grommet under the right side cover and disconnect them from the wire bundle (see pic to right). Wires you are looking for:
- Light blue – right turn signal
- Orange – left turn signal
- Green x 2 – grounds
There is another (3rd) green wire in this bundle that goes to the taillight, the 2 green wires you’re looking for are bundled together with the orange and light blue wires. With these wires disconnected you can pull them through the grommet and into the inside of the fender. If you look inside the fender there is a black metal “inner fender” that consists of a couple of hoops that follow the fender contours. This inner fender has some metal “tabs” that are bent over these wires to hold them in place. Carefully bend these tabs away from the wires so that you can get the wires loose. You want to get the wires freed all the way to the turn signal mounting points so you can remove the signals and the wire all at once.
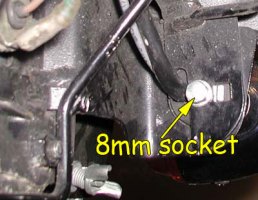
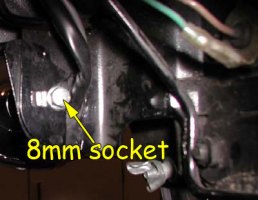
With the wires freed you’ll find these 8mm bolts (see pics below) holding the turn signals onto the fender, remove these bolts and the signals and wires should come right off the bike.
| Left signal mounting bolt |
Right signal mounting bolt |
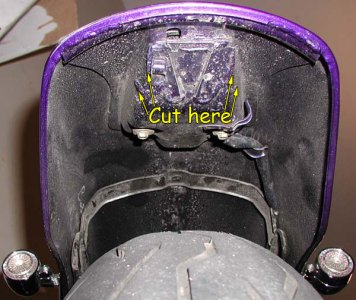
If you’ve decided to remove the entire stock plate mount for whatever reason – aftermarket replacement setup, sidemount plate, etc – now is a good time to chop off that ugly chunk of metal hanging down back there. Here is a pic of mine already chopped, you should be able to clearly see what needs to be cut when you look at yours.
I used a dremel tool with cut-off wheels to cut mine off, if you do this make sure you’re wearing safety glasses! Be careful and take your time and this should turn out nicely. Make sure you have some touch-up paint on hand to put on the fresh metal you just exposed so it won’t start to rust.
Installing the new
With the old signals removed you need to test fit the new mounting bolts for length. Remove the rear fender rail bolts, they are 6mm allen bolts. With these bolts removed thread the hollow mounting bolts (Kuryakyn #2289) into the holes in the fender. If they put up a fight you can turn them with your 11mm wrench, but you don’t have to get them any further than finger tight. Looking inside the fender you should now see these bolts sticking through their inner fender mounting nuts – all these extra threads are why you need to trim these bolts.
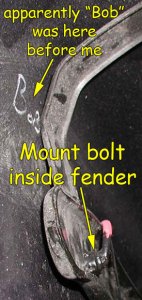
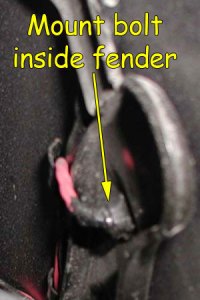
Take a sharpie marker and make a mark on the threads of the mounting bolt flush with the inside of the fender rail. What you want to have when the bolt is finished being cut is for it to sit flush with the nut it screws into, if it sticks out too far then it will hit the tire when you’re riding and that’s bad. With the mounting bolts now marked for length, remove them and cut them with the hacksaw (or dremel or whatever cutoff tool you might have). After they are cut to length take a file and debur the freshly cut edges or else they will cut into the wires over time and cause a short.
These are pics of the inside of my fender showing how the mount bolts should look after they are cut:
Anyone know who Bob is? Email me if you do, hehe. Now these pictures are obviously of the finished product with wires and covered in liquid electrical tape, but it should give you a good idea of what you’re looking to have lengthwise.
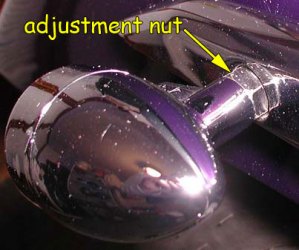
With the bolts cut to length go ahead and thread them back into the rear fender rail and tighten them down with your 11mm wrench. With them tight go ahead and thread the adjustment nuts on top of the 11mm portion of the mounting bolts, only finger tight though, you’ll need to adjust them later to lock the turn signals where you want them.
With both the mounting bolts and adjustment nuts in place on the bike go ahead and thread the wires for the turn signals through the hollow mounting bolts to the inside of the fender. Unless something has changed with Kuryakyn’s signals you will have to completely remove the black wire sheathing from the signals in order to accomplish this. The holes in the mounting bolts are just way too small to fit the wires and the sheath – I tried for a VERY long time with no luck before I finally gave up.
With the wires pulled through the mounting bolts to the inside of the fender go ahead and thread the signals onto the mounting bolts until they can’t go any further. Once you hit this point back them off until they are facing the rear of the bike (like they should be when completed) and then spin the 13mm adjustment nut back to meet the signal housing. Get the lights dialed in facing the rear at the exact angle you want them at and then tighten the 13mm adjustment nut into the signal housing to lock it in place. With the bike pretty level on the lift you might try measuring from the ground to a point on the signal, if this measurement is the same for each side then the signals are roughly level with each other. Your new signals are now mounted and set.
Now, depending on the length of the wires that came with your lights you may have to lengthen them in order to make them reach from the mounting location to under the right side cover – I had to do this with my Kuryakyn lights. There are 2 reasons you couldn’t do this sooner – first you had to estimate how much additional wire was needed, but more importantly you would never have been able to get soldered and taped wire joints through the tiny little holes in the mounting bolts.
Now that the signals are installed on the bike you can add the extra wire needed, so roughly route the signal wires inside the fender so you can estimate how much extra wire you will need to add to reach the wire bundle under the right side cover. My Kuryakyn signals needed about 1 foot of extra wire each, depending on how short Kuryakyn made your wires you may need more or less to get the job done. Regardless, whatever you need to add go ahead and cut, solder and heat shrink/tape up the new connections. Remember that it’s better to have a little extra you can cut off later than to be too short and have to undo and redo everything. Make sure you pay attention to what color wires you add to the signal’s existing wires so that when you’re rewiring under the right side cover and you can’t see these connections (under the fender) you won’t have to play the guessing game figuring out what colors attach to what wires.
With the wires extended you may want to enclose the entire length of the wires in heat shrink tubing or some other wire sheathing to protect them over time. After that, route the wires back under the fender using some of the same tabs that held the wires in place originally, and get them through the grommet at the front of the fender so they can reach the wire bundle under the right side cover. Make sure you get all the wires good and secure under the metal tabs, and if they’re still a little loose consider adding a zip-tie where necessary. The most important thing here is to ensure that nothing can ever cause these wires to vibrate loose and either rub the metal or the moving tire which would inevitably where a hole through the wire and cause a short.
Once you have the signals mounted and the wires routed and tied down there is no reason you can’t reinstall your rear tire or raise it back up and connect your shocks (depending on which you did). The only job left is to make the connections under the right side cover.
Wiring connections
If you’re installing LED signals, like the ones I did in this article, then you may want to take a few minutes and read my articles about installing load equalizers and the diode fix. The diodes are a specific problem for the C model 1800’s only, but the load equalizer is an issue for every bike going from incandescent bulbs to LED’s. You may read those articles and decide that these are things you can do at the same time you’re making these new connections, therefore saving yourself from having to come back and do additional wiring later. In order to wire these lights I recommend buying some bullet style crimp on connectors from just about any auto parts store. These should allow you to plug your new wires directly into the stock wires so you can still easily plug & unplug them as necessary.
Under the right side cover find the same wires you unplugged when you started this project – light blue, orange, and green. Coming from the bike’s wiring there is only one green wire but it has a double ended connector to allow you to ground both signals to this one wire. If you’re installing a set of Kuryakyn signals that have the “running light” circuit integrated you will also need to find the black w/ brown stripe wire. This black w/ brown stripe wire is in the same bundle with these other wires, but it remains plugged into your existing running lights. The new wires you just ran into this area will be whatever colors you used to lengthen the Kuryakyn wires – originally the Kuryakyn colors are purple (violet), black and blue – so figure out what your new colors are that associate with the original Kuryakyn wires. Remember that unlike the bike which color codes the left and right signal wires, the Kuryakyn signals use the same colors regardless of side, so keep track of which wires go to the left blinker and which wires go to the right blinker. Make your connections based on the chart below – keep in mind that depending on which set of Kuryakyn signals you’re installing you may not have all of these wires, so just connect what you have:
| Wiring Connections for Kuryakyn Turn Signals | ||
| From Kuryakyn signals | > | From bike |
|---|---|---|
| Right side purple (Violet) | > | Light blue – right turn signal power |
| Left side purple (Violet) | > | Orange – left turn signal power |
| Blue x 2 | > | Black w/ brown stripe – running light power |
| Black x 2 | > | Green – ground |
The purple (violet) wires are the turn signal leads and every set of Kuryakyn lights will have these. The blue and black wires are not on every set of Kuryakyn lights because some lights do not have a running light circuit and some lights get their ground through the mounting bolt of the light. Install bullet connectors on the ends of the Kuryakyn wires you do have and then plug them into their corresponding wires on the bike based on the chart. With these connections made, turn the key and test what you have. If for any reason you have left blinkers flashing on the right side and vice versa, double check your connections – you may have accidentally mixed up the left and right side wires! If for any other reason the blinkers are not working then double check your connections – as long as they are plugged in correctly and there are no fuses blown they should work perfectly.
That’s it – you’re done – congratulations!
Afterthoughts
This is a fairly big project for someone with limited wrenching experience. There is a fair amount of both mechanical and electrical work involved as well as a bit of tedious wiring in tight places under that fender. The first time I did this it was pretty complicated because I was still learning how to work on this bike and I made a few mistakes that involved undoing and redoing the same tasks a few times to get it all done right. With more knowledge ahead of time I could have completed this task much quicker and with less back-pedaling, hopefully this is where this article can help you. I would say to give yourself a Saturday or Sunday to complete this task in case you run into snags, it might be a little much for a novice wrench to tackle this project in one evening after a normal workday.

[…] this is a ‘how to’ for the 1800 that could help […]