Load Equalizer
Posted by Bare | Last Updated March 19, 2015These are directions for installing a load equalizer on a VTX 1800. This kit is available from Kuryakyn (part #4807) or I have details on how to build your own with parts you can easily source online. These are designed to compensate for the “fast flashing” problem most motorcycles experience after changing to LED blinkers. Let me apologize in advance, this write up was done long after I’d added my load EQ in an effort to help someone else having problems, so this article is not as thorough as many others I’ve done. I just couldn’t see tearing everything open again to snap pictures.
This project affects parts of the electrical system on your bike so if you should decide to undertake this task, be aware that this project could result in damage to your bike’s electrical system if done improperly. Any similar work performed on your vehicle is done at your own risk. With that said, this is not a very difficult task if you have basic electronics skills. You just need to be careful and take your time.
Now, you may be wondering – why do my blinkers flash so fast when I change to LED blinkers?
Stock incandescent blinkers draw roughly 21W each – 42W for a left turn and 42W for a right turn because you have front and back blinkers. The stock flasher unit is what’s known as “load dependent” meaning that when it doesn’t sense this 42W load – like when a bulb burns out – it flashes quickly to let you know that a bulb is out. LEDs draw much less than this 42W load so the stock flasher thinks a bulb is out and flashes quickly. While this doesn’t hurt anything some people find it annoying, distracting or just abrasive. Enter the load equalizer… The load equalizer is nothing more than a resistor (actually a pair of resistors) which puts a load on the stock flasher unit that “tricks” it into believing the same 42W load of the stock flashers is still there.
Each load equalizer mimics one set of blinkers, so if you remove the back blinkers you need a load equalizer – if you remove the front blinkers you need another load equalizer. With this said, there are some exceptions to the rule. You will never go wrong using one equalizer for each set of blinkers you remove, but some LED replacement blinkers draw more load than others so on rare occasion you can get by using one load equalizer with 2 sets of blinkers. It’s not always or common, but it does happen and it varies from bike to bike.
On a separate note – because of the load the blinkers put on the bike’s electrical system, the fact that the VTX electrical system only puts out 400W at peak RPM’s, and the fact that many guys want to add additional accessories to their bikes, I usually recommend getting a flasher replacement. This is a non-load dependent flasher module that eliminates the need for load equalizers altogether. You can read more about it at this link. It is an inexpensive and simple replacement option that eliminates all the guesswork and hassle of installing load equalizers (unplug the old flasher, plug in the replacement) – and it frees up the power that a load equalizer would consume so you can use it for other accessories.
Required Tools/Materials
- Wire cutters
- Wire strippers
- Kuryakyn #4807 load equalizer or make your own
If you have a Kuryakyn load equalizer then you can skip past the “Make Your Own” section to the “Installation” section.
Make your own
For those who are interested in saving a few bucks, this is how to make your own load equalizer. This is the exact same thing that Kuryakyn is selling, they just wrap theirs with a big piece of heat shrink tubing to make it look nice. If you buy a big piece of heat shrink tubing you can have yours look identical to theirs for a fraction of the price. For years I recommended buying your parts from Radio Shack out of convenience, but with them out of business you’re somewhat left to your own devices to find these parts. Check locally for small electronics shops or do an internet search for the specific parts (listed below) and it should be relatively easy and inexpensive to find what you need.
Required materials
- Two 3 amp diodes
- Two 10 Ohm 10 Watt 5% wire-wound resistors
- A few inches of scrap wire, roughly 18-20 gauge, in at least 2 colors
- Soldering iron & solder
- Electrical tape or heat shrink tubing
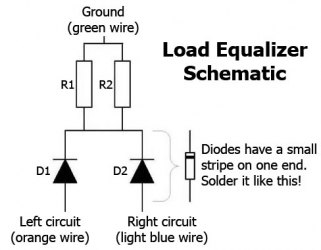
The schematic to the right shows you everything you need to know about how this circuit will be laid out once it is complete. D1 and D2 are the 2 diodes and R1 and R2 are the 2 resistors. The resistors are wired in parallel to establish the required load the bike needs to see to “trick” the stock flasher. The diodes act as one way “valves” for electricity, so their purpose is to prevent power from flowing backwards into the other side’s circuit. If you think of electricity flowing through wires in the same manner that water flows through pipes then you can see that without the diode to stop its flow, power would flow unchecked between each side’s circuit. Each time you turned on the left blinker you’d get power flowing to the right side and vice-versa.
Making this little thing is a much simpler process than the schematic makes it seem. Don’t be discouraged if the picture has you afraid to try.
Looking at the schematic for guidance follow these steps. I’ll explain from bottom (power) to top (ground).
- Solder 2 short (3-6″) pieces of wire to each diode opposite the striped end (make these wires the same color)
- Twist the striped ends of both diodes together with one end from each resistor (if that’s unclear check the schematic)
- Solder everything together at this junction, you should have one lead from each part connected in this junction
- Twist the 2 remaining resistor leads together with a short (3-6″) piece of scrap wire and solder it (make this wire a different color)
- heat shrink or electrical tape all the connections to ensure they will not short against each other
- heat shrink or electrical tape the entire unit
That’s it, you made a load equalizer! The final product should have 3 wires coming out of it – the 2 from the diodes (step 1) should be the same color, while the 1 from the other end of the circuit (step 4) should be a different color. With this setup your load equalizer will wire up and work just like the Kuryakyn unit below.
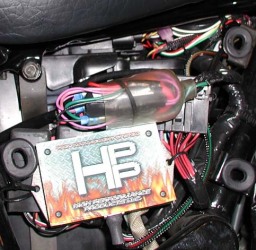
If you’re only installing one load equalizer to compensate for one set of LED signals then the wire bundle under the right side cover is the ideal place to install it. The first thing you need to do is remove your right side cover and find the wire bundle which contains all your blinker wires. Looking at the picture on the right you can see the wire bundle above the HPP unit inside the clear rubber protective “boot”. Take the bundle and slide the clear cover back to expose all the plugs for the turn signals.
If you’ve built your own load equalizer then great, if you’re using a Kuryakyn load equalizer then you need to cut off the little white connector on the end of the wires and slide off the piece of heat shrink tubing. Kuryakyn started making their load equalizers this way to make it easier for people to use them with other products like their run/turn/brake units. On these other accessories the little white plug makes the load equalizer a plug-in device rather than something that needs to be wired in. But… Since you’re not using any of these other Kuryakyn devices that connector needs to be cut off and the heat shrink tubing needs to be removed to give us just the 3 wires to work with.
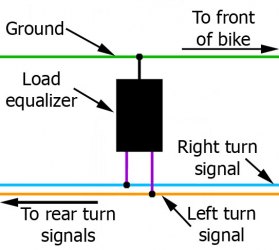
Kuryakyn provides 3 inline wire tap connectors to wire in this unit, but I am not a fan of these connectors because of the problems they can cause with wires. You may want to take a few minutes to read my article on the problems with wire tap connectors and make this decision for yourself. The bottom line is that you need to wire the load equalizer into the bike’s wiring like it’s shown in the picture below.
Find the wires you need in the wire bundle under the right side cover. You’re looking for:
|
You will be wiring the load EQ in “parallel” (for you electronic types) with the rear turn signals. The Kuryakyn load equalizer has 2 purple wires and a black wire, you can see in the schematic to the left that the black wire is a ground wire and the 2 purple wires attach to the turn signal wires. The purple wires are not side-specific – either one can go to either side. What you need to do is attach the wires into the bike’s turn signal wires. You can strip the insulation and solder into them similar to this picture or you can cut off the OEM bullet terminals and reattach new ones to both the stock wires and the load equalizer wires (like in the pictures below). When you’re finished making the proper connections, just bundle the wires up and stuff them back in the rubber protective “boot” they came out of. Do yourself a favor when packing up these wires – leave the load equalizer out of the wire bundle. They can get very hot and on occasion I know of situations where they have melted.
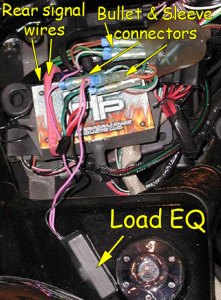
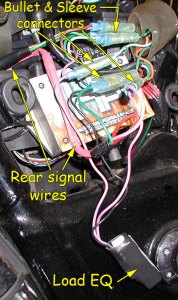
The pictures below are of the load equalizer installed with the wires under my right side cover. Mine may look different from what you’ll see on your bike because I have my HPP unit stuffed in there and I have aftermarket rear turn signals. As a result, my rear signal wires are different colors than stock and I covered my wires in pink heat shrink tubing (don’t laugh it was all AutoZone had at 2AM!). What I did for this installation was cut off the OEM bullet style connectors and recrimp new connectors onto both the turn signal wires and the load equalizer wires. This allowed me to plug in both the signals and the load equalizer with one plug. Hopefully if anything else in this article has confused you these pictures will help clear it up.
Once you get the load equalizer wired in you’re done! If you have 2 sets of LED signals, front and rear, then read through the next section to learn how to install another load equalizer in the headlight.
Headlight
If you have added a second set of LED lights to the front of the bike then a second load equalizer is required. The process is exactly the same as installing one under the right side cover (explained just above) the only difference is the location of the work.
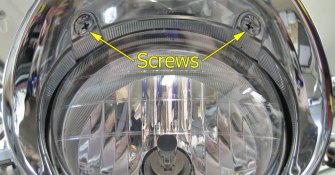
I have heard of people installing both equalizers under the right side cover, but I don’t personally like the idea. I’d rather locate them in 2 separate places to distribute the load evenly on the wires as well as dissipate the heat in 2 locations. To do this you’ll need to open the headlight bucket by removing the 2 screws under the headlight visor. These require a #3 Philips head screwdriver. Once they are removed the headlight will tip forward. Pull the headlight and visor ring forward a little, away from the bucket, and you’ll see a big plug with 3 wires attached to the headlight bulb itself. Carefully remove the plug (it’s on there pretty well) and then you can remove and set aside the headlight and visor ring.
With the headlight out of the way you can dig through the wires in the headlight bucket until you find the wires that run to the turn signals. These are identical to the ones under the right side cover, same bullet/sleeve connectors and everything.
|
The only exception to this rule is that the 1300 models and 02-04 1800 models will also have 2 additional wires mixed in with these. They are:
|
Regardless of what you have, you only need the first 3 wires – you can ignore the running light wires. Just be aware they exist so you don’t mix them up. Once you have the proper 3 wires sorted out, you’ll wire this exactly like you did under the right side cover. You can use the picture on the left as a guide, the only difference is that the “To rear turn signals” can now be “To front turn signals”.
That’s it – you’re done – congratulations!
Afterthoughts
I think it’s important to emphasize that it is not necessary to do anything to the bike if the fast-flashing LEDs don’t bother you. Nothing on the bike is going to break as a result of your turn signals flashing quickly. It could be argued that the service life of the LEDs in the signals would be shortened by the increased amount of off/on flashing, and while technically this is true, realistically it is of no concern. In this application, regardless of the flash rate, the service life of the LEDs is so long that the bike will likely die long before the LEDs do.
I do want to reiterate the idea of the load equalizer because I think it’s important that people understand what’s really going on here. A lot of riders tell me they went to LED blinkers to save power on the bike for other accessories, yet they still install load equalizers. Somehow they disassociate the load equalizers from the LEDs and misunderstand what is really happening. For anyone who still doesn’t understand – load equalizers are nothing more than big resistors that convert power into heat for the sole purpose of destroying the power. In this case you use the load equalizers to destroy enough power that the stock flasher thinks you still have incandescent bulbs and, in turn, flash normally. So you see the power is still being consumed, it’s just being wasted by being converted to heat.
The heat issue brings up another problem that I briefly mentioned above. I am aware of a few times when load equalizers melted and caused other problems. Whether these were times when people forgot to turn off their blinkers and rode with them on for miles or they were situations where people had packed the equalizer in a place where it wasn’t getting good airflow – the problem still occurred. Realize that this is not normally what happens, but that on rare occasions it does.
The heat and the power usage are 2 of the reasons why I recommend the replacement flasher so often. It’s a fool-proof idea and thanks to the guys at Custom Dynamics it is simple (plug ‘n’ play) and inexpensive. In fact, unless you’re making your own load equalizers, the cost of the replacement flasher is about the same as one load equalizer.
As I said at the beginning… Some riders enjoy the fast flash, some riders think it draws more attention to them in traffic, some riders find it abrasive and annoying – it is truly a personal preference. If you like it, leave it alone. If you hate it, fix it. I am unaware of any law on the books anywhere that governs the speed at which turn signals are required to flash.

I’ve built myself some load equalizers following your design. Is there a way to test with a multimeter to make sure they’re working as expected before attempting an install?
You should measure roughly 5 Ohms of resistance in one direction, then switch your probes and you should get no reading at all. This is because the two 10 Ohm resistors read about 5 Ohms when wired in parallel and because the diodes only allow power to flow in one direction.
Great tech article, Bare. However, as an electronics tech, I believe the two diiodes redundant and unnecessary on two points. First; the system wiring carries DC current, which travels only one way eliminating the need for D1 & D2. Second, the LED (Light Emitting Diodes) bulbs are still an array of Diodes; and thus, by inherent design, only flow current in one direction to produce light, again eliminating the need for D1 & D2. Utilizing standard diodes in the Load Equalizer certainly wouldn’t hurt, but are technically not required. This is merely based on basic electronics.
No disrespect intended, but if you truly understood “basic electronics” then you would understand all the reasons you’re wrong.
I was a Nuke ET (Reactor Operator) in the Navy & I believe you’re correct. As electricity, like water, will (beyond the shadow of any doubt) always try to follow the path of least resistance, it could create an infinite ungrounded loop going from Orange to L blue.
An absolute joy to fix. This was the easiest and most fun mod I’ve done. Thank you for this fix. Had a hell of a time trying to figure it out.
Oh and bighillbillymark has no idea.
James
YOU ROCK BARE