Sidemount Plate Installation
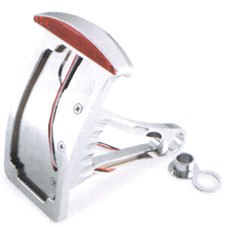
Posted by Bare | Last Updated January 20, 2011This article was written in response to those who asked for my experiences mounting a “Biker’s Choice” sidemount license frame on my 2002 VTX 1800c.
This is a good looking mount and in my opinion is a quality made item. When I originally wrote this article I said “It’s only been on my bike for a few months, but it seems to be holding up well.” I am happy to say that many years later it is still holding up well. The chrome is still in good shape, no pitting, and with a quick wipe down you’d honestly never know this thing wasn’t almost new. I do know that Biker’s Choice has made some small changes to the unit since I bought mine because I’ve installed a couple of others, I can only hope that they didn’t compromise the quality of the piece in the process.
Required tools/Materials
- 12mm socket or wrench
- M8 x 1.25 x 35 bolt in chrome or stainless steel (8mm size, 1.25 thread pitch, 35mm length)
- Two 1.5″ fender washers in chrome or stainless steel (need to be 1.5″ outside diameter and fit the above bolt)
- Bushing (see below)
Installation
For starters, my actual license plate would not fit into the mount without doing some grinding, flattening, etc of the edges – but depending on your state and how your plate is made your mileage may vary. This was not a difficult process, I’m just throwing it out there so you’re not surprised if it happens to you. Once I got the plate into the mount it was held in by 2 tiny set screws, simple enough.
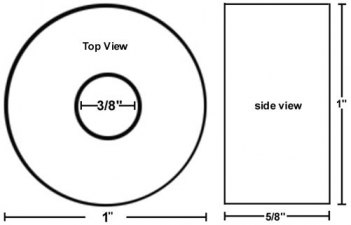
After getting the plate into the mount it became more trial and error. The unit itself is designed to mount on HD axle bolts, so the mount hole is 1″ across. The unit comes with a 3/4″ bushing but even with this my lower shock bolt would easily fall through the 3/4″ hole. I needed to come up with a way to fill in all the extra space around the bolt. This is where I owe SilverVTX as he was kind enough to machine a new bushing and mail it to me. For anyone trying to do this themselves, the image here (to the right) should give you an idea of what you’ll need.
The bushing makes up for the space between the bolt and the mount, and by making a “sandwich” with the 2 fender washers you can mount the entire assembly to the lower shock bolt using the longer bolt. With that said let me explain something – it only fit because I have aftermarket (Progressive) shocks. I was in the process of taking off my stock shocks when I was putting this on so I was able to see that by using this bushing the mount would have hit the bottom of the stock shocks. The easiest possible solution I can think of to remedy this would be to offset the bolt hole in the bushing thus allowing you to set the thin side of the bushing towards the shock, giving you more clearance for the mount (hope you follow that).
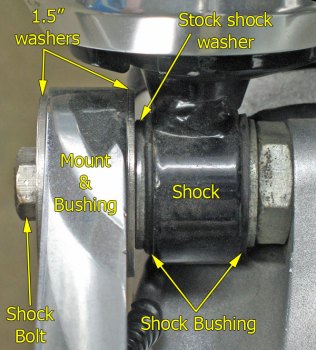
Since this lower shock bolt can only be torqued to 20 ft/lbs I had a bit of a problem to solve… At 20 ft/lbs I could still rotate the unit without much pressure just by pushing on it. I tried several different ways to prevent the mount from rotating on the shock bolt before settling on one that worked fairly well. I made a “sandwich” that looks like the picture to the left, from left to right it consists of:
- Longer (35mm) stainless steel shock bolt
- 1 1/2″ stainless steel fender washer
- Plate mount with bushing in mounting hole
- 1 1/2″ stainless steel fender washer
- Stock shock bolt washer
- Shock bushing and shock
- Stock lower shock mount washer
- Stock lower shock mount on final drive
It is important to mention that the longer 35mm bolt I replaced the stock bolt with needed to be shaved down 2 or 3 threads to about 32mm to prevent it from bottoming out in the mount. I also want to mention that the replacement bolt I was able to find actually has a 13mm hex head, not 12mm like the stock bolt. This entire “sandwich” isn’t as pretty as I’d like but it gets the job done.
Wiring
The mounting was far and away the hard part of this install, after that was done it just took some wiring. Since the mount came with no wire schematic I used a 12V DC supply to test my leads and what I found was this:
| Wiring Connections for “Biker’s Choice” sidemount license frame |
||||
| Sidemount | Function | Bike | ||
|---|---|---|---|---|
| Red wire | < | Running lights | > | Black w/ Brown stripe wire |
| Blue wire | < | Brake lights | > | Green w/ yellow stripe wire |
| Black wire | < | Ground | > | Green wire |
It was easy enough to run these wires under the right side cover and tie them in with my existing tail light wires. If you’re wondering how I got the wires from the mount to the right side cover look closely at the “finished pics” below. I have one black zip tie near the final drive on the swingarm, it’s black so it’s barely noticeable. I have another zip tie you can’t see on the swingarm, because it’s behind the frame where the frame covers the front portion of the swingarm. From there it was just a matter of “fishing” the wire over and zip tying it in place so it won’t come loose or fall out.
Lighting
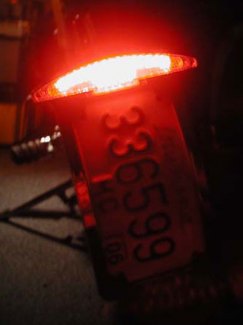
I think it’s important to mention that before I bought this plate I inquired as to how much light would actually illuminate the plate itself, especially given the radius design that would tend to block light from the lower portion of the plate. I was assured that the LED light on top of the plate had a slot cut in the bottom that would allow light to “trickle down” and illuminate the plate. After mounting and wiring the plate I can only say that I was less than impressed by this “trickling” effect. The picture to the right was taken in the dark to give you a better idea of what I’m talking about.
I will mention that I have seen newer versions of this exact sidemount plate and they have added 2 LEDs pointing downwards to light the plate. It’s still not ideal because the LEDs they used have a very narrow viewing angle, so you really end up with 2 strips of white light shining down the plate, but it’s certainly better than what you see in the picture. If you’re concerned that the police might try to crack down on you about this then it’s probably not a bad idea to tuck an aftermarket LED cluster somewhere to help light the plate better.
Afterthoughts
After all was said and done I had initially said I would not recommend this mount to others only because of the difficulty I had getting mine mounted to the bike. After having it on the bike for awhile with only minor problems I’d say that if you’re willing to have a bushing made for it then go for it. I’d be willing to bet that someone out there can come up with a better solution to this than I have (I welcome suggestions!) but this has worked well for me without much trouble. The one problem I did have was that over time the plate would still rotate down if I hit really big bumps. I fixed this by snugging the bolt down a little tighter than the recommended 20 ft/lb torque spec. Not to give the wrong idea, I wasn’t wrenching on it until I burst blood vessels, I just snugged it up a little tighter and I haven’t had a single problem with it since then.
Finished Pics

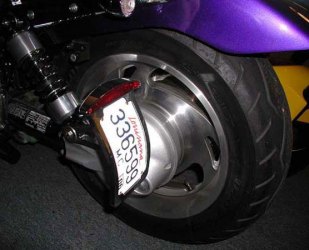
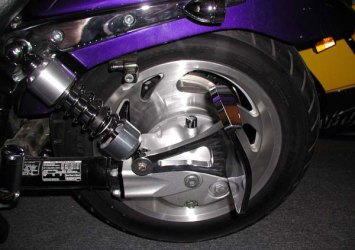
I just installed a side mount plate on my 2002 VTX 1800R, I see you mounted it to the shock mount. I tapped a 9/16 bolt threads through my axle bolt, we tapped enough to run a 2.50″ bolt. This looks just as awesome as yours and it sits farther back then yours, the only difficult thing I have encountered is finding a 9/16″ chrome or stainless bolt, not very common size and the bolts seem to be all zinc coated.
9/16″ can be a hard size to find, but I know that Gardner-Westcott has them in both 12 and 18 thread pitch (unsure which you used). Their automotive catalog has them in grade 5 & 8 in chrome or you can dig through their motorcycle catalog and there are a few more style options. It’ll be pricey to get a single bolt shipped, but if all your other options fail at least it’ll get you back on the road.
As for your location, it is a good idea that I have seen done before. I didn’t mention it here because I figured that most people could source that “donut” bushing for less $$ than a 9/16″ tap. To each their own – thanks very much for the comment! 😉
WTF, man by doing that you just weakened the rear axle bolt, might look nice but not smart move in my opinion, that bolt is under quite a bit of tensile and shear force and you just reduced the cross-sectional structure of the head end of that bolt. threads are crack starters in that instance..
the lower shock mount option is a much safer and more sensible way to mount side plates on VTX.
I used 2 nylon spacers from Lowe’s to fill the space.