Changing Engine Oil (VTX)
Posted by Bare | Last Updated April 1, 2016This is a walk-through for changing the oil on the VTX. The process is the same for both 1300s and 1800s regardless of model. I have to say thanks to David from the VTXOA for snapping these pics and doing the initial write-up which served as a template for this write-up. This is a simple job which only requires a few basic tools. As always undertake this project at your own risk, but with a little common sense this isn’t very hard to do.
Required tools/Materials
- Torque wrench capable of 20-22 ft/lbs
- 17mm socket
- Strap wrench or oil filter socket
- Funnel
- Drain pan (whatever your choice is for draining oil into)
- New oil filter
- 3.9 qts of your favorite oil
- (Optional) 2 new crush washers
- (Optional) oil change “blocks”
Process
I always start oil changes with a quick trip around the block. I ride for about 2-3 minutes just to get the engine oil warmed up and moving. By doing this I get all the "junk" that settles in the motor mixed into the oil so that when I drain it comes out too. Plus warm oil flows better than cold oil so it should drain faster. I get my tools together before I make this trip so that as soon as I get back I can drain almost immediately before anything settles back out of the oil. I know a couple of minutes won’t make a huge difference, but I’m anal about getting the old oil and as much “junk” out of the motor as possible.
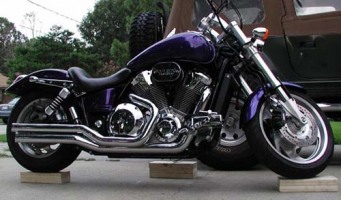
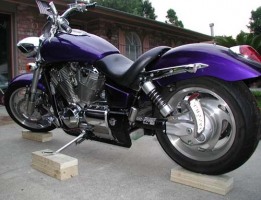
Once I take my quick trip I get my bike up on my oil change “blocks”.
Some guys will prefer other methods such as a PepsX stand, but I know that doing this without raising the bike at all will result in busting your knuckles.
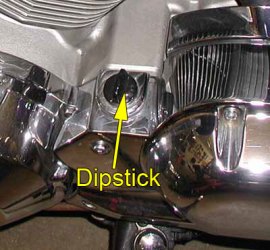
So with the bike ready to drain, slide the drain pan under the bike and unscrew the dipstick (to allow air in as oil drains):
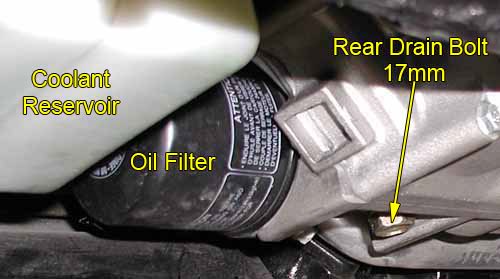
Remove the rear drain bolt with the 17mm socket:
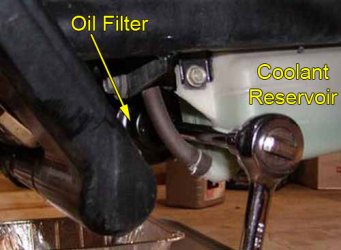
If there is any confusion, this picture was taken under the bike in front of the rear tire. On 05+ 1800s the coolant reservoir in this picture is actually the fuel pump instead. All other VTX’s should see the coolant reservoir like in this picture.
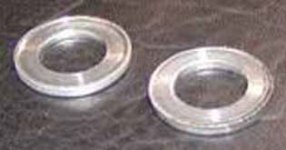
Now you wait… While the oil is draining, check out the crush washer on the drain bolt. If there is no washer there it may have fallen into the oil when removing the bolt. Unless you plan to replace this washer you’ll need to fish it out of the drain pan. Give it a close inspection, making sure there are no obvious nicks or flaws in it. You also want to look for any significant crushing or deforming of the washer. The service manual recommends replacing these with each oil change, but if they still look ok then there’s no reason you can’t re-use it. If you have any doubt about the condition of the washer replace it, your safety isn’t worth the few cents a new washer will cost.
I try to keep some of these on hand just in case I find myself needing to replace one at night or on a Sunday when I can’t get one. If you are in need of one but don’t want to buy from Honda you can usually take the existing washer to an automotive store and they can match it against their stock. Just be aware that these are not standard washers like from the hardware store.
As the oil begins to slow from the rear drain bolt you should be able to slide most drain pans back enough to get it under the oil filter also. Use your filter socket, strap wrench, hand, or whatever to remove the old filter. Sometimes they get stuck (this is especially true for bikes on the first oil change) so if worse comes to worse just punch a screwdriver through the filter (you’re throwing it away anyway) and use that to unscrew it.
With the filter removed, let the remaining oil drain and check to make sure the gasket came off with the filter. Sometimes the rubber gasket on the old filter will stick to the engine case. Installing a new filter over an old gasket results in a dangerous "double gasket" situation which can potentially leak – or worse drain all your oil suddenly. This makes it a good idea to check the old filter and visually inspect the engine case before installing a new filter.
Once the oil finishes draining from the rear drain plug and where the filter goes, take a drop of oil from your new supply and coat the gasket on the new oil filter. This usually requires nothing more than dipping a finger in a quart and then running it around the gasket. Now spin the new filter back onto the engine making sure you don’t cross-thread it – it should spin right on with almost no resistance. The specific torque for the filter is 20 ft/lbs if you have the wrench and filter socket. If not, then just spin the filter down until it seats against the engine and snug it another 1/2 turn or so. This is how I have always done this and have never had an issue. With the filter installed, replace the rear drain bolt and crush washer and tighten it to 22 ft/lbs.
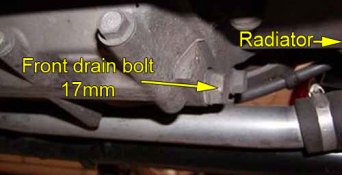
With the back buttoned up, slide your drain pan forward and under the front drain bolt (see pic). You’re going to do the exact same thing for this drain bolt as for the rear one – remove it, let the oil drain, inspect the crush washer, and when the oil is finished draining replace the bolt and crush washer snugging them down to 22 ft/lbs.
Keep in mind that you’re not going to get a lot of oil out of this front drain, the majority of the oil comes out of the rear drain plug.
With the filter replaced and both drain bolts/washers checked and torqued down, you are now ready to add your 3.9 quarts of oil. Oil is a very personal choice so make your own decision on what you want to run. I run Amsoil’s “MCF” 10W-40 in my bike. It is their motorcycle specific 10W-40 and it has an additive package that is designed to work well with the wet clutch. If you’re uncertain about your oil decision then maybe you should read Tapper’s big oil article. It has a wealth of information about oil from someone who has done their homework.
After you’ve chosen your oil, grab your funnel, remove the dipstick, and dump all 4 quarts in quickly – pouring but not allowing the bottle to sit upside down and drain every little bit. After pouring all 4 quarts this way there is about .1 quart left between all 4 bottles so you’ve added the required 3.9 quarts.
There is some debate/discrepancy between folks about the proper method to refill the bike. This confusion has led to some folks putting 5 and 6 quarts of oil into a bike that only requires the 3.9. What I’ve learned from working on these bikes is that the sticks in these bikes can vary slightly from bike to bike- how they read, how you lean when you check the stick, how much oil has drained down, etc. No matter how much you try to replicate the same conditions (run time, cool down time, etc) there are always slight discrepancies. This is why I pour the old oil into the 4, now empty, quart bottles. This makes it easy for me to deliver the oil for recycling, lets me know how much oil I drained, and lets me monitor if the motor is burning oil. After a few changes you learn how much oil to expect and if anything is off you’ll recognize it. I never look at a dipstick unless the amounts of oil drained and replaced are dramatically different.
If you’re a strictly "by the book" person, or you have to check the oil level using the dipstick, then this is the procedure per the manual:
- Start the engine and let it idle for 3-5 minutes
- Stop the engine, let the bike sit for 2-3 minutes
- Make sure the bike is on a level surface
- Remove the dipstick and wipe it clean
- Stand the bike upright off the sidestand
- Insert the dipstick until it seats, but don’t screw it in
- Remove the dipstick and check the level
If you decide to use this method please keep in mind what I’ve mentioned above. I am generally always a “by the book” kind of guy when working on bikes, but this is one time when I trust real world experience over what the book says.
That’s it – you’re done – congratulations!
Afterthoughts
This is a simple process that even the most inexperienced rider can do with the right tools. Doing this yourself will make you feel more comfortable and knowledgeable about your bike and you can be certain it’s getting serviced properly. Plus, you’re saving a few bucks that you can invest in other things…

Great article. Thanks!
It helped me! Thanks! I went Mobil1 10/50 fully synthetic
Thanks for the detailed article!
This was alot of help, I used my mc jack and set it on the blocks and the rest was a breeze.
This was my first attempt to change the oil own bike ever, let alone on my vtx.Thanks to your article and directions, it was like taking candy from a baby.I feel like an idiot paying all that money over the years having a shop to do it. GREAT INSTRUCTIONS! THANKS AGAIN! Visuals were an ecellent touch, because I sure needed them.
..and, you don’t know if the dealer is doing it right, or at all! I don’t trust dealers as far as i can throw them when it comes to doing maintenance on my bike.
Thanks. Spot-on instructions. I have changed many of my cycles in the past…but I didn’t expect front and rear plugs on this cycle.
For Cannon…be careful, motorcycle oil is DIFFERENT than Car oil. Mobil 1 Motorcycle Oil is available…I hope you used it and not regular Mobil 1 car oil….. just in case….hate to see anyone have a problem with his/her sled!
Thanks for the step by step instructions. These were a great help in my first oil change on my vtx . This took me about 30 minutes total time from getting up my supplies, bike on blocks, the change, used oil back in jug, and clean up. Saved myself some hard earned cash.
I went with the Shell Rotella T 15/40.
posts like this just makes things easier……..THANKS
Directions are clear, haven’t tried it yet but plan to at the end of this season. Thank you very, very much.
This is a greate article. good advice. well thought out . and easy to follow
Thanks Again
Doh!
I was unaware of the front 2nd oil reservoir/draining bolt. I completed everything else. Is the front one totally seperate from the back?
thx. bro . read info and took me a few min. great info two thumbs up bro .
fast and easy guys no problems . thx again .
I have been having problems with oil blowback through the crankcase vent. Did many other things and finally checked the oil while it was on the lift. I didn’t know about the front drain so the crankcase was overfull. Hopefully this will take care of the problem, and I’ll have to change oil a bit earlier next time.
Had the lift for years and worked great on smaller bikes, but not so good with VTX. Today I just used scrap wood like in pics(so much help) and this works great. With the lift out of the way the change went very quick. Now I made up proper blocks with wheel chocks and will look forward to next change being easier and safer.
Thanks Bare,
Mikey
Thanks Bare. well written and helped alot
Thank-you for a well written article. It’s clear, concise and personable. Maybe a reference on the various oil filters as to which is best might be added to the article as a footnote.
Just wanted to say thanks for the information… Great work
Marty
Thanks for the write up…Just got my VTX Will be doing my own oil changes…I just purchased the AMSOIL for my sportbike, afew memebers on the forums spoke very highly of it….I may have to get it for this bike too.
Ihave a2005 VTX1800 R. There was plenty of clerance. I didn’t need to put it on blocks. Great instruction took about a half hour.
Thank you! Clean and clear notes!! I never thought I would have to look up a oil change being a mechanically inclined person. Until the vtx. I kept checking off the dipstick and adding more until it read all the way up the stick.
Awesome post, I will a regular on here soon!
Proud vtx1800 wide body owner in southern Utah
Ryan
Hey man! Thanks for the great info!! Change the oil perfect and love the new routine I will be using. A millions thanks friend!
2007 VTX1800R
REALLY good info. My 2002 VTX 1800S is running the purple syn. stuff now… did it all from the right side…I have a triangle shaped drain pan made it very easy…NO blocks…. also put in the hotter ’03 plugs too….running great…next ..desmog and Fi2000R
Excellent!,
Works just as you described.
Did not use the blocks, but afterwards I now know why and always will after that.
Thanks for Sharing.
2004 VTX1300c
I’m trying this week to do my first oil change…good article..thx
Great write-up!!
The strictest oil requirement for ALL Japanese imported motorcycles with a wet-clutch system is that the oil meet JASO-MA standards. I recommend Shell Rotella T6 5W-40 full synthetic. It is found nearly everywhere and is in the diesel engine oils section. I have never suffered clutch slipping and have +57,000 miles and climbing on original engine and clutch.
filter too tight to come off by hand, and without blocks there was no clearance to ram a screwdriver through and turn it. (although I did try and I used this method with my old pickup with success. But the oil filter is so small I got mine off easily with pipe wrench pliers. I didnt need a funnel because the hole is big enough. I didnt need blocks. next time ill consider buying a filter with a hex bolt at the front for even easier removal. – VTX 1300 R
Thanks very much for the clear instructions. This is going to be my 1st time doing the oil change, so it will greatly help me in preparing and doing the work.
Thanks for the post. First time oil change on my 2006 VTX — without reading about the front oil sump — I would have over filled the case. Good write-up.
[…] and its time to do maintenance. Today I start with the oil change. I used the instructions found here and it very easy. The part that took the longest was going back and forth to the store to pick up […]
Outstanding instructions written in crystal clear clarity for people even as UN-mechanically inclined as I am. We could not miss or second guess ourselves with the photo illustrations you included. Thanks for guiding us through this as you did. I wish I had the same kind of instructions for working on the car and lawn mower and appliances and stuff around the house. If I had a company, I’d hire you in a minute!
Great article, but let me add something to it to simplify it. It is not necessary to remove the front drain plug (at least not on the 1300). Instead of riding your bike on the blocks like in the above photo, it is only necessary to ride the front wheel up on the 2 blocks and use 2 blocks for the kickstand. With the bike in this position you can still easily reach everything (from the pipes side) and, because your bike is on an incline, it will allow all of the oil to drain out the back plug and filter. You can also use the socket attached filter wrench (the adjustable one (black with red rubber tips)), just spread it open slightly larger than the filter. It’s easier getting your bike on the blocks this way, and faster when doing the oil change, plus you don’t need to worry about a crush washer replacement on the front because your not messing with it. To give you peace of mind (that you are still in fact getting all the oil out, even with the front plug in), use old oil bottles and pour the old oil into the old bottles.
While I understand what you’re saying I would never recommend this. The 2 drain plugs exist because there is a baffle in the sump to prevent the oil from pushing backwards under acceleration. By doing what you recommend any trash in the oil can get hung up on that baffle and stay in the motor rather than drain out. It’s really not any harder to do both drain plugs, so I just don’t see any real benefit from it.
Just my $.02
!00% agree on the baffle, lots of gunk will get hung up on there…sure it might only be 4 tbsp but that’s junk in the motor, sludge build up and we are changing the oil for a reason! ….2 plugs for a reason, supposed to be horizontal on the kickstand for a reason, FluidFlow is beyond most riders technical training, don’t 2nd guess the engineers.
Pull them both and spend the $.20 on the washers
Excellent instructions. I did almost forget the front plug. (When I pulled it I got a bit more out). I’ve been paying others for years. Thank you for taking the fear out of this!!!
Very good article. Found this through vtxoa.com I used this to change my oil for the first time on my vtx1300. Thanks.
If there is gunk in your oil pan you haven’t been changing your oil filter or oil often enough.
Just my $.02
Thanks for the detailed instructions! Although I have a Kawasaki bike, the process is very similar!
Thanks man that worked great on my 2003 VTX1800C, I am very grateful.
Many Thanks! This oil change was easy thanks to your detailed instructions!!
Thanks. I was checking on oil capacity and ran across this after I changes my oil this evening. I used the Shell Rotella T6 for the first time. Usually I use Royal Purple but I am think of selling my bike and didn’t want to spend a fortune on oil I might never use. Good article and great information. Thanks for the effort!
Thanks for the instructions on this and other work on the VTX 1800 that you put on here. I just got mine last year and took it to a friend of mine to help change the fluids. Didn’t even notice the front oil plug. Good idea and thanks for explaining why it is important to get the junk out by in plugging both. Also I just removed my tank for painting under your instructions. Much appreciated all you have put into this site to help others. Have a great day.
Thanks for the well written and very helpful how-to article. This is my 5th oil/filter change on 06 1800C, and I refer back to your article every time before starting. You have made my life easier and I thank you.
Truly helpful, concise, acurate instructions, with helpful visuals. Thanks a bunch.
Thanks a lot man. Great walk-through
This is my first oil change. Thanks for the thoughtful write up.
Happy Fourth of July.
Hello!
I find some good washers for oil-drain bolts in autoparts-store, it was washers for some models of Toyota – and they fits good.
Sorry for my bad “english”, I`m from Russia.
Been changing my VTX1300c oil for years and this has been the best resource for doing it. Just did it today. Excellent write up – Many thanks!
Excellent write-up, but here’s a dumb question; Since the amount of oil required is 3.9 quarts, we should be fine pouring in 1 oz. shy of 4 quarts, correct?