VTX 1800 Desmog
Posted by Bare | Last Updated May 27, 2014Original mod by Biglry – updated pics and info added by me
This is a walk-through for removing the PAIR valve assembly and the secondary air system with all the hoses and junk that are associated with them. I am separating the steps involved into the PAIR valve removal (desmog) and the secondary air system removal since they are 2 entirely separate systems but have been lumped together for so long many people think they are one in the same. For those who wonder how much stuff is under the tank that doesn’t need to be, here’s what gets removed:
Lotsa junk eh? There’s even more on the CA model!
I’ll let Biglry sum up the mod since he wrote the book on it originally:
Ever heard of any one changing header pipes, they go cheap and use the old gaskets then get popping on decel from sucking in cold air at the exhaust port? Well I have seen by doing this mod 99% of decel popping stops on a stock bike. Could it be because no fresh air is going in the exhaust port? I feel that it is why we see this decel popping on a lot of stock VTXs.
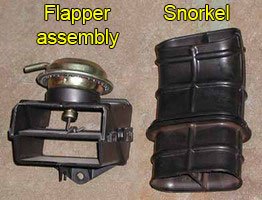
Now for the secondary air solenoid and flapper removal. Go to Honda and buy a new air box for your VTX – there’s no flapper only a hole where it once went and they don’t have the flapper for sale any more. Honda has eliminated this part as far as I know. One side benefit with the flapper assembly gone is you pick up 3% more available air to the air filter. You can also gain 2% more available air to the filter by removing the rubber snorkel. As for RWHP gain on a dyno run with a stock bike you gain less than 2 HP but this is a mod that I did in my quest for more RWHP to work together with other mods I’ve done like my "Twin Scoops". I also use a K&N filter.
Finally the EVAP canister on the CA model bikes, it dumps gas fumes from the fuel tank into the intake manifold at low rpm only, not when the bike is stopped. When the bike is stopped the fuel tank fumes are released directly into the atmosphere. I don’t want any fumes going into my manifold unless it is controlled by my fuel Injectors. Again any RWHP gain? By itself none, but as with all mods it is a item that helps others work better.
I would like to clarify a few other points. Nowhere in my "how to" post did I say these mods were needed for the VTX or said any thing about RWHP gain or possible warranty problems. I tried to give a straight forward way to do this mod as there is a lot of myth and misconception that has arisen over these federally regulated emission parts of the VTX. In no way do I advocate anyone to break Federal emissions laws or state emissions laws 😉 and as Docc has said I know of NO Honda dealer that would violate Federal emissions laws (it’s a big $ fine). The fact is without these Federal mandated and state regulated laws, Honda probably would not have put a PAIR system or EVAP canister, catalytic muffler, O2 sensor or any of the other emission specs on the VTX. The emissions equipment on my VTX is of no benefit to it’s rideablity and makes no RWHP gains that I have found.”
BIGLRY Out 🙂
As always undertake this project at your own risk. I have detailed this write-up for the C model but the procedure is the same for all 1800 VTX’s.
The original version of this mod recommended capping off the reed valves using rubber caps but over time I’ve found that these caps dry up and crack leaving you with unfiltered air getting into your motor and the need to refix the same problem every few months. In updating the mod here I recommend using block-off plates to alleviate this issue. You can buy these plates from DLP or Biglry & Bone’s which do not require dismantling the reed valve gasket plate. The plates are inexpensive, look a lot nicer than caps and last forever.
This project takes most people between 1-2 hours the first time, YMMV.
Testing
For anyone that is interested in this mod but are afraid of what the end results will be you can test it out beforehand by doing this. Go to a local hardware store and buy a #000 rubber plug. ACE Hardware has the plug for less than $.25.
If you look in the airbox under the air filter you will see a small hole with a ledge on the left side of it. Take that #000 rubber plug and push it into that hole. You can smear a little RTV silicone on the plug if you want but it fits really well by itself and the ledge keeps it in place. If you don’t want to use the rubber plug you can use just about any creative method of plugging this hole you can come up with, as long as the plug is solid and has no chance of being sucked up the hose. I’ve heard of guys removing the hose from the back of the airbox and plugging it with a large bolt, a marble, etc – whatever works for you. The only thing you need to be absolutely certain of is that you DO NOT plug the crankcase breather!
Now some of you may ask, why not just plug this instead of doing the entire mod?
This is an excerpt from VTX-Rated:
In addition to the smoke problem, as condensation builds in these hoses it can cause an annoying "gurgling" sound. Over time the PAIR valve will eventually stick open allowing air to move from one reed valve to the other through the accumulated condensation. Bottom line, it’s best to do the entire removal if you decide that you would like to keep the system inactive.
Required tools/Materials
- Tools to remove seat
- Tools to remove gas tank
- 10mm and 8mm (or 5/16") wrench
- 10mm socket
- 5mm allen
- One 1/8" rubber vacuum cap (available at most auto stores – CA models will need 3 of these)
- #2 philips screwdriver
- Small flathead screwdriver
- Pliers
- Electrical tape
- RTV silicone (high temp variety)
- Tank prop
- Block-off plates from DLP or Biglry & Bone’s
If you still have the stock airbox you’ll need:
- A good #2 philips screwdriver, possibly an impact driver (for removing stock airbox)
- One 1/2" rubber vacuum cap (available at most good auto stores)
Process
Run the bike low on gas, this is not a mod you want to do on a full tank as it’s heavy and you risk spilling fuel out of the tank vent line. Also make sure the engine is cold as I have burned my hand on a few that were ridden over for the work.
Now remove the seat and remove the gas tank. It is not 100% necessary to completely remove the tank to do this job, but it does make it a lot easier and there is much less chance of damaging the tank if it is off the bike and out of the way. If you choose not to remove the tank then remove the dash panel so that you can manipulate the tank, and then slide the tank back about 4" and lean it over at about a 45 degree angle to left side of frame (it will sit there just fine). If you do not remove the dash panel it will be nearly impossible to maneuver the tank.
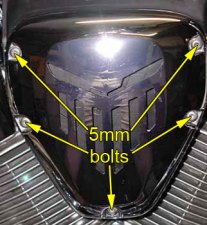
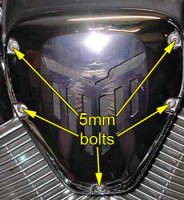
Remove the stock airbox cover and filter using the 5mm allen. Don’t lose the 5 plastic washers that are behind these screws as Honda gets $2 a piece for them. Make sure that the big rubber gasket that the air box cover seals against stays put, if it comes out just use a small screwdriver to carefully push it back in place.
|
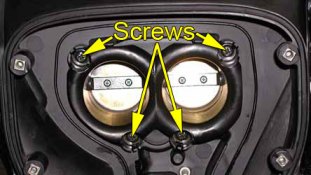
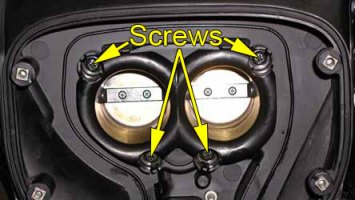
With a good phillips screwdriver remove the 4 screws that hold on the plastic velocity stacks and air box. If they do not come right out then use the impact driver rather than strip the screws. Be careful when you hit the driver, you just need a little tap with a hammer and the driver does all the work. |
|
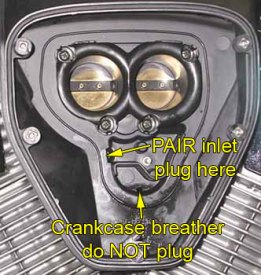
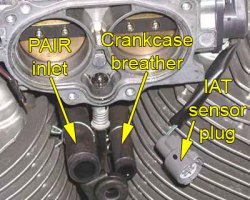
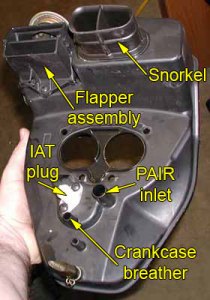
Now if you start to pull the airbox away from the bike you will see 2 hoses and an electrical plug going to the back of the box and one small vacuum line plugged into the flapper valve at the top of the airbox. The big hose is the PAIR inlet, the small hose is the crankcase breather and the electrical plug goes to the IAT sensor. Reach behind the airbox and pull off all 3 hoses and the electrical plug. The plug has a little tab you need to press to get it off. With this removed you should be able to get the airbox off the bike altogether. |
Secondary air system removal
These are not steps to complete the desmog (PAIR removal) but since the secondary air system really serves no purpose (Honda doesn’t even make these parts anymore) there is no reason not to remove this stuff. I separate the 2 "parts" of this write-up only to make the distinction between what is the secondary air system and what is the PAIR system on the bike.
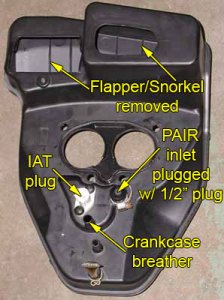
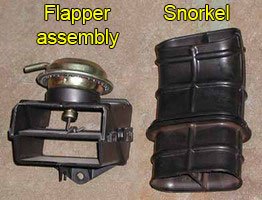
Take a phillips screwdriver and remove the screw that holds on the air flapper on the back of the airbox and remove the entire assembly. There is a little silicone that is used as a sealant but don’t worry it will peel right off.
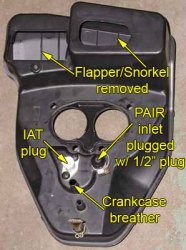
Next to that new hole you have the snorkel. Removing it takes a little work but what I do is fold the rubber up and push it out the front of air box. It is also possible to do the same thing and pull it out the back of the airbox – whatever works for you. Once it is out you will have two big holes on the back of the airbox for the VTX to breathe through. You can also cut the back of the airbox to allow even more air, but I prefer to have everything intact in case I ever want to reinstall it.
| Before | After |
Ignore the 1/2″ plug mentioned in the “after” pic for now, you’ll get to that later.
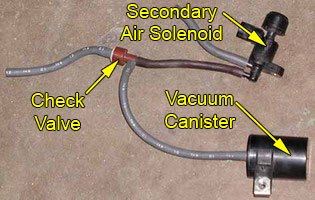
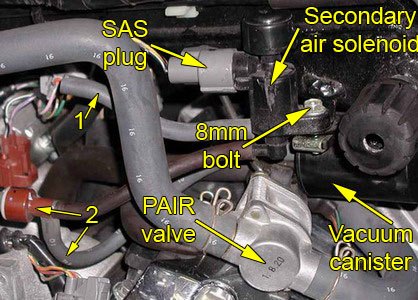
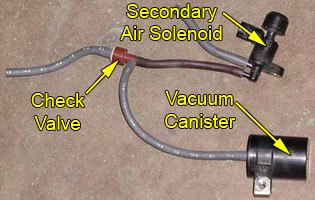
Now looking just forward of where the PAIR solenoid valve is you will see the secondary air control solenoid and a small black vacuum canister with vacuum lines bolted in place with an 8mm bolt:
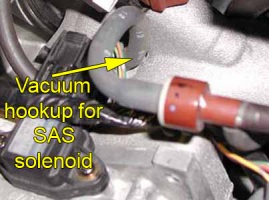
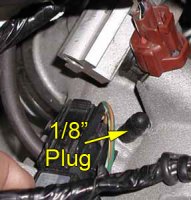
The vacuum line labeled #1 in the pic used to plug into the flapper on the back of the airbox and there is an electrical plug on the secondary air control solenoid. Remove the 8mm bolt, unplug the electrical connection and trace the last vacuum line (#2 in the pic) that is still connected back to the intake manifold, remove the vacuum line and replace it with the 1/8″ vacuum cap.
| Before | After |
Take the electrical plug and zip-tie it out of the way. I usually squeeze a little grease in the plug and wrap it with electrical tape to keep it protected from the elements in case I would ever want to hook it back up.
This is the end of the secondary air system removal, you should now have all this junk off the bike:
And now on to the desmog process itself.
PAIR system removal (Desmog)
Grab the airbox and the 1/2" vacuum cap and cap the inlet where the PAIR hose (the large hose) went into the airbox.
Biglry used to recommend 3/8" caps but many (including myself) found that these were nearly impossible to get on and would usually split in the process. The 1/2" caps work great. To ensure a good seal use a little RTV silicone in the cap, it helps with sliding the cap on and when it cures it will make a perfect seal. As you can see in the pic I use a small hose clamp to hold the cap in place, this gives the RTV a little time to cure while I do the rest of the work.
Looking at the back of the airbox you can also see the smaller nipple the small hose hooks to, this is the crank case breather, do not cap this line! It must be left open to vent the crank case. You will put this hose back on when you put the air box back on. If you cap, pinch or kink this line so it cannot vent when the bike is running you will blow the seals on your transmission and make quite a mess spraying oil around.
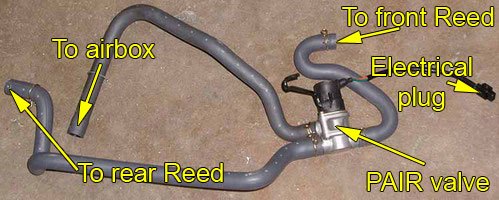
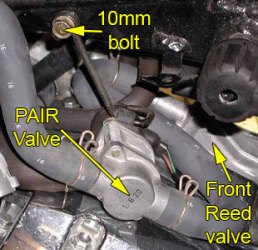
Now look at the backbone of the bike and you will see a 10mm bolt holding a wire bracket which in turn holds the pair solenoid valve in place. This is right next to where the secondary air solenoid was.
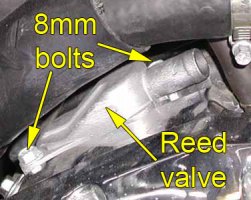
There are 3 hoses coming from this unit and one electrical plug. Trace the 3 hoses, one was the big hose that plugged into the back of the airbox and the other 2 go to the reed valves on top of the motor (one in front, one in back). Trace the hoses and pull them off the reed valves, after awhile they stick on there pretty well, but a little twist will help get them off.
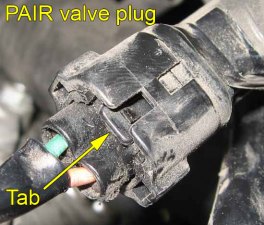
With the hoses disconnected you can work on the electrical plug. Find this tab (right pic) and instead of pressing it, lift it up with a flathead screwdriver to disconnect the plug.
With the 3 hoses and electrical plug undone you can remove the 10mm bolt on the backbone of the bike and remove this entire assembly. I do the same with this plug as the SAS one – squeeze a little grease in the plug, wrap it with electrical tape and then zip tie it out of the way.
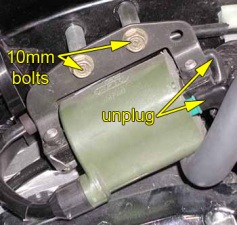
Now with all that junk out of the way it’s time to remove the reed valves and replace them with block-off plates. Find the rear coil on the right side of the backbone back towards the seat and using a 10mm socket unbolt it from the bike. Be careful not to lose the spacers as you remove the coil.
Unplug the black wire w/ white stripe and the yellow wire w/ blue stripe from the coil and you should be able to rotate the coil back and out of the way to get a perfect shot at the reed valve.
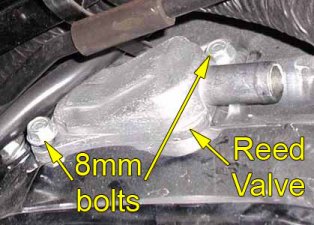
With the coil out of the way take an 8mm or 5/16″ wrench and remove the bolts that hold the reed valves in place. If you have a 1/4" drive ratchet with an 8mm or 5/16" socket you can use that instead of a wrench and it will make this task a little easier. I sometimes find it easiest to remove the right side bolt from the right of the bike and the left side bolt from the left. It is a tight space and I have big hands, so I know it can be tough – just be patient and you’ll get it. It will require a lot of small turns to get it loose and eventually you’ll be able to spin it out with your fingers.
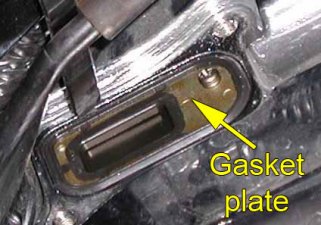
With both bolts out you can remove the reed valve cover and then reach in to pull out the gasket plate assembly.
Unless you are using Biglry’s plates you’ll need to disassemble the gasket plate assembly to get just the gasket plate by itself. If you don’t disassemble it then the screw that holds it all together will prevent the plate from making an airtight seal. This will give you a bad air leak, horrible clatter with the motor running, decel popping like crazy, and unfiltered air entering the motor. If you are using Biglry’s plates then click here to jump past this section.
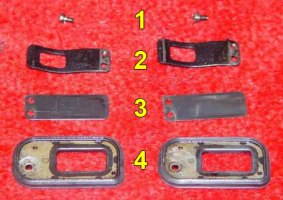
The screw (#1) is what holds it all together but it is flared on the end so you can’t just unscrew it. You can take a grinder or dremel tool and grind the flare off and then unscrew it, but if you slip and nick the gasket you’ll have a leak. You can also take a pair of pliers and pull off the #2 and #3 plates. You can bend them, they will snap off and the screw will come out as well. It destroys the #2 and #3 plates but you’re not reinstalling them anyway and it’s much faster than hassling with the screws. I do want to offer a word of warning since it was mentioned to me by one rider… He broke the gasket plate itself in half when trying to remove parts #2 and #3 from #4. First, be careful – it doesn’t take a lot of force just a good pair of pliers and a few times bending and "rocking" the metal back and forth to snap it off. If you do have the misfortune of breaking a plate, don’t panic! You can use a small dab of JB Weld CAREFULLY applied to put it back together and use some high temp RTV to seal the block-off plate. To be honest, if you use the high temp RTV you don’t need the gasket plate at all, but I like to keep it in for good measure (between the gasket and the RTV you have 2 seals so you’re sure not to get any leaks).
With all that said, the safest and surest way to do this without breaking anything is to drill the screw head off using (roughly) a 7/64″ drill bit. With the screw head gone the entire thing just falls apart.
Now drop the gasket plate (#4 above) back in the reed hole on the motor where it came from and install one of the block-off plates on top of it. I like to put a small bead of RTV silicone (high temp variety) on the plate before putting it on. I don’t think it’s totally necessary, but it only takes a moment to do and it helps ensure a good seal. Use the same 8mm bolts that held the reed valve in place when bolting down the block-off plate. There is no specific torque spec for these bolts in the manual but trust me, they are small enough that you don’t have to really “wrench” them down tight. Get them snug and you can leave them alone.
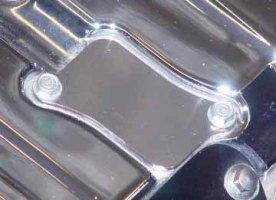
You can see the finished product in the picture on the left (The picture is the front plate installed, but you get the idea).
With this done reinstall the rear coil, spacers, bolts, and wires in reverse order and move onto the front reed valve.
If you haven’t removed the tank completely then to get to the front reed valve you will need to "center" the tank back on the bike and slide it backwards. It is on the front left of the motor and like the back one I find it easiest to get to the right bolt from the right side of the bike (reaching across the motor) and the left bolt from the left side, lifting the top radiator hose to get to it.
Use the 8mm or 5/16″ wrench (or 1/4″ drive socket) to remove the bolts and remove the reed valve and gasket plate assembly just like on the back one. If you’re using Biglry’s plates then again disregard this part about disassembling the gasket plate assembly.
Just like last time remove #1, #2, and #3 and reinstall #4. Put the block-off plate on in place of the reed valve using some high temp RTV if you choose to. Reinstall the 8mm bolts and snug them down. When working on this be careful you don’t drop the 8mm bolts or else you’ll end up spending about 30 minutes scouring in the radiator/fan area to find them. One of those telescoping magnets helps a lot if you drop the bolt.
The finished product should be identical to the completed picture up and to the left.
At this point, if you’re on a 49 state (non CA) bike then you are done and you can skip down to the “reassembly” section and put everything back together.
CA model additional steps
Since I have a 49 state bike I can’t comment too accurately on the following steps but Paul (Rev on the CA forums) was nice enough to detail the process with some pics on an 04 1800 N model.
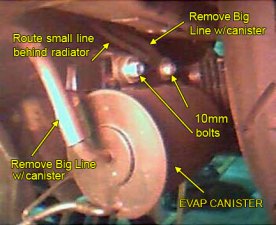
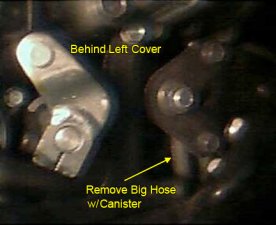
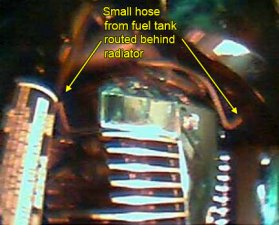
Look under the bike near the rear tire, that "soup can" you see is the evap canister. Remove the two 10mm bolts and remove the canister. The small hose is from the fuel tank and is to be routed down the side of the coolant overflow tank, the other lines will come out with the evap canister.
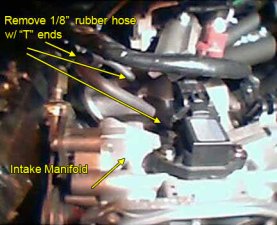
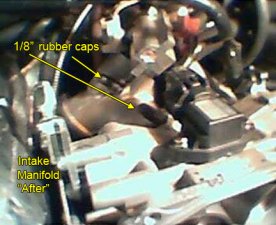
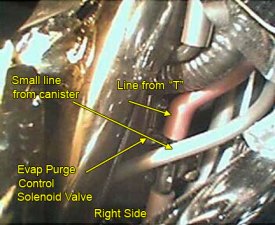
On top of the intake manifold behind the throttle body you’ll see a 1/8″ black hose that forms a “T” with two ends plugged into the rear of the intake manifold and the other end routed to the evap purge control solenoid. Remove the 1/8" rubber hose “T” ends from the rear of the intake manifold brass nipples and replace them with the last two 1/8″ rubber caps. Now follow this line to the evap purge control solenoid.
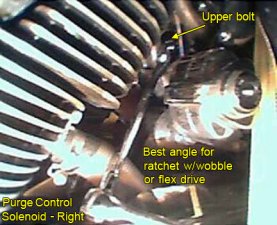
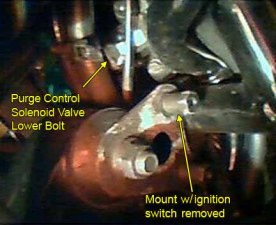
Here is the hardest part of this entire job, the control valve. On the right side of the bike behind the rear cylinder you can get to the first bolt with a 10mm open end wrench just behind the exhaust pipe. If you can’t get a tool onto the upper bolt from the right side try the left side (even though it’s a tight fit and you have to squeeze the extension through several lines). The bottom bolt is easy once you remove the ignition switch – it’s only held in by two screws so this part is simple.
Once the two bolts are out and the electrical connector is unplugged, pull the control valve out with all the hoses attached. The hose from the left side of the fuel tank is routed down the side of the coolant tank. If need be you can use a few zip ties to hold it in place.
Reinstall the airbox in reverse order, make sure to plug the crankcase breather back in and the electrical connector for the IAT sensor. Make sure that the 1/2" plug you just installed is in place over where the PAIR hose used to plug in. Get the airbox in place and use a good phillips head screwdriver to reinstall the velocity stacks nice and snug – DO NOT use the impact driver to reinstall them. Reinstall the filter and the cover with the five 5mm bolts making sure that you don’t lose the 5 plastic washers on the screws in the process.
With the airbox back in place check under the left side of the fuel tank to make sure the 1/8" tank vent hose is still on before sliding the fuel tank back in place – it usually gets pulled off when you slide the tank back. If you completely removed the tank then reinstall the gas tank by following the directions in reverse. With all this back in place reinstall the seat by also following the directions in reverse.
That’s it – you’re done – congratulations!
Afterthoughts
This is an inexpensive mod that helps cut down on about 95% of the decel popping this bike exhibits when stock. It will help stop the "blatty" sound you hear when you first start the bike when it’s cold and it will make your exhaust note a little deeper. It will not have ANY affect on the performance of the bike and doing it requires no additional "mapping" changes to your fuel manager. Some have argued that removing the smog system from the bike may aid exhaust scavenging when using a 2-into-1 or a 2-into-2 exhaust with a crossover. While this is likely true (the smog system would tend to cancel out scavenging effects) the results would be, in my opinion, very minimal and not worth mentioning.
A lot of people ask about the warranty aspect of doing this mod. The bottom line is that it will depend on your dealer and how much of a hassle they want to be. Technically they cannot refuse you warranty service based on this mod, but some will because some dealers are a pain in the ass. So they may give you grief over it, but if you call Honda of America (bypassing the dealer) they should make them honor the warranty.
The legal side of this is the Magnuson-Moss Warranty Act which is vehicle warranty law – US Code – Title 15, Chapter 50, Sections 2301-2312 state "Legally, a vehicle manufacturer cannot void the warranty on a vehicle due to an aftermarket part unless they can prove that the aftermarket part caused or contributed to the failure in the vehicle." This means, very plainly, that if a dealer tries to void your warranty based on any modification to a vehicle then they have to prove (THEY have to prove, not you!) that the problem you’re having was caused by the modification you made. Since the desmog (when done properly) cannot cause any problems on the bike they would then be forced to honor the warranty.
If a dealer fails to honor your warranty you can contact the FTC at (202)326-3128 or www.ftc.gov.

very good info thanks, al
My 03 VTX 1800 R ran like crap and back fired, it was embarrassing to ride to be honest. I dis exactly as instructed and wow, I now have a whole new animal on my hand. My bike runs fantastic and has no backfiring at all. Thanks so much for posting this and taking time to do so, really appreciate it LOTS!
I have completed this mode on a VTX 1800 2006 C Spec 3 CA model, and three 1800 2007 F Spec 3’s. On every one, the improvement in exhaust note and elimination of the backfiring was immediate. I have now done this mod for three more friends and they all got the same result The Bilgary and Bone plates were well made and really clean uo the top of the engine. Thanks guys for all the great work!
Dshrek (Dave)
Wel thiss is a compleet writeup. Thx.
One question, wy not just block of the reed valve and let it there?
The Biglry’s plate look better I agree.
Greetings Siebster
I was a little confused about your mention of a 1/2 inch cap when in fact it is a plug. But in the end, I figured it out.
Thanks
Joe
Well I completed the mod. Great and easy. The popping is gone. Thanks for all your hard work.
Joe
No, it’s a cap.
I am go to install a Baron Big Air on my 1800f3 and needed the info you provided about the reed
I will let yoy know how it turn out
Just a quick thank you for the info. Even though I have a small engine shop, your instucions made the job easier.
I used Baron’s plates from Dennis Kirk.
Just finished this mod and there was immediate results. The popping when the pipes are cold is embarrassing till it heats up. As soon as I started it up, nothing but a purr. At 100mph, no raspy sound. I have Hard Krome 2-1 pipes.
Biglry’s & Bone plates work most excellent!
I followed your directions word for word, picture for picture and the results were fantastic! !!! Thank you very much, I have no decel pop at all. Thanks again for your knowledge !!!
I am not confident to do it myself, i’ll look for a Honda bike dealer to do it for me. I hope I can fix the popping n backfire at deceleration.
Thank you and more power!
The instructions are very explicit and easy to follow. The hard part is getting the back bolts off the reed valves. There is very, very little clearance so you must have lots of patience turning them about 1/4 turn at a time from whatever position you can do so. When installing the reed valve cover plates I did not re-use the stock bolts to put them back on, but instead used comparable sized allen head bolts – this allowed me plenty of clearance to tighten all the allen-head bolts easily using an allen wrench.
When finished I was glad I went with the cover plates because it was a very neat job. Do yourself a favor too and buy the Biglry cover plates with the divet drilled into to it clear the screw in the reed valve. It it absolutey worth the extra couple of bucks.
My exhaust note after this mod is pleasantly deeper and the exhaust has a desired consistency to it – well worth the effort.
Thanks. Did this step by step with a s&s install worked great.
I did this today in about a hour thanks to this great right up. Exhaust tone is deeper and no more gargling/pooping. It makes me proud to ride my Honda again 🙂 THANKS
great write up! I have done two vtx 1800r’s and the instructions are well done. The second one was a CA model, so had more smog junk to take off. Only thing I did different was to leave the purge solenoid valve on the bike. You don’t see it and it is a pain to remove. So I just capped the electrical connection so I can always reverse if need
to. Spend the $30 and get biglry’s block off plates…. Neater,easy and looks great!
I would like to thank all for your self help information and videos they have been a great help to me,I have removed pairing valves,ajusted tappets and replaced head stem bearings. Thank you so much.
Just finished the desmog on my 03 1800c and noticed the difference immediately. Not only is the popping gone during decel, but it sounds and feels better during acceleration also. Greatly appreciate your write up- made it very easy to accomplish in about an hour. Thanks again.
I just finished this mod to my 03 VTX 1800R, it made a world of difference on the sound, no more popping or backfiring, just a nice smooth ride… I used a brass plug, threaded the inside of the original reed valve cover and some High Temp RTV all total $15.00 and about 3 hours of my labour… What an amazing difference…
Well done. no experience and pulled this off in a short afternoon. Thanks guys for the step by step pics, they r very usefull
Great Mod, took just under an hour from start to finish on my 08 1800f…. the covers with the dimples are worth it. Just wanted to say thanks again for this write up
Been a while since this write up was first entered. But it still works! I recently did this pair system removal on my ’05 1800F3. Good info and easy to follow having my laptop on the bench for a reference. My bike has the external fuel pump, and removing tha tank is a bit more tricky, but it can be done safely and without a mess. Bilgry doesn’t make the plates anymore, but other sources exist. Took the time for reworking grounds and general cleaning while the tank was off. This mode really gets rid of the “junk” on top of the motor. Thanks again!
Wish I had done this mod years ago. Instructions and pictures made the process go so smooth. I completed in just over an hour. Only holdup was the rear reed valve cover bolt on left side of bike was the hardest to unscrew. Bike sounds so much better and a deeper tone to my HK 3″ straights. Thanks for the write-up
Wow, what a difference it made in the sound. My bike had a weird sound coming out of the pipes but after I did this mod it sounds throaty. Directions were spot on. I tapped out my plates and put a brass plug in them. Also adjusted the valves while I had it apart. Thanks for all the great info
Great write up!!! A+++++…… Did this last night and WOW I have a different bike now.!!!! Thanks for all the help….
Just a quick THANK YOU!!!! for an awesome wright up. I took my time and followed every step. Word to the wise: make sure you make a good tank prop tool because I used wood shims and they slipped and I ended up having the gas tank fall on my head. Nothing a beer and Advil couldn’t fix though. It took me just under 5 hours to complete, but that included running to Advance Auto to get the 1/8 inch hose plug and some Gasket maker( have fun not getting any on the engine jugs, lol). Give yourself plenty of time to get the gas tank off if it’s your first time doing so. Sounds great now and well worth the time and money 😉 😉 😉
Great info and articles. Thanks.
[…] Try this […]
Easy up Grade easy to do
[…] Try removing the PAIR System, or Desmog, as it’s called. See this; […]
[…] the hardest part is removing the gas tank […]
[…] Follow Bareasschoppers directions to do the Ground Fix and the PAIR system removal. It’s all very easy to follow. […]
[…] With the dimple it's just easier than to try and remove that screw. See this; https://tech.bareasschoppers.com/engine/vtx-1800-desmog/ #1 in this picture is that set screw; […]
This write-up is great! The links provided appear to be dead links, but I found a good assortment of block-off plates below for anyone that’s looking to do this.
Would love to do this procedure if I could just find the block off plates.
The block off plates can be found here — https://www.denniskirk.com/baron-custom-accessories/air-injection-removal-kit-ba-2561-00.p173229.prd/173229.sku
Did the pair valve cover plate removal exactly as you outlined. I’m not a big “wrencher” but am so frugal I decided to try it. I ordered plates and had at it. After the procedure I was dismayed to still have decel popping, but not as bad. A couple of months went by and I was watching a guy on a video using high-heat silicone to make a gasket. He said to apply and let the sealant “cure” for about 15 minutes to make it a better seal. I was wondering if maybe I was getting a leak as I didn’t apply a lot of sealant or let it cure. Yesterday I removed both covers, sealed them, let the silicone cure and replaced them. NO POPPING. My suspicions were correct. Just wanted to let you know that others may have the same results.
Where did you get the covers from ?
Great instructions that are easy to follow. Did the desmog today and was very satisfied with the results. Lots of junk to take off. Engine bay looks much cleaner now.
Hello. I’m just curious if this is something that would be suggested on a VTX with V&H after market pipes installoed…? Thanks.
Many thanks for your info.
But i just wonder why not just block of the reed valve and let it there?
I do use a Kuryakyn PRO-R intake.
Can this mod be done with this kind of intake because of the two intake’valves’ operated by vacuum?
I only see alot of parts coming off the bike with this mod. 🙂
I do use a Kuryakyn PRO-R intake.
I wonder if this mod be done with this kind of intake because of the two intake’valves’ operated by vacuum
I only see alot of parts coming off the bike with this mod. 🙂
i find that especially with a race tuner, it’s extremely important to let the bike run through it’s fully warm up process each time you crank it. That seems to get rid a lot of my pop on decel. I’m going to do this mod as well now, but thought that was worth a mention.