Gas Tank Removal (VTX 1300)
Posted by Bare | Last Updated January 20, 2011This is a walk-through for removing the gas tank on any model VTX 1300’s. Before doing this, it’s a good idea to run the tank down as low as possible just to make handling it easier. A full tank of gas is going to weigh 40-50 pounds. If you’re stuck having to do this with a full tank, then you might want to consider siphoning some fuel out first to lighten the tank and make this process easier. As always, undertake this process at your own risk.
Required tools/Materials
- Tools to remove seat
- 5mm allen
- 12mm socket or wrench
- Shop towels for soaking up spilled gas
- Bungee cord
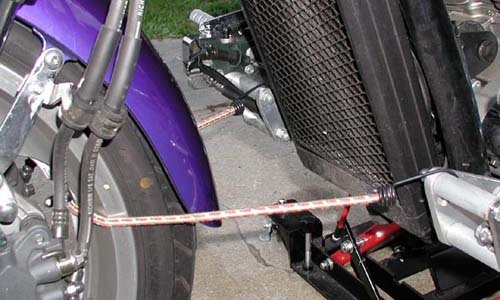
First remove the seat, and then use a bungee cord to secure your front wheel. This will prevent the handlebars from flopping side to side and dinging the tank.
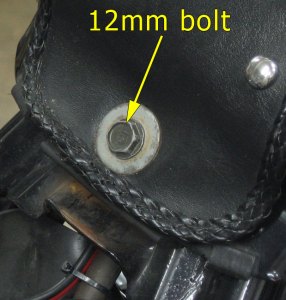
Remove the rear tank bolt that secures the tank to the frame. Do this using a 12mm wrench or socket. Be careful not to lose the steel spacer that is in the hole the bolt goes through.
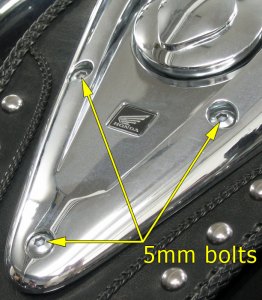
Next, using the 5mm allen, remove the three lowest bolts holding the console. When removing these bolts, make sure that you don’t lose the little plastic washers that go underneath them. These plastic washers help prevent the dash from rattling. Keep the gas cap on until these bolts are removed so you don’t accidentally drop them in the tank.
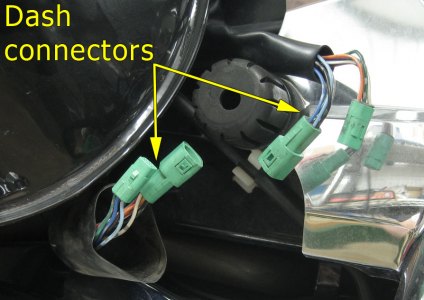
With the bolts removed, take the gas cap off and pull the console forward to remove it. When removing the console, be careful that you don’t pull off the little rubber cover that sits on the tab at the front. Once the console is removed, put the gas cap back on. I wrap the console in a towel and let it hang along the side of the bike once it’s off. You can do whatever you want, but be sure not to knock it around and scratch it up. If you are interested in removing the dash from the bike altogether in order to protect it, you can find these connectors at the front right of the tank (just follow the dash wires). Using a tiny screwdriver or pick you can carefully lift the tabs that hold these connectors together and separate them. I will stress that the tabs you have to lift are extremely fragile and will break without much effort – so be very careful when doing this.
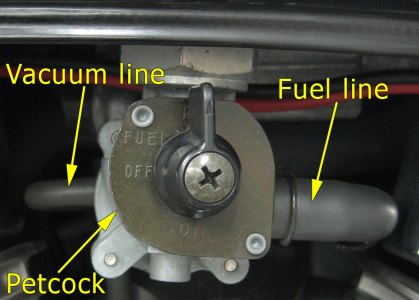
Now that the rear tank bolt is removed, find the petcock on the left side of the bike. Turn the petcock off (knob to the left) and then wiggle off both the vacuum line and the fuel line. The vacuum line will pull right off, the fuel line has a little clamp on it that you may have to remove before the hose will slide off. I find it’s sometimes easier to get to the fuel line if I remove the left rear plug cover. Have a towel handy to catch the few drops of fuel that may be left in the fuel line when you disconnect it.
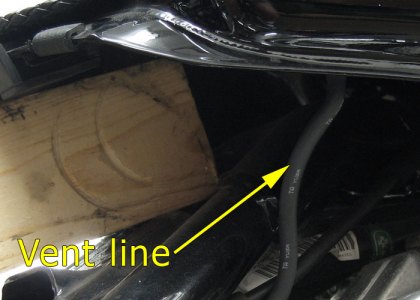
Now lift the back of the tank and look under the right rear for the vent line. Disconnect the vent line. It just slips onto a nipple and will pull right off.
With the vent line disconnected, the tank is ready to come off. Grab the tank and carefully slide it backwards to remove it from the front rubber mounts. Remove it from the bike and set it aside somewhere safe. I also cover the tank with towels to give me an extra level of protection against anything that might get dropped on or near the tank.
Reinstalling the tank is as simple as following these steps in reverse order, but save the petcock connections for last. There isn’t much slack in the hoses, and often the vacuum line will come loose when moving things around.
That’s it – you’re done – congratulations!
Afterthoughts
While this task may seem daunting to those who have never tried it, I can assure you that the more you do it, the easier it gets. Removing the tank makes so many other projects easier.

Sweet!,
Thanks Much!
Thanks for the info on this. I still appreciate the walk through on this “simple” stuff even though I have been an old shade tree for many….years. Every bike or car, truck is in some way different and its just easier in the end if you don’t break small stuff with pulling too hard on a fragile part.
[…] you should be able to correctly assemble yours […]