Seat Removal
Posted by Bare | Last Updated May 27, 2014This is a quick walk-through for removing the seat on a VTX. This is basically the same procedure regardless of model or year. You just might need a different wrench for one versus another. If you are pulling your seat off and putting it back on a lot, you might consider swapping the bolts out by using the seat pin mod. As always, undertake this process at your own risk.
Required Tools/Materials
- 6mm allen (wrench or socket)
- Socket wrench
- Socket wrench extension (not necessary, but makes things easier)
- 10mm socket or 5mm allen (depending on the bike)
- Tiny screwdriver (for models with chrome covers on the bolts)
Process
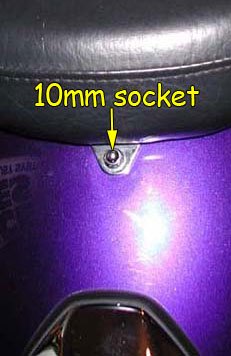
There are 3 fasteners holding on most driver and passenger seats. The rear-most nut/bolt can be seen here:
This is a 10mm acorn style nut on some models (C models primarily) and a 5mm allen head bolt on all other models. It can be found at the back of the passenger seat in front of the taillight. My bike is a C model so that’s what you see here. Just use whatever is necessary for your bike. If you have a luggage rack or backrest, this process is usually made easier using a socket on an extension.
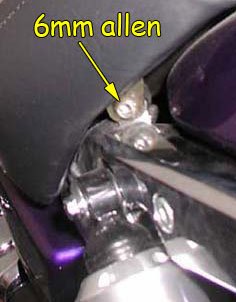
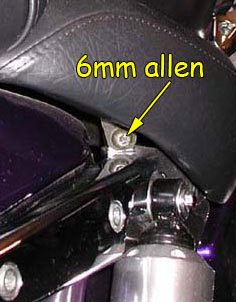
With that back passenger seat fastener gone, move on to the driver seat bolts:
These are 6mm bolts on every model. There is one on each side of the seat just above the top rear shock mount. The bolts in these pictures are on a C model and as you can see, they go under the seat at approximately a 45° angle. The bolts on other model VTX’s do not go under the seat on this angle. Rather, they go straight into the fender at a 90° angle. Some aftermarket seats use 12mm hex bolts instead of these 6mm allens.
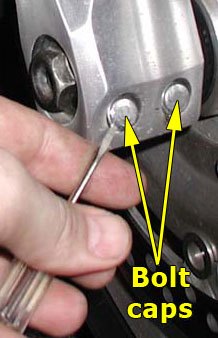
If you are staring at these pictures and wondering why your bike doesn’t seem to have these same 6mm bolts, keep in mind that some models have small plastic chrome caps for decoration that cover the head of the bolt. These are found in various places on the bike (see pic below) and you can use a tiny screwdriver to pry them off in order to access the bolts. When it comes time to reassemble, just push these caps back on with your finger and they will stay put on their own.
Afterthoughts
This is a simple process everyone should know how to do. Your battery is under the seat, along with a lot of other electronics. You’ll also need to remove the seat if you ever need to remove the gas tank. As mentioned at the top of this article, you might want to consider replacing your 6mm left and right seat bolts with pins for simple and quick access via the seat pin mod.


Short, sweet and pix speak volumes…thanks!