Throttle Body Sync (VTX 1800)
Posted by Bare | Last Updated April 13, 2011Information courtesy of Biglry
I have been asked about how to sync the throttle body on the 1800 engine so here is another “How I do it” post. What this adjustment does is make the vacuum in the intake manifold or intake runners equal at idle with the throttle closed. The VTX does not have a common intake manifold, but two separate intake runners cast together as one unit with no common plenum chamber. When the idle vacuum is equal the bike will have a smoother idle and it helps cut down on decel popping when slowing down with the throttle completely closed. Unless you have a basic understanding of this process I would not undertake this without supervision by someone who does.
Required tools/Materials
- Tools to remove seat
- Tools to remove gas tank
- Whatever tools are necessary to remove your airbox (OEM requires 5mm allen and #2 Phillips screwdriver)
- Short flat screwdriver or pilot screw wrench – Honda OEM #07908-4730002. I use this one from Carbtune but it’s expensive. Similar offset drivers are available at most auto supply houses and Motion Pro also makes a few.
- Vacuum gauges – I use a Carbtune II but any good quality mercury carb stick will work. You can get a Carbmate, a SyncPRO or a Vacuummate depending on your budget. The Carbtune II has no mercury and has worked well for me. I don’t care for liquid filled gauges since they need to be calibrated to be certain they are reading the same.
Process
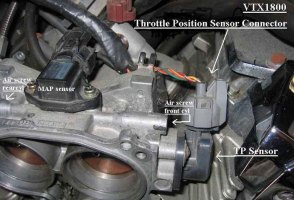
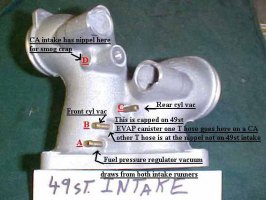
Before you get started take the bike out and ride it for a few miles to be sure it is good and warm. Shut the bike off, lift the tank, and remove your air box to gain access to the air adjustment screws on each side of the throttle body (see pic to right) and the vacuum hookups (B & C in the pic below). I know you can’t see the rear cylinder air adjustment screw in the pic to the right, but it is just like the front cylinder one.
With your screwdriver or pilot screw wrench carefully turn each air screw all the way in, counting the turns as you go, and then bring them back out the same amount to where they started. This is just to get an idea of where the screws are set to begin with.
DO NOT TIGHTEN THESE SCREWS CLOSED – just use a light touch
If both air screws are close to being the same (within a half turn) then go on to the next step, if not then adjust the rear cylinder to within a half turn of the front. I have never found the air screws to be very far apart, if I was given a throttle body with them removed I would start each at 1.5 turns.
The picture to the left is a 49 state intake from a VTX 1800. I put a mark on the picture (D) where there is another brass nipple on the CA intake that is not found on the 49st intake.
Remove the caps or hoses that go to port B (front cylinder) and port C (rear cylinder) on the throttle body and connect your vacuum gauges. If your bike is desmogged you will have to remove small rubber vacuum plugs to get to these. If your smog system is still intact there will be hoses hooked here for smog stuff.
With your gauges hooked up start the engine and let it idle. DO NOT “blip” the throttle with the vacuum gauges hooked up. Watch your vacuum gauge and note the differences between the 2 cylinders. Now using the air adjustment screws and your driver adjust the the higher reading cylinder down to the lower cylinder and reset the bike’s idle (if necessary). If you have to adjust the idle then repeat the entire process until no changes are necessary.
Tips/tricks
- Make sure the air box and filter are off! You can adjust the air screws without removing some aftermarket air boxes, but don’t do it
- Don’t “blip” the throttle with mercury or fluid type vacuum gauges or you will get mercury in the intake!
- Check to be sure the butterflies are completely closed
- Reset idle after every air screw adjustment if needed
- I like 900 RPM for the 1800 engine idle, I won’t run them any lower even though Honda says 800RPM +/- 100 is OK (this is just a personal preference)
- You may need to readjust the idle if the air filter is really dirty when put back on
Finishing up
With everything set and the idle adjusted you can remove your vacuum gauge (don’t forget to reinstall vacuum plugs or smog hoses), reassemble the air box, tank and seat. Make sure that anything else you may have disconnected is reattached.
That’s it – you’re done – congratulations!


I have had popping on decel and haven’t been able to figure it out, everything from exhaust gaskets to trying to tune it out with the power commander. The bike already had the pair valve removal done. I just starting syncing the throttle bodies and my air screws were almost 3 turns out. Would this be causingmy issue? Won’t really know till spring and the bikes on the road. Thanks for your help the website has been amazing
Mine has been desmogged and it also does the backfiring or popping or dece,l it’s very loud and. Very annoying . I worried that the tail pipe is going to get blown off.ive adjusted as per instructions, and doesn’t get any better. Is there something else that could be causing this I heard something about the read valve Don’t know if it has anything to do with the popping. Also there is a tiny little screw in the center of each throttle body intake with a set nut(I think that is resetting the cold start I’m not sure exactly what that is could you provide some insight on setting this also) I also changed spark plugs and it’s still pops very loudly very very loudly were they all like this from the factory with the popping, I can’t imagine that being the case. Thank you for addressing this problem with your article and tutorial I found it very informative thank you very much any further assistance with the popping situation would be greatly appreciated have a wonderful day.
spits back true intake will not crank
Mine has been desmogged and it also does the backfiring or popping or dece,l it’s very loud and. Very annoying . I worried that the tail pipe is going to get blown off.ive adjusted as per instructions, and doesn’t get any better. Is there something else that could be causing this I heard something about the read valve Don’t know if it has anything to do with the popping. Also there is a tiny little screw in the center of each throttle body intake with a set nut(I think that is resetting the cold start I’m not sure exactly what that is could you provide some insight on setting this also) I also changed spark plugs and it’s still pops very loudly very very loudly were they all like this from the factory with the popping, I can’t imagine that being the case. Thank you for addressing this problem with your article and tutorial I found it very informative thank you very much any further assistance with the popping situation would be greatly appreciated have a wonderful day.