Tires 101
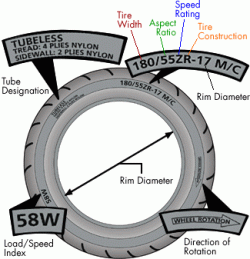
Posted by Bare | Last Updated March 19, 2015Ever wonder what all those numbers, letters and markings on your tire sidewall really mean? Ever wonder how old your “new” tires really are? Believe it or not everything you want to know about your tires is right there on the sidewall, and with just a little knowledge you can answer all these questions for yourself. This information is intended to be an introduction to your tires and will not cover every detail. There is a world of knowledge printed right on your tires that goes beyond what is discussed here. So if you want to learn more about tires, remember that Google is your friend. As you read through this article refer back to the picture on the right because I’ll use it as the example.
Tire Width
The first number or second letter in a tire size represents the nominal width. This width is measured in a straight line from the furthest point on one sidewall, across the tread, to the furthest point on the opposite sidewall and is generally measured in millimeters. Tires which have a 150mm or smaller width may also be represented by letters. The breakdown for this is 10mm per letter, so A=10mm, B=20mm and so on until V=150mm. Beyond 150mm the tire will always be represented by the actual numerical designation – the tire in this example (the picture on the right) is 180mm.
Aspect Ratio
This number references the overall height of the tire from the bead to the tallest point in the center of the tread. Unlike the tire width discussed above, this number does not actually represent the height of the tire in millimeters, but rather a percentage of the width. Using the example this means the height of the tire is 55% of the 180mm width – or 99mm.
| Speed Rating | MPH | KPH |
|---|---|---|
| Q | 99 | 160 |
| R | 106 | 170 |
| S | 112 | 180 |
| T | 118 | 190 |
| U | 124 | 200 |
| H | 130 | 210 |
| V | 149 | 240 |
| W | 168 | 270 |
| Y | 186 | 300 |
| Z | >149 | >240 |
Speed rating
This letter notes the maximum speed a tire can sustain under its recommended load capacity. This rating system is similar to what we discussed for tire width above – it is one letter per 10, but it is kilometers per hour in this instance. The ratings start with J which is safe up to 100KPH, K up to 110KPH and so on into the ratings we typically see on motorcycles which run from V-Z. I honestly have no idea why the Z rating is only good up to 240KPH or why H is thrown into the middle at 210KPH, if you know then please email me and I will add it here.
Rim Diameter
This is the diameter of the rim on which the tire will be mounted, measured in inches. This is important to ensure you have the proper tire for your specific rim.
Tire Construction
When included, this letter is listed after the speed rating. There are three options:
- Bias tires have no letter in the size designation
- Bias-belted tires are reinforced using diagonal belt construction and are recognized by the letter “B” in the size designation
- Radial-belted tires (radials) are recognized by the letter “R” in the size designation
A belted tire has fiberglass, Kevlar, or aramid fiber belts for added strength and load capacity. There is an entire section discussing radials and bias tires below, written by Handler of the VTXOA.
Additional Sizing information
Some tires may have additional information in their size designation such as “M/C,” meaning the tire is a “motorcycle” tire. There can be other specifics too.
- “WW” means “white wall” tire
- “TT” means “tube type” tire for tires requiring inner tubes
- “TL” means “tubeless” tire for tires which do not require tubes
Sometimes you can find this information listed separately from the size designation in its own area. This area can also contain specific qualities of the tire such as the tire ply, composition and materials used in making the tire.
manufacturing dates
While there is a lot of information to be gathered from the sidewall of a tire, the manufacturing date is among the most important. Over the last few years there has been a bit of a scare in the tire industry as people are discovering that some of their “new” tires are actually several years old. I can only speculate as to the reasons why this old stock is just getting into the hands of consumers, but it’s always smart to check tires when you get them. The industry standard definition of “too old” is considered to be between 5 and 6 years. This information applies to all tires, not just motorcycle tires. In fact the pictures below are automotive tires because they were the easiest to find.
Look on the sidewall of the tire for a raised block with four digits. It is usually mixed in with several other markings that I don’t discuss in this article. The first two numbers indicate the week the tire was manufactured and the last two indicate the year. The exception to this rule is tires manufactured prior to the year 2000 – they used 3 digit codes where the last number indicated the year.
the 12th week and the “04” means it was made in 2004
The “37” indicates the 37th week and the “5” means it was made in a year ending in “5”
Rotation arrows
Another critical mark on a motorcycle tire is the rotation arrow. Today’s specialized tires generally have a tread pattern that must go in only one direction in order to disperse water properly. Another reason to pay attention to the direction has to do with the manufacturing process. The tread rubber is initially a flat strip that is cut to length at an angle and then spliced together with the two ends overlapping and creating a hoop. Under acceleration a tire mounted backwards may try to “peel back” this splice.
Balance Marks
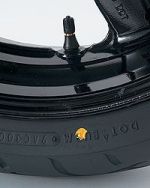
Most tires are pre-balanced by the manufacturer. During this process a yellow mark is put on the tire indicating the lightest spot (see pic). Some manufacturers also put a red dot on the tire indicating the high point. When mounting tires the best way to reduce balancing weights is to match the low spot on the rim to the high spot (red dot) on the tire. This is not always a known variable with a rim though, so the next best thing is to match the yellow dot to the valve stem. The reasoning behind this is that the valve stem is usually the heaviest part of the rim, and the yellow dot represents the lightest part of the tire.
Wear Indicators
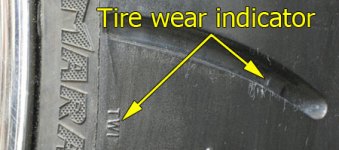
Monitoring your wear indicators is the key to making sure you’re riding on safe tires. You can check these by looking closely at your tire near where the sidewall meets the contact patch of the tire. Some manufacturers use raised triangles, some print the letters “TWI” (see pic) – whichever your tire has it will be raised/printed in the rubber. When you find this mark look across the contact patch of the tire and recessed into the treads you will find the actual wear indicators. When these marks are equal to the tread, it’s time for new tires.
Break in Period
New tires should be ridden cautiously for the first 100 miles or so until the entire tread surface gets scuffed up. This 100 mile figure is a conservative estimate, but it has a lot to do with what kind of riding you’re doing during break-in. If you can take the bike out on a safe but curvy road (preferably one you’re familiar with) you can likely break new tires in within 25 miles, but to be on the safe side this 100 mile figure is a good number to shoot for. There are a few different reasons why this is necessary:
- Tire manufacturers use a release compound when making tires in order to be certain they will come out of the tire mold. This is the equivalent of using cooking spray to make sure things won’t stick to a pan, so you can see how this stuff would be slick.
- Some tire manufacturers will put an additional coating on tires to help prolong their “shelf-life”. This creates the same sort of problem caused by the mold release agents we mentioned already.
- During the mounting process there are lubes used to ease the process of getting tires on and off the rim. Sometimes these lubes can drip or run onto the tread portion of the tire even when people are being careful during the mounting process. This can be dangerous for obvious reasons.
Tire wear
Rather than reinvent the wheel (no pun intended), read this great article from Chet @ Rattlebars.
Radials vs Bias-Ply
Information courtesy of Handler from the VTXOA
The following information relates primarily to motorcycle applications but may be applicable to other vehicles as well.
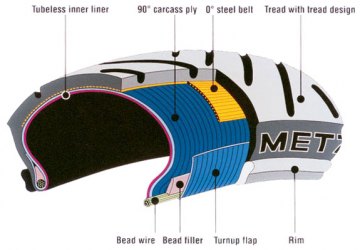
Radial tires are only available in a tubeless configuration. Bias-ply tires can be had in either tubeless, or tube type. Tube type tires can’t hold air without a tube because the bead is not designed to seal against the wheel efficiently as it does on a tubeless tire. Also, the tire itself is not designed to hold air as some air can escape through the tread. The primary difference between radial and bias-ply is that a radial can sustain a much higher speed rating because the radial tread design generates much less heat than a bias-ply design. Another big difference between radial and bias-ply is in performance. A bias-ply is a very strong tire often (but not always) with a very stiff and strong sidewall. They are very durable and are a real working tire. A radial is a lighter tire by design and is geared around performance with a softer and more responsive sidewall and tread. For example, all sport bikes run a radial tire due to performance and speed rating requirements while many cruisers run bias-ply tubeless tires because their top speed is not very high and the performance requirements of a Harley type cruiser are not very demanding on a tire. Bias-ply are also a bit cheaper to buy than radials due to manufacturing costs. The VTX 1800 uses a radial due to its higher speed and the need for a better performing tire. The 1300C uses a bias-ply tubeless tire and the 1800S uses a bias-ply tube type tire.
Current bias ply tire designs are much different from the tires of old and are much more like a radial in design and performance. As a result, some of the old rules no longer apply – this is according to several of the major tire companies.
Fact: it is ok to mix different brands of tires on the same vehicle.
Fact: It is ok to mix radial and bias-ply as long as the radial is on the rear.
One other point that is often discussed is the use of tubes in radials and in bias-ply tubeless tires. It is thought that running a tube in a radial tire is a bad idea and indeed most tire manufactures frown on this practice. However, in real life situations, 240 radial tubeless tires have been run for years with tubes on many custom bikes. Anytime you see an old school custom with a spoked wheel on the back, these bikes are using a 240 tube within that tubeless tire due to the nature of the spoked wheel and its inability to hold air. I have done this myself with no ill affects. In this situation the tube also gives you an option when a perfectly good radial tire gets a puncture and won’t hold air. Likewise, a bias-ply tubeless tire can accept a tube just like its bias-ply tube counterpart. In fact, these tires are almost identical apart from the tube/tubeless designation.


Thanks for the page on tires. It was very helpful knowing what I was buying. Dealer wanted me to go with Dunlop’s and I didn’t want them because I was seriously considering either Avon or Metzler. Based on the info from your page I went with the Metler, from another dealer, ME880 Marathon’s. The Avon tires don’t seem to have a speed rating, or maybe I missed something. Regardless, you have been a great help.
Thanks,
John R.
[…]In researching the difference between bias and radial tires I ran across these articles that I thought were interesting.[…]
Just thought I’d add some corrective info – no tire manufacturer uses release compounds in their tire manufacturing process anymore. The reason new tires are more slippery is simply that they’re silky smooth – they get more rugged up after you “scrub them in” and give better grip.
Yes, we do use a release compound when molding tires. I make tires every day and personally run a mold.
I second that… I have worked with tire companies that make tires for cars, bikes, planes, etc. ALL tires are built w/ a releasing agent.
Bias/Radial tires-what makes a radial tire work so well is soft flexing side walls and a harder compound in the tread area, this works well with four wheels. If you are old enough to have been around when they were doing the motorcycle development, it took some time, they were wobbling. To solve this problem they went to shorter stiffer side walls, witch required softer tread area to handle properly. This makes me wonder are motorcycle radials truly radials, maybe, maybe not. I have put bias tires on motorcycles I have owned that came with radials (proper sizing is not always available to do this) and had good handling and 25-30 % better mileage. My motorcycle experience is extensive, street riding and racing for over fifty years. Just my opinion–Bill
Thanks all for the great forum! I agree with Treatster! New bias ply tubeless are great tires.
I’m Running bias ply on 02 VTX1800 Spoked with tubes. Replaced Bad Metzeler Marathon (Brazilia). with New Shinko Tour Master! Love this tire! Running Dyna Beads in the front tube! Rear is Dunlop OE with tube and static balance.Spokes are all set with 4 ft/lb tension torque wrench. A Flapper style cleaner on a cordless drill and an electric tooth brush work great cleaning the spoke wheels. 33 psi both.
Broka If you want better handling and mileage you need to bump that air pressure up–38 to 42lbs–I’m about 170 lbs on a 560lb cycle and am happy with 40 frt / 42 r–Treaster
[…] He has a a website with a Tires 101 page. […]
[…] Here is a link you should read: […]
Most educational article on tires I have ever seen. I feel like a “tireman”. Thanks, Joh
[…] To understand your tire numbers […]
My 1300C has faint yellow dots on the wheels, however they are an inch or so from the valve stem. Do I line the tire up with the valve or the yellow dot on the wheel? Just noticed it when I was polishing the wheel and almost rubbed it off!
Some knowledge about Metzeller ME 888 and 880 and the red dot, According to manufacture info the red dot should be the lightest point on these tires. In real life this is absolutely not true. The red dot seems to be random. I balanced lot of rims and mounted lots of Metzellers. It newer matched the lightest point. nor the heaviest. My tip for those who mount their tires themselves: make sure You find the heaviest point or Your rim, mount the tire and start rough balancing by turning adjusting the tire position on the rim. (Don’t inflate it, Just use some silicone spray., it will rotate). Only after matching the perfect combination, inflate and balance it perfectlu.