Fork Spring Replacement (VTX 1300)
Posted by Bare | Last Updated August 17, 2013This is a walk-through for changing the fork springs on the VTX 1300. Most dealers will charge more than the springs cost to change them, so here is the process to do it yourself. This is a great mod for a reasonable price and for what’s involved (cost & time), I think that every bike would benefit from it.
This is a simple job that requires only a few basic tools and a torque wrench. As always undertake this project at your own risk, but with a little common sense this isn’t very hard to do. I’ve done so many of these that I can swap them in about 20 minutes, but I would say a first-timer should expect to spend about 45 minutes to an hour on this project.
Required tools/Materials
- Progressive 11-1126 fork springs
- A few ounces of your preferred fork oil (10W is recommended). One quart will do several bikes.
- 6mm allen socket
- 17mm socket
- Ratchet & (optional) extension
- Torque wrench capable of 17 ft/lbs
- Wire coat hanger
- Motorcycle lift
Process
Disassembly
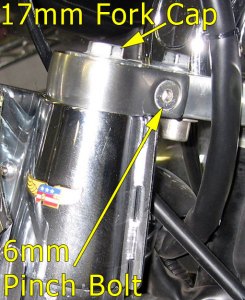
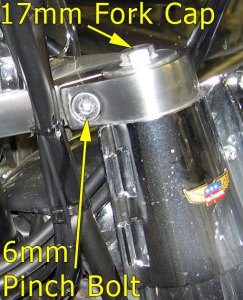
With your tools gathered, you’re ready to get started. Get the bike up on the lift and make sure it is secure. You’ll have to push down on the forks later to compress the new springs so you want to be certain that the bike is stable on the lift. Now cover the tank and front fender with clean, soft towels to protect them in case you drop something. Once all this safety stuff is done, break the top pinch bolts loose using a 6mm allen socket. You don’t have to remove these bolts, just loosen them a couple of turns.
With the pinch bolts loose you can remove both fork caps using a 17mm socket. Remember to be careful doing this, the caps are under spring pressure and will pop up when the threads are finished. Also be careful not to smash your hand or fingers between the ratchet and the handlebars.
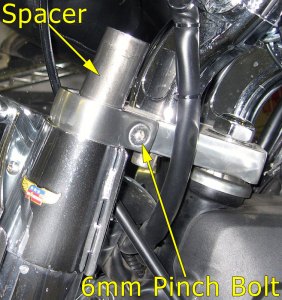
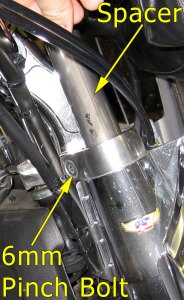
With both fork caps removed, you can remove the spacers from each tube and set them aside:
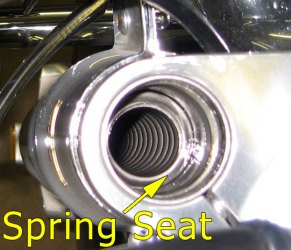
Looking down into each tube you will see the spring seat (it’s a big washer) sitting flat on top of each fork spring. Bend your coat hanger so that it is straight with a little hook on the end. Now use it to reach down into each fork tube and remove the spring and spring seat. Keep in mind that each spring is in oil so the slower you remove them the less oil you will spill and the less oil you will have to add back to the fork tubes later. It also helps to have a shop towel handy to help minimize any mess during this step.
You have now removed the springs from each fork and can move on to reassembling everything with the new springs.
Reassembly
At this point you can easily see the difference between the old springs and the new Progressive springs:
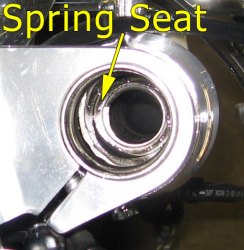
Drop both new springs into your fork tubes by putting the end with the "closer" coils down (left side in the pic above). The next step is important – drop the spring seats into each tube and make sure they are FLAT on top of each spring. Use your finger, a screwdriver, your coat hanger, or whatever – just be absolutely certain that they are flat. They should look just like these pictures:
Before you continue, take a moment and put some fork oil in each tube to compensate for what came out on each of the old springs. Usually this takes no more than 1 or 2 capfuls of fork oil per tube. Use your best judgment based on how much ran off the springs after they were removed.
With the oil added, drop both spacers back into the tubes:
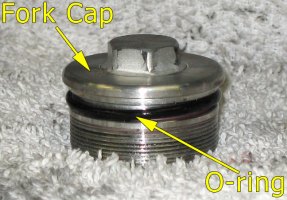
Now take a drop of fork oil on your finger and coat the O-rings on each fork cap:
Here is the toughest part of the whole process – compressing the fork springs to reinstall the fork caps. Put the fork cap on top of the spacer tube. Carefully center the cap on the tube so when you press down it gives even pressure and doesn’t fly off to one side. Press down and carefully thread the cap back onto the tube, it is EXTREMELY important to be careful doing this because it is easy to cross thread the fine threads on these caps. If you accidentally cross thread the cap you will ruin the fork tube and that is an expensive mistake. If you have any uncertainty about whether the cap is cross-threaded, then back the cap off and start over. When the cap is threading in properly, it should turn easily despite the spring tension.
With both caps threaded down, torque them to 17 ft/lbs, then tighten both upper pinch bolts to 17 ft/lbs as well.
That’s it – you’re done – congratulations!
Afterthoughts
In my opinion, dollar-for-dollar, this is one of the best mods you can do for the bike. There may be better mods out there, but not many that are this inexpensive with such noticeable results. You will immediately be able to feel the difference in the bike just when you sit on it. For a small price you just improved handling, braking, cornering clearance and comfort. There aren’t many mods that can boast such a wide variety of positive results for under $100. If you do this I think you’ll agree!
Video courtesy of Big Bad
This video is intended to give you an idea for the kind of things you’ll see and do during this job. It is not intended to replace the above instructions for anyone except experienced mechanics because the text above contains important details.


glad I found this a local shop was going to charge 4 Hours labor to do this
[…] Bare's site he says several ounces: https://tech.bareasschoppers.com/susp…ment-vtx-1300/ Curt E is online now Quote Quick […]