Remove/Install Front Tire (VTX 1300)
Posted by Bare | Last Updated May 27, 2014This is a basic walk-through for removing/installing the front wheel on the VTX 1300. The pictures for this article are primarily from the C model, but the procedure is the same regardless of which model 1300 you have. As always undertake this project at your own risk, but with a little common sense this isn’t very hard to do.
Required tools/Materials
- Motorcycle lift
- Torque wrench capable of 16 to 43 ft/lbs
- Deadblow/rubber hammer or hammer and block of wood
- 6mm and 17mm allen sockets
- 7/8″ or 22mm socket
- Something to block the rear wheel (2×6, phone book, bricks, whatever)
Removal
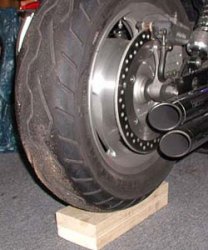
Raise the bike on the lift and block the back wheel so the bike won’t rock off the lift when the front wheel is removed.
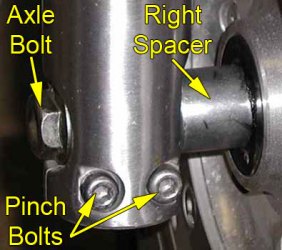
Use a 6mm allen socket to break loose the pinch bolts on the RIGHT side only. With those pinch bolts broken loose, use the 7/8″ or 22mm socket to loosen and remove the axle bolt.
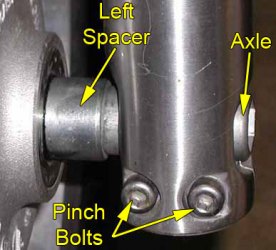
With the right side complete, break the left side pinch bolts loose and remove the axle altogether. You may need a dowel or broomstick to drive the axle out. Whatever you use, make sure it’s soft enough that it won’t damage the threads for the axle bolt.
Be aware that once the axle is out, the wheel will fall – so be ready!!!
With the wheel out, remove and inspect the spacers. Take note that they are different sizes (right bigger than left). I usually put my axle and the spacers back together so nothing gets lost while I swap tires, etc. This picture is from an 1800 but it’ll give you an idea of what I mean. It also helps ensure that no parts get lost.
While everything is broken down do some inspection to make sure you’re riding safe – check the axle, bearings, dust seals, bolts, etc. If anything seems worn or faulty then replace it – isn’t your life/safety worth more than a $.50 bolt or a $15 bearing?
Intermission…
Now is the portion of the write-up when you do whatever you were removing the wheel for in the first place…
Install
This is pretty much the reverse of what you just did to remove the wheel. If for any reason the rotor needed to be removed (some shops will remove it to swap tires) make sure that it is reinstalled with red loctite and torqued to 31 ft/lbs. The manual doesn’t mention loctite on these bolts because they “require” replacement and new bolts come with the loctite on them. If your bolts look fine then they should be ok to re-use (with loctite). If you don’t feel comfortable re-using them, then replace them.
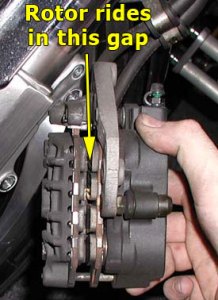
Now put your wheel spacers back on properly (right bigger than left) and lift the wheel into place. When getting it into place, the rotor must be inserted into the brake caliper properly. The pic to the right is an 1800 caliper, but the idea is still the same – get the rotor into the caliper between the 2 brake pads. Since it’s not necessary to remove the caliper, just make sure it lines up properly as you lift the wheel into place.
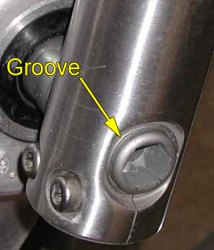
With the tire in place and the rotor inserted into the caliper get the axle started through the rim and use a deadblow/rubber hammer or a hammer and block of wood to drive it through. It’s important not to use just a regular hammer or you will round over the edges of the 17mm axle hole. If you do that, you won’t be able to get the 17mm allen in there to torque the front axle. If you look at the axle you will see a small groove on the left side where it seats into the fork leg. You want to drive the axle in until that groove is flush with the edge of the indent on the fork leg. It should look just like the picture below – you will see the groove with the axle out and it should help you better understand.
With the axle/groove in place, tighten the pinch bolts on the left side only to 16 ft/lbs.
Now reinstall the axle bolt on the right side and torque it to 43 ft/lbs. If for any reason the axle slips in the left pinch bolts, hold it with a 17mm allen socket. With the axle bolt torqued in place, tighten the right side pinch bolts to 16 ft/lbs.
That’s it – you’re done – congratulations!
Afterthoughts
This is a fairly easy job for most riders and it can cut your tire changing costs in half. More money = more chrome and that’s a good thing!
Video courtesy of Big Bad
This video is intended to give you an idea for the kind of things you’ll see and do during this job. It is not intended to replace the above instructions for anyone except experienced mechanics because the text above contains important details.


The manual says to do that to be certain that the brakes are aligned, they say the same thing for the 1800 as well – but the axle bolt aligns the right side and aligning the groove in the axle aligns the left side. I’m honestly surprised that a company like Honda would recommend a procedure as inaccurate as “bouncing the front end”.
Thanks for the comment though! 😉
thanks again.
thanks a whole lot, this info. was greatly helpful. my breaks were dragging because my pinch bolts were’nt tightened correctly. big difference, thanks again, mike.
I’ve been told to apply some grease to the axle before putting it all back together again. Probably a pretty good idea dont you think?
While I do recommend applying a very thin film of moly paste to the rear axle during reassembly I don’t usually recommend the same for the front. It is my experience that the rear axle has a higher tendency to “stick” in place than the front, and because of exhaust clearance it is typically harder to remove. The front is easily accessible and sticks much less often so I don’t bother. If it makes you feel better to do it I don’t see the harm, just be sure you use a very thin layer. I also highly recommend moly paste over typical grease – not so much because of the moly, but because the paste really stays put.
thank you I was getting frustrated it would not spin freely well some how I had switched spacers runs great now
This was extremely helpful, very well and clearly written. I like many others appreciate being able to save money by being able to do things by oneself, but most importantly the feeling of satisfaction following the ability of being able to achieve this is the best! Thank you!
I am over in Lafayette, La and have a bad ass Fury. I’d love to come to your shop sometime. Maybe we can do some work on my bike. Contact me via email and I’ll gladly share pics.
Thanks, I was worried about the gap on the left side between spacer and fork. Should have looked before I took it apart! I was able to pull the fork in, but that didn’t seem right!! Major headache saver here!!!