Remove/Install Front Tire (VTX 1800)
Posted by Bare | Last Updated May 27, 2014This is a basic walk-through for removing/installing the front wheel on the VTX 1800. The pictures for this article are primarily from the C model, but the procedure is the same regardless of which model 1800 you have. As always undertake this project at your own risk, but with a little common sense this isn’t very hard to do.
Required tools/Materials
- Motorcycle lift
- Small flat screwdriver
- Torque wrench capable of 16 to 67 ft/lbs
- Deadblow/rubber hammer or hammer and block of wood
- Red loctite
- 6mm and 17mm allen socket
- 12mm and 7/8″ or 22mm socket
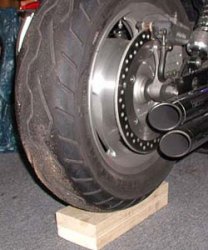
- Something to block the rear wheel (2×6, phone book, bricks, whatever)
Removal
Raise the bike on the lift and block the back wheel so the bike won’t rock too badly when the front wheel is removed.
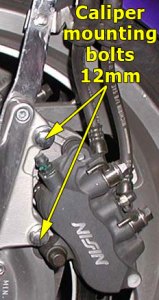
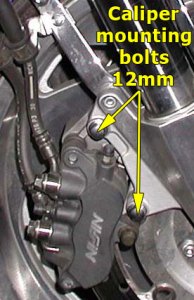
Remove the brake calipers from both sides using a 12mm socket:
With both calipers off the bike, don’t let them just hang from the hoses. I use a bungee cord to hook them to the bike and take the pressure off the brake lines.
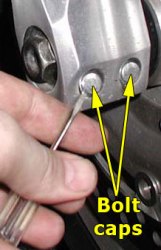
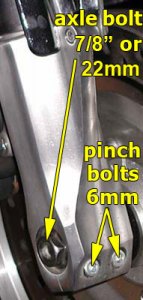
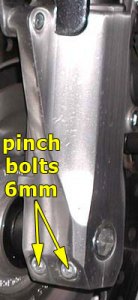
Now use the small screwdriver to remove carefully (so you don’t damage them) the 4 pinch bolt “chrome” caps from both sides of the fork legs.
Once all 4 caps are off, use a 6mm allen socket to break loose the pinch bolts on the RIGHT side only. With those pinch bolts broken loose, use the 7/8″ or 22mm socket to loosen and remove the axle bolt.
With the right side complete, break the left side pinch bolts loose and remove the axle altogether. You may need a dowel or broomstick to drive the axle out. Whatever you use, make sure it’s soft enough that it won’t damage the threads for the axle bolt.
Be aware that once the axle is out, the wheel will fall – so be ready!!!
With the wheel out, remove and inspect the spacers. Take note that they are different sizes (left bigger than right). I usually put my axle and the spacers back together so nothing gets lost while I swap tires, etc.
While everything is broken down do some inspection to make sure you’re riding safe – check the axle, bearings, dust seals, bolts, etc. If anything seems worn or faulty then replace it – isn’t your life/safety worth more than a $.50 bolt or a $15 bearing?
Intermission…
Now is the portion of the write-up when you do whatever you were removing the wheel for in the first place…
Install
This is pretty much the reverse of what you just did to remove the wheel. If for any reason the rotors needed to be removed (some shops will remove them to swap tires) make sure that they are reinstalled with red loctite and torqued to 14 ft/lbs. The manual doesn’t mention loctite on these bolts because they “require” replacement and new bolts come with the loctite on them. If your bolts look fine then they should be ok to re-use (with loctite). If you don’t feel comfortable re-using them, then replace them.
Now put your wheel spacers back on properly (left bigger than right) and lift the wheel into place. Get the axle started through and use a deadblow/rubber hammer or a hammer and block of wood to drive it all the way through until it’s flush with the fork leg (see pic to right). It’s important not to use just a regular hammer or you will round over the edges of the 17mm axle hole. If you do that you won’t be able to get the 17mm allen in there to torque the front axle.
It is important to pay attention because sometimes the fork legs are slightly different lengths (this is due to slight misassembly of the fork inners). You may need to use something to compress one fork to line up with the other before you can drive the axle through. If your forks are misaligned then you should check out this section of the fork springs swap which outlines how to adjust the fork caps and locknuts to get both forks the same length. This is important because misaligned forks can put undue stress on fork seals and wheel bearings and that stress can result in premature failures.
With the axle installed, put the axle bolt in on the right side and torque it to 67 ft/lbs. With the axle bolt torqued down, tighten the pinch bolts on the right side only to 16 ft/lbs.
Do NOT tighten the left side pinch bolts yet. Reinstall the brake calipers on each side. You may need to use a screwdriver or C-clamp to compress the pistons in the calipers enough to give you space to get them back on.
Closely inspect the 12mm caliper mounting bolts. If they look damaged replace them. If they look fine then clean off the old loctite and use red loctite when reinstalling them to 22 ft/lbs.
Now step away from the service manual and use a procedure recommended by Showtime56 of the VTXOA.
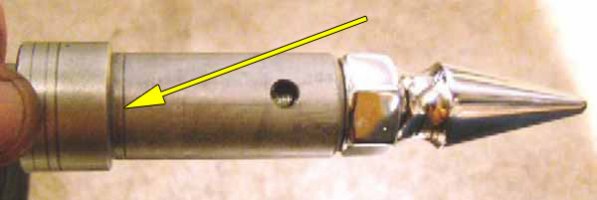
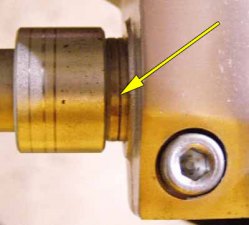
There are problems associated with brake rotor drag, specifically on the left of the bike. These problems arise from improper spacing when installing the axle and tightening the axle pinch bolts – specifically on the left side. Using original OEM parts, the right side dimensions are set and cannot be adjusted, so the right side brake clearance is not an issue. With this said, let’s look at this groove in the left side of the axle:
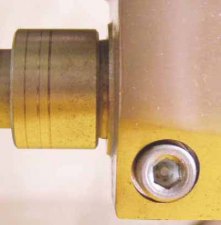
That groove is the “guide” for how far the axle should be seated in the fork. The pictures below are of the installed axle without the rim/tire – this is strictly for the purpose of this write-up so you can easily see what you’re dealing with. The installed axle in the pic on the left below is incorrect, but it lets you see where the groove is in relation to the fork. It is incorrectly installed because the axle is pushed in too far – it would also be wrong if it were too far out so you couldn’t see the groove at all. The pic on the right below is what the axle should approximately look like when installed. The groove should be just against the inside of the fork leg. The exact location of this groove will vary slightly from bike to bike.
| Incorrect | Correct |
What you want to do is spin the wheel and lightly tap the left fork leg in or out to make minor adjustments. It doesn’t take much as you’ll find that a slight variation to either side of the groove will result in a lot of brake dragging. Continue to spin and adjust in tiny increments until you get several rotations of the wheel with one good spin. Once you have it “dialed in” to your sweet spot, make a note of the location for the next time you have to do this. Tighten the left side pinch bolts to 16 ft/lbs and reinstall all the “chrome” bolt covers.
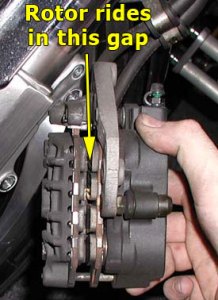
Using this procedure I’ve never had any clearance issues, and you shouldn’t either, but always visually inspect your clearance between the brake disc and the caliper mounting bracket on each side to make sure that it’s not rubbing. Your clearance should be at least .7mm (.03″).
That’s it – you’re done – congratulations!
Afterthoughts
This is a fairly easy job for most riders and it can cut your tire changing costs in half. More money = more chrome and that’s a good thing!


Thanks Bare, great write up!
I want to thank you for giving me a very good view and understanding of how to remove my front tire on my VTX. Thanks again and God Bless!
GREAT write up! I have used this twice now without fail. x2 on saving $$$ for more chrome!
Bare, I’ve been taking advantage of several of your postings, and I gotta say that it’s SO refreshing to see great people doing great things. Documenting all of this tech stuff takes a considerable amount of time and effort, and I greatly admire guys like yourself who are making our world a better place, one reader at a time. Seems like something happened to our wonderful country 20 years ago, when too many of our citizens directed their energies toward evil (spamming, writing virus attacks, scams, phishing, and general destructive or self-serviing acts). When I leverage posts like yours, I can’t help but remember the good old days when most folks were like you. Nowadays contributions like yours are rare. From me and my many friends who ride VTX’s, thanks so much for doing all of this hard work. All the best Bare!
Mike- Working at my place tonight – not at Jon’s and as usual, used your sight for the great resource it is to double check my work. Thanks bro- nice having you on the web!
Thanks for having this. It was a breeze!
I don’t think the front brakes were ever centered right.
It rolls a lot easier.
Thanks again Bare
Hey thank’s man there was a lot of stuff here I did not know about,very helpful!!
Iron horse is the life. Iron horse is the wife.
themule
This post just saved a rotor !!!! Thanks
This is my first VTX 1800. I would like to say thank you for taking the time to go through step by step on how to remove the tires on the VTX. I prefer to do the work myself on my bike. With that, I like to do the job right without cutting corners. Your write ups are better than most manuals! Thanks again!!!!!!1
Good instructions. Just did my own tire change on my 06 N. I only removed on caliper, and did so after the tire was free. This kept me from having to tilt the fender.
Thanks for the write up on the brake drag…..
Followed the directions to a T, the left side does not drag at all, but the right side does. 🙁
Had my tire changed at the local dealer(sealer) and my left break was dragging.
I am going to print this out for the know it all’s at the dealer and make sure they do it right the next time. I fixed this time Just loosened the clamp bolts and pushed the fork out till I got the results I was looking for.
Thanks.
Thanks Bare for the great write up! You saved my rotor…the installers at the dealership pushed my left fork flush against the spacer and ignored the groove. It’s great to have such a fantastic resource on the web for my VTX!
Like Kevin, I loosened the clamp bolts and pushed the fork until I got the desired spacing.
The dealer will be seeing this article…they need to be educated.
First time taking off front tire on my 02 1800S. It says the pinch bolts take a 6mm allen but a 6mm allen won’t fit mine, ended up being a 1/4 allen that fits mine.
Hondas are metric bikes, so every stock fastener on the bike is metric. Unless you have aftermarket forks or poor quality allen wrenches, the 6mm is what fits.
Big Thanks! I always use B/C for reference. Just finished removing a crappy crooked Brazilian made Metzeler -Marathon 880.
New Shinko -230 Tour Master is very nice handling, true running Tire! 02 VTX1800S feels Good again! Metzeler owes me $200!
new front tire, new brakes, new fork seals. You guys saved a small fortune in labor.
Awesome writeup, thank you for sharing! First time replacing the front tire and I wanted to do it myself. Couple of comments, the small chrome caps are only like an 1/8 of an inch thick so you don’t have to dig down to pry them out, I didn’t realize this until I took a closure look and could see the seam between the cap and the bolt. Also, I wasn’t too sure about the last section of your write-up, left brake rubbing due to left fork not adjusted correctly. Sure enough, when I took the bike for a spin the left brake was rubbing so I re-read your section and like you noted, slight adjustment and all is good.
Thanks Again
Rangeleywood
NH
I removed the front and rear wheel and replaced the tires on my VTX 1800. This information was very helpful and put me back on the road. At first I was unsure of a few things like the torque specs and bearing spacer. The illustration helped me out. I really appreciate the info.
Thanks
Thanks for all the time you took to help out. I replaced the front tire and the fork seal. This site made it doable for me. I never get work done if I can do it.
Thanks alot for the great info, gonna try this today and hopefully be out riding. Greatly appreciate your help. Wish you all safe riding
Thanks you sire, this is greatest site for help. Just want to add to y’all when i had my 1800 up for tires i looked and changed shaft drive gear oil again, called honda for there 8oz bottl @ $9 then called other cycle shop they had bell-ray 32oz for $14 it only takes 6 oz. Honda says to chage every 10k but i have and can do so eazy & cheap every other oil change { 4k }
( . ) ( . ) more lap dances or chrome ! Daddy
6/12/23
Very informative and precise. Thanks so much.
Have two suggestion’s;
I replaced both tires/wheels on 2003 1800c VTX.
I have a motorcycle Jack and when I raise the bike
I added two hydraulic car jacks with 2×4’s on both
Sides of the motorcycle Jack for more stabilization and safety
In case the motorcycle Jack would go down.
Next I suggest a helper when your reattaching the wheels,
He/she can hold the wheel up in place while you tap the axel through.
Tim
This was very informative
Wish I would have read this before I changed my tire. lol Thanks