High Wattage Headlight Problems
Posted by Bare | Last Updated January 20, 2011You may be reading this wondering “Why can’t I run a higher wattage headlight bulb?” You might be reading this wondering “How can I run a higher wattage headlight bulb?” Or you may be reading this thinking “I am running a higher wattage headlight bulb… What’s the problem?” Well, if any of these situations fit you, then this article is worth reading so that you don’t end up stranded on the side of the road.
The VTX (and most bikes) comes from the factory with a 60/55W bulb. What this means is that your regular headlight is 55 watts and your high beams are 60 watts – simple enough to understand. What some people don’t understand is that the electrical system that supplies power to this bulb is designed around that 60/55W bulb and the current it draws. Many people figure that if the H4 plug fits a 60/55W bulb base then they can just replace the bulb with a higher wattage bulb that still has this H4 base and all will be fine. This could not be further from the truth!
Now I’m not saying that if you swap to a higher wattage headlight bulb your bike will explode, or that tomorrow you’ll go out to hop on the bike and the motor will fall out of the frame. What I’m saying is that without proper precautions for the electrical system on the bike, which is not designed to handle additional current draw from higher wattage bulbs, you will begin to melt parts until they fail. This melting process could take months or even years, but the problem is that you’ll never know a part has failed until it’s too late. This failure could take place during a quick trip to the grocery store, or thousands of miles from home on an extended trip. The only certain thing is that if you’re running a higher wattage headlight bulb then eventually it WILL happen. This is not a matter of if but when.
Cause
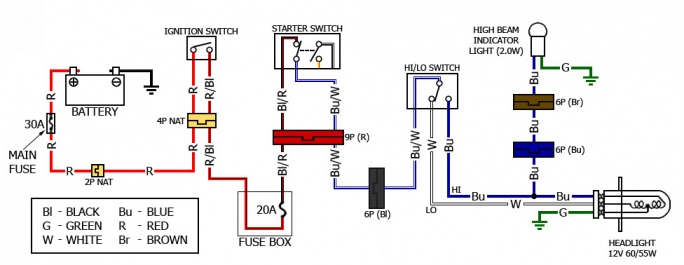
To better understand the root of the problem let me explain how power gets from your battery to the headlight. It sometimes helps to think of electrical circuits in terms of water flowing through pipes, going from one point to another. This simplified schematic will help illustrate what I’m explaining:
Power starts out at the battery where you have a big red wire connected. That red wire passes power through a 30A fuse which is located under your left side cover. Power continues past the fuse to a small 2-pin connector and then through a 4-pin connector that is located under your seat. From this 4-pin connector power flows to your keyed ignition. When you turn the key on, you allow power to run through the switch and into a red w/ black stripe wire that runs back through the same 4-pin connector and then over to the regular fuse box under the right side cover. From the fuse box the power runs through a 20A fuse and exits the fuse box as a black w/ red stripe wire. This wire runs into the headlight bucket where it passes through a 9-pin red connector and then runs over to the right switch housing. In the right switch housing this black w/ red stripe wire normally passes power across a tiny contact in your starter switch that is roughly equivalent to a 22 gauge wire. Power passes across these contacts and into another wire which is blue w/ a white stripe. This blue w/ white stripe wire then runs back into the headlight bucket, through that same 9-pin red connector from before and then through a 6-pin black connector. From this black connector the wire runs into the left switch housing where it provides power to the high/low beam switch. At this point you select whether the power goes to the high or low beams with the switch. If the switch is on low beams, then power travels from the high/low switch through a white wire that goes back into the headlight bucket and into the headlight bulb’s low beam filament. If the switch is on high beams, then power travels from the high/low switch through a blue wire that goes back into the headlight bucket and into the headlight bulb’s high beam filament. For arguments sake, this blue wire also connects to your dash panel light to let you know your high beams are on.
Now, with that lengthy explanation finished (hopefully the schematic helped!), you can focus on the problem area. Every part of this system is solid enough to support the headlight except that tiny 22 gauge contact I mentioned in the starter switch. This small contact is how the headlight turns off when you hit the starter. Pushing the starter button disconnects the contact which stops the flow of power across it and in turn cuts power to the headlight as long as you’re pressing the starter to crank the bike. This tiny contact can handle between 1 and 7 amps of load (depending on conditions) and the stock headlight bulb pulls roughly 5 amps by itself on low or high beam. So you can see that there’s not much overhead built into this switch.
Now most people wanting to go to a higher wattage bulb will likely replace the stocker with at least a 100 Watt bulb which pulls over 8 amps and easily overloads the contact in the switch. When all this extra current starts flowing through that little contact in the starter switch, it struggles to handle the extra load and it heats up. As it heats up, it slowly begins to melt the starter switch. As I said earlier, this is a slow process. Some people have problems within months while for others, it takes years. The only sure thing is that if you’re running a higher wattage bulb it is happening, and one day it will melt the switch enough to cause problems.
If you really want to replace the bulb with a higher wattage light then read on to see how to fix this problem before it happens to you.
Before moving on I would like to interject one additional piece of information – incorrectly wired lightbars or other accessories can cause these same problems. I’ve seen this mistake many times. Usually it is made by an inexperienced wrench at a dealership. If you want to be sure you’re safe, you need to check in your headlight bucket:
- Check your headlight bulb to ensure it is the proper wattage (60/55W)
- Check if you have driving lights, a lightbar or any other accessories that are getting their power from the blue w/ white stripe wire forward in the circuit above. Drawing power to trigger a relay is perfectly fine, but actually supplying accessories with power from these wires will cause the same problem to occur. If you’re unsure about any of this then spend some time reading Chet’s Foglite pages and double check your wiring to be sure you’re safe.
Solution
If you really want to run a higher wattage headlight bulb in your stock housing but you don’t want to get stranded on the side of the road somewhere late at night, here’s a workaround that should remove almost all the load from the starter switch and help ensure long life from the switch.
Required Tools/Materials
- Typical automotive relay (available at most auto stores)
- Wire cutter
- Wire stripper
- Small bit of 18 gauge (or heavier) wire
- Crimp on spade terminals
- Soldering iron & solder
- (Optional) switch
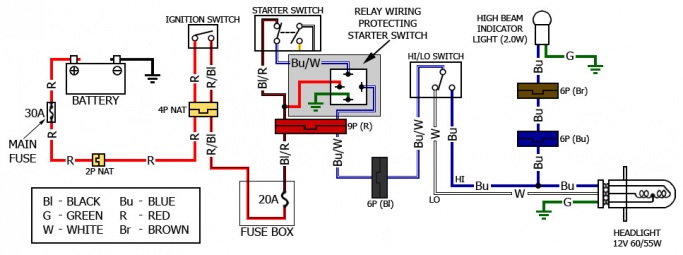
Big thanks to Chet @ Rattlebars for the idea for this workaround. Check out the diagram below to see how to go about this.
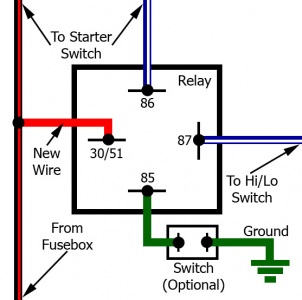
The part you’re adding is in the gray box. I have a detailed version of just the relay below. By doing this you are making the starter switch do nothing more than trigger a relay which then pulls power to the headlight from the same place it was drawing from before, but without running all that current through the starter switch! This is so simple, Honda should have done this from the factory. (Thanks again, Chet!) Basically you’re just rewiring a bypass for the starter switch because everything else remains unchanged. Wiring it this way means you don’t have to worry about melting that switch or getting stranded ever again.
Green is your ground, black w/ red stripe provides power (from the headlight fuse) and the blue with white stripe is what provides power to the headlight hi/low beam switch. Tap into the black w/ red wire to get power, then cut the blue w/ white wire and attach it to the relay. Now you’re done.
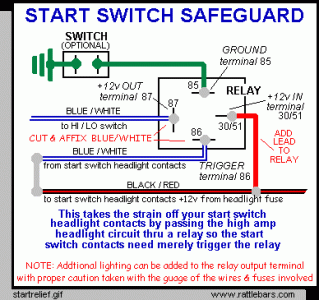
For anyone more familiar with Chet’s diagram here it is:
This does the exact same thing, it’s just Chet’s picture instead of mine.
If you’re having trouble figuring this all out then consider reading Chet’s Relay Basics 101 page. It is packed with great information to help you better understand what you’re doing.
Afterthoughts
This is a quick and cheap fix to a problem many guys don’t even know exists. This cheap and simple fix is important since a new starter switch will cost you $60-$70. I want to specify that this is not strictly a VTX problem. Honda has used this same starter switch on many, if not most, of their bikes for years. So even if you’re riding a different Honda you should still read, consider this, and check your service manual or wiring schematic to decide if this is something you deem necessary.
One thing I haven’t mentioned which may make even more people consider doing it, is that the melting starter switch, while primarily an accessory caused problem, can also be caused by normal wear and tear. It’s not as common to have meltdowns without causes, but over time, the contacts in the switch can begin to oxidize. The oxidation makes it difficult for the headlight to get the power it needs through the switch and overheating can occur. This is the reason why Chet has made pages like this (which walk you through cleaning the switch to prevent these problems):
http://www.rattlebars.com/mtz/starter.html
The last thing I want to mention is that there are a lot of alternatives to swapping out to a brighter headlight bulb. Everyone knows there are tons of driving light and lightbar options out there, but you now also have the benefit of falling prices on things like HID lights. HID is a pretty great technology. It uses a ballast similar to a fluorescent light and puts out significantly more light while using less power than a traditional incandescent bulb. An HID replacement for the stock headlight can be bought for under $100 (cheaper than a lightbar) and puts out considerably more light than any incandescent light I’ve ever seen – and it does this all while drawing less power!


The same problem occurs on the Honda VT1100 Shadow. Having Larger wires from the fuse-box to the relay, and the relay to the hi/low switch, and on to the headlight is also good. Key the relay with the juice from the Start switch (Right Bar) 100 mA vs 5+ Amps.
SUPPOSEDLY this is a STOCK Function in the Gold Wings, but I haven’t looked.
Ever sense my wife seen a bike one night with a the blue headlight she has been after me to install one for safety. Thanks now I know the in’s and out’s of the problem, and the fix.
Thanks
Mackey
very interesting read first year gold wings had this RLU reserve lighting unit my start stop switch stopped working so pulled it out of handle bars the contacts were ok but the wires were melted a little further away if you wiggled them you could get the switch to work.
now comes problem two I really think that problem one caused it I found an H4 80/100 watt bulb in a headlight circuit meant for 40/50 watt and I think it also caused failure of this RLU.
so this is my plan put in new start stop switch already ordered also bought a RLU on e-bay used but not melted and install a 40/60 watt sealed beam bulb then if that works I will try to put this relay in.