Rear Fender Removal (VTX)
Posted by Bare | Last Updated January 20, 2011This is a quick walk-through for removing the rear fender on a VTX. The pictures and information here are specific to an 1800 C model because that’s what I have, but the process is very similar across all makes (1300 or 1800) and models (C, R, S, T, N, F).
Required Tools/Materials
- 6, 8 & 10mm allen wrenches
- 12mm socket
- Socket wrench
- (Optional) socket extension (not necessary, but makes things easier)
- Tools to remove the seat
- Tiny screwdriver (for models with chrome covers on the bolts)
- Motorcycle lift
- Something to block the rear wheel with (2×6, phone book, bricks, whatever)
Process
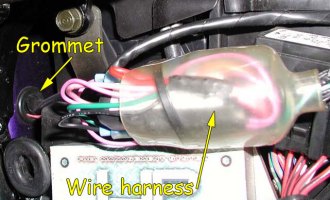
First things first, in order to remove the rear fender you need to remove the seat. With the seat pulled go ahead and pop off your right side cover to display your wire harness. The wires coming through the grommet in the fender are what runs your turn signals, running light and brake lights, they come through the grommet and into this bundle of wires (see pic to right). There should be 7 wires unless someone has changed something:
- Black w/ brown stripe – running lights
- Green w/ yellow stripe – brake lights
- Light blue – right turn signal
- Orange – left turn signal
- Green x 3 – grounds
Trace all these wires into the bundle and find and disconnect all the connectors. Unplug all the wires that run through the grommet so you can remove the rear fender. You can’t remove the fender as long as these wires are still tethered to the rest of the bike.
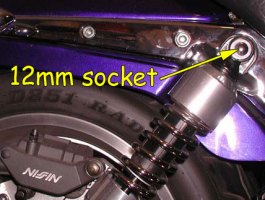
At this point let’s go ahead and get the bike up on the lift. With the bike raised support the rear tire with something solid (2×6, phone books, bricks, whatever) and take out both upper shock bolts with a 12mm socket (see pic to left). Once the upper shock bolts are removed you can slide the shocks off the top mounts – just be prepared that if there is any space between the tire and your “block” the swingarm is going to fall until it hits something. If you’re concerned about scratching the shocks or having them in the way you can also remove the lower 12mm shock bolts and then remove the shocks entirely.
Sometimes the rubber shock bushings can be extremely difficult to slide off, in these cases it sometimes becomes necessary to wrap a towel around something and do a little prying. I recommend that sometime before reinstalling the shocks use a little silicone grease (if you have it) or a drop of oil to lube the inside of the bushing.
Take a moment here and remove some (not all) of the blocking for the rear tire so that it lowers down a bit, this will help give you clearance for the actual fender removal. Just be cautious, the swingarm can only go so far before it hits the exhaust hanger bracket and basically “bottoms out”.
Now, with the 12mm upper shock bolt removed you will see that there is a 10mm allen head where the threads of the upper shock bolt were. Get your 10mm allen wrench and use it to remove the upper shock mounts from both sides. I have heard horror stories from other people about removing these shock mounts, I will say that every one I’ve ever removed was H-A-R-D to get out. In the past I’ve had to use a section of pipe as a breaker bar, being careful not to break my ratchet or knock the bike off the lift in the process. In more recent efforts I’ve switched to using an impact gun/driver to take the hassle out of this. If you’re using a breaker bar or a pipe extension then I’ll warn you to be careful, when it finally does break loose you may bust your knuckles on something – don’t ask me how I know… 😉
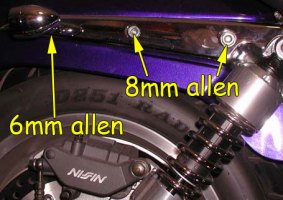
With both of the upper shock mounts removed you can move on to the fender rails. Using an 8 and 6mm allen break all 3 of these bolts loose but remove only the front and back fender rail bolts, leaving the middle 8mm bolt in place. With the front and back bolts removed the chrome fender rails will come off while the middle 8mm bolt will still hold the fender itself in place. Some VTX models have small plastic chrome covers on these bolts, if they do just use a small screwdriver to lift and pop them out.
At this point I highly recommend having an extra set of hands around to help prevent scratching your paint when pulling the fender. If you’re doing this part solo then you may want to run a few strips of masking tape along the fender and frame rail, this will help give you a little protection if you bump the fender into the frame rail. Go ahead and remove the middle 8mm bolts and the fender will then be loose in your hands. You have to carefully slide the fender backwards to get it off of the frame rails, but once it’s clear of the frame rails you’re done!
That’s it – you’re done – congratulations!
Reassembly is in the reverse order, still being careful not to scratch anything. Take notice that the front 8mm fender rail bolt is longer than the rear (middle) 8mm fender rail bolt. If you mix these up then the longer bolt could rub your tire and cause a blowout.
Torque specs:
- 10mm upper shock mount – ~40 ft/lbs (no spec is listed in the manual)
- 12mm shock mounting bolts – 20 ft/lbs
Reattach all the wires under the right side cover, they are color matched so it should be a breeze – orange to orange, green to green, etc.
Afterthoughts
This is a simple process, the most difficult part is being careful so you don’t scratch the fender when removing it. With an extra set of hands it should be a breeze.


Vary helpful info thanks
Very useful. I got lazy with the wood block and just loosened the shocks and braces instead of removing the top shock bolts. Fender came out without a problem
Wow this was great. I was able to remove the fender quite simply with this site. Top notch tutorial!!!!
I sure am glad I found this tutorial, having had Harleys for the last 40 years and never removing a VTX fender, this was very helpful to me. Thank You for your knowledge…
I sure am glad I found this tutorial, having had Honda’s for the last 40 years and never owning or had the desire to own a Harley, this was very helpful to me. Thank You for your knowledge…
Wow, not the first “how to” I used from this site, thank you for all you’ve done. Oh, btw, fender came off easy, no fighting the shock mount.
I sure am glad I found this tutorial, having had no motorcycle for the last 10 years and finally choosing a Honda, this was very helpful to me. Thank You for your knowledge
Thanks for this. Removed my fender for paint and found someone changed all the wires to blue. This helped a lot to trace things out.
CARFULL>>> Be VERY CAREFUL. My 1st experience was mounting bags Not even taking the fender off the frame on mine..(BOTH) 1800R seem to spring out of place making it a hell of a gig to realign… It took me all day by myself. I just repainted my 02 and spent a ton of cash getting it done… Trying to reinstall the tins has me reading up again after 4 hrs of my buddy and I trying to reinstall safely.. Thanks for the post-it helps to reference
Awesome…. made what I was dreading as simple as 1,2,3…