Remove/Install Rear Tire (VTX)
Posted by Bare | Last Updated January 20, 2011This is a basic walk-through for removing/installing the rear wheel on the VTX 1800C. The process is identical for the 1300 model with the exception that the axle bolt is 8mm instead of 12mm. Some say that you need to remove the exhaust and the license plate bracket to do this, but with a little patience and care I’ve never had a problem getting this done with them on. As always undertake this project at your own risk, but with a little common sense this isn’t very hard to do.
Required tools/Materials
- Motorcycle lift
- Torque wrench capable of 31 to 81 ft/lbs
- Moly paste
- Deadblow/rubber hammer or hammer and block of wood
- 5mm and 12mm or 7/16″ allen socket (if you’re doing a 1300 you need an 8mm instead of the 12mm)
- 14mm and 27mm or 1 1/16″ socket (a crescent or flat wrench may be better for this task because of exhaust clearance)
- Something to block the front wheel (2×6, phone book, bricks, whatever)
Removal
Before you begin this task, I recommend wrapping the end of your exhaust with a towel to protect it. You’ll be working all around the end of the exhaust pipes and you don’t want to scratch or ding anything. A little bit of caution now can save you an expensive or annoying problem later.
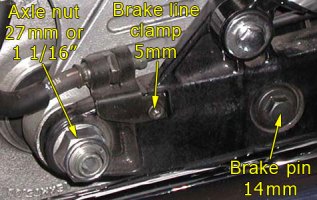
Now that your exhaust is protected with a towel there are a couple of things to do before putting the bike on the lift. Loosen the 14mm brake stopper pin and if you can, remove it. Some exhausts get in the way, preventing complete removal. If this is your case then just slide it out as far as possible – you only need it to come out approximately 1″ or so to give the clearance you need. With that done, remove the 5mm brake line clamp. Technically you don’t have to remove the 5mm brake line clamp, but it makes the task a little easier. 1300’s do not have this 5mm bolt.
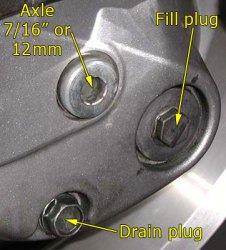
Now take the 12mm (or 7/16″) allen socket (8mm for 1300’s) for the left side of the axle and the 27mm (or 1 1/16″) socket for the right side and break the axle nut loose – do not remove it yet. If you have clearance issues with the exhaust then a flat or crescent wrench may do the trick with the axle nut on the right side.
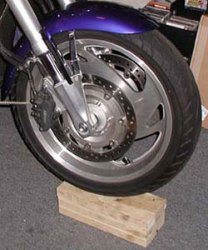
Now put the bike on the lift and block the front wheel so the bike won’t rock too badly when the rear wheel comes off.
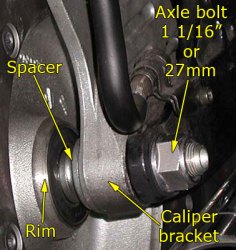
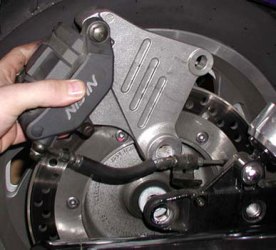
With the bike secured on the lift, remove the axle nut completely and begin to drive/pull the axle out. Once the axle is driven past the brake mounting plate you can rotate the brake back and out of the way. If the brake mounting plate doesn’t rotate like this then it’s possible you need to pull the 14mm brake stopper pin further out.
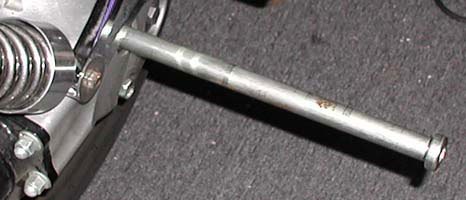
With the brake out of the way, remove the spacer from behind it and set it aside. Now finish driving the axle out completely – don’t worry, the final drive is sealed so it won’t leak oil and the wheel is held into the hub by its splines so the wheel won’t fall out even with the axle completely removed. If you need to drive the axle out, use something softer than the axle like a wooden dowel (broom stick?) so that you won’t damage the axle or its threads. If you’re having trouble getting to the axle because of the exhaust, sometimes something thin, like a wooden paint stirrer, can fit between the exhaust and work.
With the axle, spacer, and brake assembly removed, sit behind the bike and slide the wheel to the right until it disengages from the splines in the final drive and falls out. Some people claim that it’s necessary to remove the license plate on a C model to get the tire out from under the fender, but guys with Retro fenders can tell you that it’s not necessary. If you’re having trouble getting the tire out from under the fender, raise the jack further or slide the bottom of the tire to one side and you should be able to get the clearance you need.
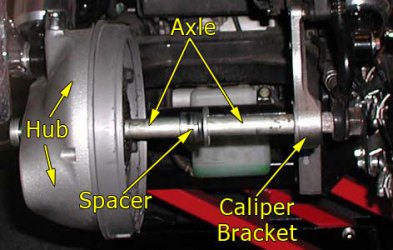
At this point, reassemble the axle, spacer, and brake just so nothing gets misplaced and the brake isn’t hanging from the hose:
While everything is broken down do some inspection to make sure you’re riding safe – check the axle, bearings, dust seals, bolts, etc. If anything seems worn or faulty then replace it – isn’t your life/safety worth more than a $.50 bolt or a $15 bearing?
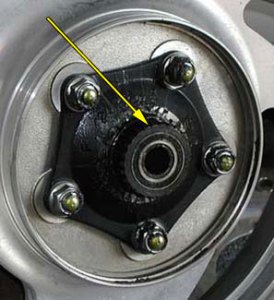
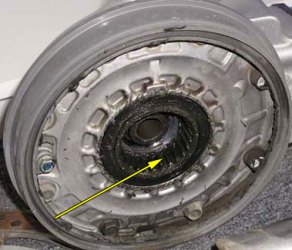
Pay special attention to this bearing:
There have been a number of failures of the bearings in that drive flange. You can read more about the problem here and in multiple other threads in many online forums. If you find you have a bad bearing please report it here so we can help make Honda fix the cause of the problem.
I want to be very clear about these drive flange bearing failures – the word “common” is thrown around a lot to describe something that happens more than usual. The truth is that there are hundreds of thousands of bikes on the road without any known problems. When I say that this bearing failure is “common” I am talking about less than 1% of all VTX’s on the road. Normal monitoring of this bearing at every tire change (usually every 8-12k miles) is perfectly acceptable and safe. If you’re changing your own tires, all you need to do is stick your finger in that hole (see pic above) and turn the bearing. If you feel anything other than perfectly smooth rotation you should have the bearings replaced.
It is important to always re-check these bearings after replacement. Honda only sells this flange as a pre-assembled unit (one reason I believe they are aware of this problem) and I have heard from several people that brand new flanges from Honda have had bad bearings. If you do find a dealer who replaces the bearings rather than the entire flange, be aware there are known cases where just the process of pressing in new bearings has broken them.
Intermission…
Now is the portion of the write-up when you do whatever you were removing the tire for in the first place…
Install
This is pretty much the reverse of what you just did to remove the wheel. If for any reason the rotor needed to be removed (some shops will remove it to swap tires), make sure that they are reinstalled with red loctite and torqued to 31 ft/lbs. The manual doesn’t mention loctite on these bolts because they “require” replacement and new bolts come with the loctite on them. If your bolts look fine then they should be ok to re-use (with loctite). If you don’t feel comfortable re-using them, then replace them.
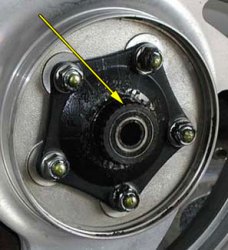
With the rotor on, liberally coat the splines with moly paste. The splines are the square ridges that allow the wheel to “lock” into the final drive:
This is a controversial subject among many riders who change their own tires… Honda recommends the moly paste for this application but lots of guys use moly “grease” instead because it’s cheaper and more readily available. The problem is that moly grease does not have nearly the moly content that the paste does and therefore does not offer the same level of protection. The grease can be slung off the wheel under extreme conditions (think how fast that hub spins!) leaving you without the protection you need. These splines see a lot of abuse so I wouldn’t cut corners on something trivial like this. One tube of moly paste will last several tire changes. It’s sad to say that I’ve even seen Honda dealerships that use the grease out of convenience as well – this is just one more incentive to do your own work! Consider this information and if you’re still unsure then read this link (bottom right corner in particular) and then don’t be shy about putting moly paste on both sets of splines (hub and wheel).
After the splines are well-coated with moly paste, slide the wheel back under the bike, lift it into place and slide it left until it seats into the final drive. You may need to rotate the wheel a little bit to get the splines to line up so you can slide it over and into place. Once the wheel is in place, start to slide the axle back in. Sometimes axles get a little rusty and they can be tough to remove or install. In these cases, I lightly sand the rust off the axle with some sandpaper and then put a very thin coat of moly paste on the axle. I usually just use whatever moly is left on my finger after coating the drive splines and it is enough to get the thin layer I want. This thin layer of moly serves two purposes – it helps the axle go in easier and also helps prevent the axle from rusting again.
With the axle started, reinstall the spacer and the brake mounting bracket making sure the brake pads are seated properly on the rotor. You may need to use a screwdriver or C-clamp to compress the pistons in the caliper enough to give you the space necessary to get the caliper back on the rotor.
With everything back in place, finish driving in the axle with a deadblow/rubber hammer or a hammer and a block of wood so you don’t damage the axle. It’s important not to use just a regular hammer or you will round over the edges of the axle hole. If you do that, you won’t be able to get the allen wrench in there to torque the axle down. Now put the axle nut back on the right side and finger tighten it. Rock the brake mounting bracket forward and reinstall the 14mm brake stopper pin. You don’t have to torque the brake stopper pin down yet – you just want to make sure everything is lined up before torqueing the axle down.
Now take the 12mm or 7/16″ allen socket (8mm for the 1300’s) for the left side and the 27mm or 1 1/16″ socket for the right side and tighten the axle nut to 81 ft/lbs. Just like when you removed the axle nut, if there is not enough clearance, you can use a different wrench on the right side axle nut and torque the axle from the left side. At this point you can lower the bike back to the ground and torque the 14mm brake stopper pin to 51 ft/lbs. If you have trouble getting to this bolt with a torque wrench (sometimes the exhaust gets in the way) I’ve found that having someone sit on the bike will usually compress the shocks enough to allow access to the nut. After the brake stopper pin is torqued down, reinstall the 5mm brake line clamp and snug it to 9 ft/lbs.
That’s it – you’re done – congratulations!
Afterthoughts
This is a fairly easy job for most riders and it can cut your tire changing costs in half. More money = more chrome and that’s a good thing!

Where can I buy the moly paste?
Thanks
I bought mine at the Honda dealership for about $12 for a tube of it. Don’t compromise and buy any cheaper substitutes.. Buy the Honda moly paste only..
Spoiler
Aaron, get a small enough length of wood ( piece of broom handel, 1/2 dowel rod) to fit in behind the exhaust and the end of the axel then put your thin piece uf wood thru the exhaust again and tap it some more. it sound to that you just haven’t got it tapped enough to grasp from the other side. I just followed the above instruction, on my 05 Neo, and it came apart exactly as described. the axel did not want to give until I took a tiny piece ofdowel to get the extra depth thus forcing the axel out enough to grasp and pull. let us know. good luck
I don’t normally answer questions here, that’s why the comment system says in big letters “Post Questions in the Forums”. My reasoning is just that I don’t regularly check here to answer questions, but I hit the forum usually at least once a day.
With that said – on rare occasion I find an axle that is seized (rusted) to the inner race of the wheel bearings. Fondo’s suggestion to tap it with a broom handle or dowel is spot on, always try something soft first so as to not damage the axle threads. Unfortunately I often find that this is not enough, so when this happens you need to get out something more solid like a chisel/punch that will better transfer the “shock” of the hammer as you tap it. The most important thing here is that you CANNOT hit the axle threads with anything solid like this, it will ruin the threads and you won’t be able to get the axle nut back on. With a pointed punch I find I can usually put the punch in the hole in the middle of the axle and a few taps usually breaks the axle loose. Once it is loose it usually comes right out.
What I do to prevent this problem in the future is I lightly sand the axle with sandpaper. Use whatever you have handy, the idea is just to knock the surface rust off the axle and clean it up. When you apply moly paste to the final drive splines you will inevitably have some leftover on your finger, rub this up and down the axle and you will see a very thin (mostly transparent) film appear on the axle. You do not want to glob it on, you only need this thin film. When everything is back together this thin film will help prevent the rust that seized the axle in the first place. If you do this at every tire change I doubt you will ever have an issue with the axle seizing again. 😉
My axle was rusted in place. I kept splitting every piece of wood I used. I finally pulled the exhaust completely off and drove the axle out with a steel pin and a beater. Thanks for the help everyone! RIDE ON!!
Thanks for the help on the wheel removal and replace. Saved me $25.00 at the stealer and brought me a little closer to my daily rider.
I tried all the steps above just added one more. I pulled the shocks, it gave me the range of movement of the rear tire to give me pleanty of room to access all the bolts. FYI, I did have the bike set up on my lift so when i did pull them off there was no issues. OH YEAH my axle was also rusted. but this gave me room to swing away at it.
Thanks, I found this a great help when taking off the rear wheel on my 1300 to replace the rotor and have a new tyre fitted. I have taken my front wheel off a few times but I had a dealer in the past tell me that taking off the rear wheel was a nightmare and he was charging me alot of labour because he said it was such a hard job. Infact I was surprised how easy it was 🙂
Another option when working with a stubborn axle is to keep the nut on (back out to end of threads) to further protect the threads and prevent axle from simply splitting your dowel.
I only find some loctite moly paste on spray? is this good for the splines?
Direct Line sells this:
http://www.directlineparts.com/product.asp?pid=4330&str=1
Is this the stuff that we should use?
The actual moly paste sold by Honda is 60% moly and this is the protection you need. I’m not out to push Honda products, I know that Loc-Tite does sell a Moly Paste that is 65% moly:
http://www.henkelna.com/cps/rde/xchg/henkel_us/hs.xsl/full-product-list-7932.htm?iname=Loctite+Moly+Paste&countryCode=us&BU=industrial&parentredDotUID=productfinder&redDotUID=0000000I5G
I would trust that as well since it has a high enough concentration of moly to provide the necessary protection. For most people the Honda stuff is readily available, if not then the Loc-Tite stuff is a perfectly viable replacement. I can’t comment on the Loc-Tite spray you mention unless I know what it is so I can verify the moly content, but whatever you use it should have similar moly content to these other products – 60ish percent.
This just works. When things just work they are easy. I swapped out the back wheel/tire with an RC Wheel
and done. Thanks Alot.
Gun Powder
Thanks for the info,clicking away at all ads. Changed back tire and couldnt turn bearing at all with tire off. Would you recommend replacing whole unit or having a new bearing pressed in? I am driving this bike daily.Just took on four hour trip before changing tire and not noticing any issues.Im looking online for parts and having trouble finding proper nomenclature for unit. Thanks, Kipper
Thank you so much for this site and information. I just finished this job last night, and everything went well. I did remove the right shock to make it a little easier to get to the brake pin bolt. And I removed the two bolts for the lower exhaust to get the tire back on, because the tire was hanging up on them. Overall, saved a lot doing it myself. Thanks again for a great site.
I have yet to use ALL the information on your site, but give me a little more time. Third or tenth time I’ve used your site. Just changed my rear tire today and could NOT have done it without your help. Thanks.
Thank you for the great description!
Helped me a lot to save some $s!
Daniel
Thanks for the information Guys. You have saved me $60.
A well made tutorial. Thanks a lot. Just removed my blown out wheel about 5 minutes ago with only a gallon of sweat (it’s hot here!) but very little cussing. I went ahead and removed my slipons just to make things less annoying to reach. With a flat, my frame was lower then my lift so I put a 2×4 under my rear fender (under the license plate) and lifted the bike with a scissor jack to gain clearance. Didn’t leave a mark on the fender. It supported the weight just fine.
Thanks again!
I have a 2003 1800 VTX with 8,000 miles. The bearings in the assembly were worn out. I took it apart myself, got new bearings and put it in the assembly myself. Honda has a problem with this. Bearings are not big and heavy enough for this Bike. Bearings are only sealed on one side . I repacked bearings and put it back together. Unsealed sides face each other. You do need to be careful that everything is lined up when putting the bearings back in. Total for bearings including tax was 32.00 vs 270.00 for the whole assembly. Be sure to use moly paste which I found only at the Honda shop
Thank you for your help
Why don’t you head over to the forum and read this article <--link. I think you'll find it enlightening.
The only moly paste that has even more molybdenum disulfide in it than the Honda paste, is Loctite Moly Paste. About $32 for a one pound can with abrush applicator. A lifetime supply. Very good stuff.
I just called our local Honda dealer in Maysville KY to see if they sold moly paste. They informed me that they did not have it. I asked what they used when changing the rear tire and he said “a differential grease, moly grease is just an overpriced grease not worth the money”. Not even moly grease but a differential grease??? I just lost faith in there service dept.
$24 for Honda Paste. This crap is not even thick as most grease’s. Try Permatex Anti-seize. $8- 4oz.any automotive parts store.
A highly refined blend of aluminum, copper and graphite lubricants. Use during assembly to prevent galling, corrosion and seizing due to weathering or chemicals. Anti-Seize assures easier disassembly. Temperature range: -60°F to 1600°F (-51°C to 871°C). Salt, corrosion and moisture resistant – ideal for marine use. Suggested Applications: Axle assembly!
If you actually knew anything about grease then you’d know why you cannot replace Moly paste with anti-seize. Please study and understand what you’re talking about before recommending it to other people. The “suggested applications: axle assembly” you list is for cars – not motorcycles. 2 totally different applications, not even remotely the same. Offering this advice is dangerous to others, following this advice is dangerous to yourself.
[…] Based on many VTXOA threads, Bareass Choppers site, and my Repair Manual, I would only use Honda moly paste 77 (or 60 if I already had it) […]
Thanks for the instructions. Very helpful. I found after wrestling trying to get the 14 mm brake bolt out on my 02 VTX 1800 R it was easier to remove the exhaust. Four clamp bolts and two hanger bolts and the rear section of the top and bottom exhaust came off together. Took no more than five minutes. It allows easier access altogether for both wheel removal and cleaning while you’re at it. Also got a chance to wire brush the rust off the clamp bolts and oil them up for return to service.
[…] It seems far more intimidating and difficult than it really is to remove the wheels from these bikes…
Here’s what I followed, quite simple really… […]
[…] To do it without removing the exhaust you will need to buy a 27mm wrench to get to the axle nut, especially with those extra long pipes. […]
Nice write-up, back bearings were shot (03 1800, 16K miles), need to order those along with the paste and replace the tire. Keep it coming, thanks!
Just wanted to comment on how great a write-up this is. Very easy to follow. The process of removing the tire is time consuming but following these instructions step-by-step helps make the process a lot less painful. Thank you much!!!!
Great instructions. If I took my VTX-1300s to a Honda dealer to change the tires, how could I make sure they are using a good paste? Also, my VTX is approaching 8000 miles. Do the bearings wear out with such low mileage?