“Ground Fix” for VTX 1800
Posted by Bare | Last Updated April 7, 2014Original pictures provided by Tapper, Bill, and “Dangerously” of the VTXOA
This is an article about cleaning up and fixing the grounds on the VTX 1800, all models. It has been done so often by so many riders that it has taken on the simple moniker of “the ground fix”. I’d like to thank Tapper who was the first to document this process that has helped riders all over for many years. He is also responsible for the original pictures in this article, which I have modified.
Now you might be asking why this is so important, or even wondering why a brand new VTX would need this – I mean, it’s a new bike, right? Well here’s the deal, when Honda made the VTX they did pretty much the same thing they’ve always done – design the frame, powder coat it, bolt all the parts to it. Now that has worked for Honda and many other manufacturers for years, the problem that sets the VTX 1800 apart is that it is fuel injected (FI for short). FI means this bike has a lot of electronics and sensors that carbureted bikes don’t have. Electronics need a good power source and good grounds to function.
I mentioned earlier that Honda powder coated the frame and then bolted everything to it. This includes the electronics and the electrical ground eyelets. Anyone who knows anything about electronics will tell you that it’s hard to run power through an insulator like powder coat. This means the bike’s ground points that are trying to connect through the powder coat are struggling.
The next problem is caused by all the connections at the grounds. For example, the common electronics ground consists of a powder coated steel frame, a steel coil mounting bracket and a brass eyelet for the electronics ground. These are all connected by a zinc-coated steel 10mm bolt. This design poses a problem because of an electrochemical process known as “Galvanic action” or “Galvanic corrosion.” The short explanation is that when you have different metals in direct contact with each other they corrode at an advanced pace. When you run a current through these metals the process occurs even faster. So here there are multiple metals in direct contact, and one of them is a ground terminal so there is current passing through them all…
Link – Wikipedia entry on Galvanic corrosion
Hopefully this helps paint the picture of why this is a necessary thing to do with your bike before it gets bad enough to cause problems. Once the corrosion sets in your bike will likely start exhibiting all sorts of problems like running poorly, fouling plugs, rough idling, cylinders misfiring, or the worst part – throwing random ECU error codes. These random codes can cause you to spend tons of cash at a dealer as chase ghosts trying to diagnose what is essentially just a poorly connected ground terminal.
So let’s fix this before it becomes an issue, right?!
Required tools/Materials
- Tools to remove seat
- Tools to remove gas tank
- 5mm allen
- 10mm socket
- Socket wrench
- Socket extension
- Dielectric grease (available at most auto stores)
- Sandpaper or Dremel w/ grinding stone
Process
In order to get to everything to fix these grounds you need to be able to remove the seat and remove the gas tank. Technically this can be done without completely removing the tank, so if you’re feeling a little intimidated by that process you can just break the tank loose and slide it backwards on the backbone to get to the front coil. This is admittedly a little easier on 02-04 model VTX’s, but I still believe it can be done on the 05+ VTX’s with a little care. It also makes things easier if you remove the front spark plug covers (5mm allen) and disconnect the spark plug boots so the coil can be taken loose later.
So remove the seat, the front spark plug covers, and decide how you’re going to handle the gas tank. Now you should be ready to get started.
Common Electronics Ground
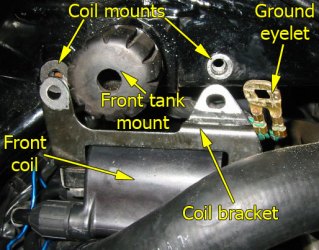
This ground is the most problematic of the bunch and is usually the culprit when most problems arise. Look on the left side of the backbone towards the front of the bike – just behind the handlebars, under the front tank mount and in front of the radiator cap and you should see the front ignition coil. If for any reason you have trouble finding it just follow the spark plug wires from the front cylinder up, they plug into this coil. The pic below is what you’re looking for, it’s just already dismantled.
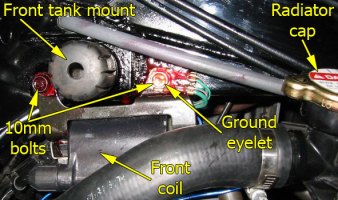
When you find it you’ll see it is bolted in place with two 10mm bolts. Remove the 2 bolts and the coil comes loose, the rear bolt also has the common electronics ground “eyelet” under it. This is some of what I talked about above, many different metals all in one place with a current across them. When you take yours apart you may already find corrosion throughout the connections.
The easiest way to do this job is to remove the coil from the bike altogether. This is why I said to remove the spark plug boots from the plugs earlier. There are 2 additional wires plugged into the rear of the coil. Remove them as well. Take notice that the 2 wires are black w/ a white stripe and blue w/ a yellow stripe – the black one connects to the inner terminal closest to the backbone of the bike.
With the 2 bolts, 2 plug wires and 2 electrical wires disconnected the coil and bracket should come right off the bike. You’ll have to wiggle it a little and compress the radiator hose to get it out, but it will come out.
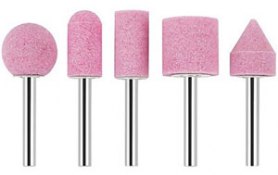
Now with everything apart, start cleaning it all. First take the sandpaper and use it to clean the ground eyelet. A quick sanding should remove any surface corrosion and get it nice and shiny. Next sand off the powder coat at the coil mounts until you have bare metal. I find that using sandpaper to clean the ground eyelet works well, but it can take a bit of time for the powder coat. This is why I mentioned a Dremel or drill with grinding stone attachments. If you have an attachment like the ones pictured below, it can make this job a breeze. You just have to be careful because they will also quickly remove paint and powder coat from other places where you still want them.
At this point you should have cleaned the coil mounts and the ground eyelet so you can move on to the coil and coil bracket which you removed from the bike. Look at the bottom of the coil on each end and you should see a 10mm bolt. Remove these 2 bolts to remove the coil bracket from the coil. Be careful not to lose the “U” shaped connectors that the bolts run through on each terminal. Using sandpaper clean the paint off the coil bracket where the 2 bolts pass through it (see pic above) on both the inner and outer face. You want to be certain that when you bolt this back up, you have good metal to metal contacts. Also sand the coil bracket where the coil mounts to it – under where the nuts are tack-welded to the bracket.
Now set the coil bracket aside and grab the coil itself. Remove the “U” shaped pieces on the coil and clean them with sandpaper. Also clean the coil connections where these “U” connectors sit and both 10mm bolts. Then get ready to put everything back together. Get the coil, bracket, bolts and “U” pieces ready to reassemble and put a good coat of dielectric grease on everything. Begin to reattach the coil bracket to the coil, making sure that you put the “U” shaped pieces on the coil before you put the bolts back through. Think as you reassemble the coil and bracket, every part should be clean metal to metal contact and coated with dielectric grease – the bolts, “U” pieces, coil and coil bracket. If this is the case then go ahead and tighten the two 10mm bolts that hold the bracket to the coil. With this all reassembled cover the connections with more dielectric grease. There is no reason to be stingy with the grease because you are depending on it to provide a protective barrier around the connections, protecting them against the elements.
With the coil reassembled squeeze it back under the front tank mount and into place. Don’t forget to reattach the 2 electrical wires to it, remember – black wire to the inside. You’re going to do the same thing here that you just did attaching the coil and bracket – cover the coil mounts on the frame with dielectric grease, cover the ground eyelet with grease, cover both sides of the coil bracket (the part you sanded where the bolts pass through) with grease, and cover the two 10mm bolts with grease. Just like when you bolted the coil and bracket back together, think to yourself and be certain that you sanded, cleaned and greased each piece being bolted down. If this is all done then bolt it back up, the shorter black bolt should be in front and the longer gold-colored bolt should be in the back with the ground eyelet under it. Snug these bolts down well to ensure you have a good connection. You also want to squeeze most of the dielectric grease from between the pieces as you tighten everything.
The last part here is to once again liberally cover both bolts and the ground eyelet with dielectric grease to form a protective barrier around everything. If you look, the picture to the above right is what you should have when finished – everything bolted up and greased over. At this point you can reconnect the spark plugs (put some dielectric grease in the plug boots before you reattach them) and reinstall the plug covers. You can reinstall the tank by following the above directions in reverse and if you have a newer (05+) VTX this is it, you’re done – there is no secondary battery ground on these models and the common chassis ground issue I mention below was only a problem on a limited number of ’02 C models. Congrats!
Secondary Battery Ground
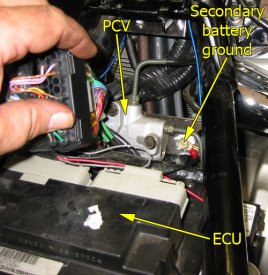
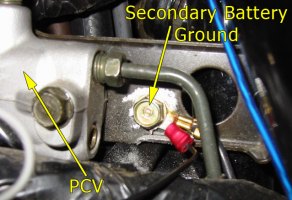
With the common electronics ground completed, doing this secondary battery ground will be a piece of cake. If you have a coolant reservoir between the motor cylinders on the left side of the bike (mostly all 05+ VTX’s) then you do not have this ground and you’re done! Otherwise, look under the seat, in front of the battery and ECU and to the right of the Proportional Control Valve (PCV) for the brakes. You will have to dig around, move some wires and a few things out of your way to get to this. Under all this you will find a 10mm bolt with another ground eyelet under it (see pic to right).
This ground is subject to the same problems as the common electronics ground – powder coat issues, multiple metals and electric current. To fix it let’s remove the 10mm bolt so you can get in there and work.
With the bolt removed, use sandpaper or a grinding stone (if you can fit it in there) to clean the powder coat off the frame underneath where the bolt sits. With the powder coat cleaned, use sandpaper on the ground eyelet and get it clean and shiny. From the factory the bike usually only has this one eyelet here, but Power Commander and some other accessories use this ground also, so if you find multiple terminals just clean them all with the sandpaper. You can see an additional terminal in the picture below.
Just like above, put dielectric grease on the frame, eyelets and bolt and reassemble everything. Snug the bolt down nice and tight to squeeze out any extra dielectric grease and then liberally cover the entire thing with more dielectric grease for protection.
With this done you can put all the wires, etc. back where they came from under the seat and reinstall your seat. If you have anything other than an ’02 C model you are done – congrats! The last section discussing the common chassis ground is a problem that existed only on certain ’02 C model VTX’s.
Common Chassis Ground
As mentioned above, this is a problem that existed only for certain 2002 VTX 1800 C models. Chet from Rattlebars did an excellent article on this issue years ago so I won’t try to rewrite the entire thing. You can view Chet’s article here:
http://www.rattlebars.com/vtx/vtxground.html
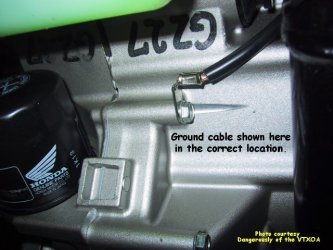
The short version is that Honda had a short run of 2002 C models where someone was placing the common chassis ground terminal under the rear bolt on the clutch cover rather than the proper bolt on the motor case. This incorrectly located ground terminal resulted in all sorts of problems from things as simple as trouble starting the bike all the way to electrical fires caused by melting insulation on the ground wire. I am sorry to say that my bike was one of these that briefly caught fire, so I learned about this problem the hard way long before I ever saw Chet’s article!
The picture to the right is the proper location for the ground cable but it can be slightly misleading because this picture was actually taken UNDER the bike, just in front of the rear wheel. The picture is so nice and clean you might not realize this if you didn’t recognize the oil filter and coolant reservoir, also in the pic.
Honda circulated service memos to all their dealers, so if you find this and don’t feel like getting your hands dirty you can ride over to your local shop and ask them to fix it for you. If you want to do it yourself, it’s just a matter of unbolting the ground terminal from the wrong bolt and moving it to the proper one. I cannot stress how important it is to have this addressed if you discover that you have one of these problem ’02 C models. My bike caught on fire 6 days after I bought it, I have heard of others not having problems for years but then one day – “poof” – the wire went up in flames.
If you have any additional questions please check out Chet’s article as it is very thorough and has even more pics.
That’s it – you’re done – congratulations!
Afterthoughts
This is one of the most important things you can do to keep your VTX 1800 up and running well. As mentioned above, and discussed time and time again on VTX forums all over, there are so many problems that can occur as a result of these poor grounds. Ask someone on a forum what could be causing a problem on your bike and 9 times out of 10 the first thing asked will be “Have you done the ground fix?!” Fouling plugs, trouble starting, intermittent ECU error codes, rough idle, one cylinder misfiring? All these and more can be solved by the ground fix.
Now don’t get me wrong, I’m not saying that these grounds are the source of every one of these problems every single time – but I can say from experience that the overwhelming majority of these types of problems are resolved after reworking these grounds.
This is a fairly simple process that only requires a few tools and a few bucks worth of dielectric grease – but most importantly it’s a process that will eliminate so many problems before they ever occur. I consider this to be so important that I recommend doing it as a part of regular maintenance. Every 1-2 years, depending on mileage, riding conditions, etc get into the bike and check these grounds. Reclean them with sandpaper and put a fresh coat of dielectric grease over everything to insulate them. Trust me, you won’t be sorry!

I just performed this mod on my 03 VTX 1800 and it was simple. I did however remove the tank because it made it look easier to get into everything. Removal of the tank was easy too. Now for the fun part… to go out and take it for a spin to see if there is any difference. If no difference is noted, at least I now know that the grounds are all good and will be for quit a while.
Thanks
Joe
I found that my ‘recently acquired’ 02 has the ground wire in the wrong location. Just moved it and working my way through the other ground touches. Was just curious to “why” the wrong location caused the burn out? after relo, it appears to me it’s more apt to be touching the engine in the correct location, than the in-correct location. Plus, after relo, it’s sitting pretty against the swing arm bolt/bushings. (maybe the original wrench seen it logical to place where they did, however it’s obviously proved to be wrong)
Thanks for the info, your site/info has been my bible for my VTX(s).
Great article. i’ve ;earned so much from this web site, its amazing. one thing that you might want to add though that no one seems to mention in any of these grounding articles is that most dielectric greases are non-conductive. in fact the stuff that Honda sells isn’t conductive. if you go and buy their stuff and slather it all over and under your connections, it should make the problem worse instead of better. hence the term ‘dielectric’, which means insulator. are you using battery terminal grease?
When doing the ground fix you refer to sliding the gas tank back rather than totally removing it. Does that apply to the VTX 1800 are also? Mine is a 2002 model and I am starting to have some misfiring one coming just off idle at low-speed and also going to full throttle at higher speeds. Hopefully this will fix all the problems and I’m getting ready to try and do it. Thank you for your great article
I worked it the transformer industry for years.
When you connect aluminum and copper together, if the connection isn’t perfect an explosive gas forms as the metals oxidize, blowing the connection apart. We used dielectric grease to ensure the copper, and aluminum didn’t touch, but had good electrical conductance.
I have always used dielectric grease to prevent corrosion, on connections of dissimilar metals (especially battery terminals and spark plugs) with excellent results.
explosive gas? Never heard that one. This really doesn’t have anything to do with the ground fix, but aluminum to copper connections fail because aluminum and copper have different coefficients of thermal expansion. Under load, the two metals expand and contract at different rates and amounts. Over time, the junction loosens which allows oxygen to react with both metals and form oxides which aren’t conductive. This increases the resistance of the junction which causes a voltage drop and therefore heat. The junctions don’t blow apart, they heat up and melt. That’s why people use no-ox creams in those kinds of connections – to prevent oxygen from coming in contact with the metal surface and oxidizing the metal. There is also an issue of galvanic corrosion with dissimilar metals, cold flow and creep. Either way, dielectric grease is non-conductive. But I certainly can’t argue with the results….
Just wanted to say 2 thumps up. Typed in itermittent miss on VTX1800 and this post came up. Read it, did it and fixed it. 300+ miles and no miss. Thanks, I would have done so much trouble shooting to find this problem and your article made it a breeze. Thanks again, Jimmy
My 2003 VTX1800R (21k miles) started running on just the rear cylinder recently, and it would come and go intermittently for no apparent reason. I replaced the plugs, tried fresh gas, injector cleaner, etc but nothing helped. I have always be a BIG Honda fan because of the legendary reliability and cutting edge engineering. This scenario led to me being quite disappointed and frustrated with my big, beautiful bike. Then one day I was looking on the Internet and stumbled upon your remarkable and user friendly article. I just completed the work about an hour ago and I just now got back from a 20 mile check ride. Feels like a new bike! Great article and simple to follow. Thanks a million, fellas!
I got a 02′ C model. Did the entire ground fix. It took care of my fouling spark plugs.
The ground and secondary ground wire were in the right places.
Also I did the cleaning of all contact’s points on the rear coil as well.
Same issue there. Frame and brackets are powdercoated and then put together. You wont get a good spark like that.
Thanks
I have been fighting an intermittant misfire problem on my 2002 VTX1800 for the last 3 or 4 years. The local Honda dealer couldn’t find the problem cause it would start running OK when I take it him. After replacing the front cylinder coil I still had the miss and no spark. I had tested the wiring from the coil to the computer and also the power wire. I read this fix and found the frame mounting areas for the grounds you mentioned were painted. After cleaning the paint off and shining the ground connections, the engine runs GREAT! This bike only has 9,000 miles and when it runs rignt is a power monster.
Thanks for the great fix!
[…] here is a link to the vtx write up on how to fix it. i`m going to try this on the fury to see if this fixes the problem […]
I just completed the Ground Fix for my 1800 F VTX. Only problem is I can not locate the secondary ground it is not located to the right of the PCV for the brakes. Thanks for your website you have allowed me to do several jobs myself saving much in labor costs.
The later model VTX’s, mostly 05+ bikes, do not have that secondary ground. Thanks for pointing it out, I actually thought I had that written in the article.
I have an 05 VTX 1800F. Do I need to add that second ground myself or is just fixing the 1 good enough?
I bought one of the first VTX 1800’s available in VA in 01. When I heard of the chassis ground issue, I took it to a dealer and they “corrected” it back in 02. The bike has Cobra pipes, Power Commander ( tuned by Dr. Dyno during a bike week in front of a bunch or Harley owners ) and several other add ons in lighting and custom paint. The last several years, I would have some starting or poor running issues as well as long periods of cranking ( replaced several gel batteries because of this ), and would replace gas, despite of using Stabil. The bike has only 6200 miles and I don’t ride much now and thought of selling it, but could not get it to start, so in frustration I went to the internet.
Just finished your “Ground Fix” and after putting everything together and with “old” gas in the tank, it fired off in less than a full revolution of the crank; both cylinders firing strong and throttle very crisp. I think the bike is no longer for sale!
Thanx for a great documented article. I slid the tank back because I replaced the fuel pump years ago, (possibly due to a bad ground) and did not want to go through that again. I used Dremel grinding, wire and buffing wheels, and the whole exercise took less than two hours. Keep up the good work.
[…] VTX 1800 are also plagued by Earth loose contact problem. Not guessing but here are some links … an interesting read […]
I also had dirty contacts on start button. A little WD40 and compressed air, Good To Go.
[…] Here’s another link for a great walk-through on the ground fix… […]
[…] I would recommend that you do the ground fix. It only takes an hour, maybe two for even for the most severely mechinacally challenged. […]
[…] If the engine surging, do the ground fix. This is a must on this bike for it to run “right” […]
[…] Even if they’ve been corrected already, it’s good practice to clean up the grounds every so often. […]
Thank you for this post! The last few weeks, my 2003 VTX 1800 S became really hard to start. I did the ground fix and changed plugs and it’s running like new.
Hi, my 2001 vtx1800 was running badly, great when under power but surging when trying to cruise.
Read about the ground fix and thought why not. Bike now runs like a dream, many thanks for your info. Keep up the good work.
I thinks these links are out of date.
Rattlebars and http://www.rattlebars.com/vtx/vtxground.html
I was doing the desmog on my 2002 vtx 1800c and noticed this part on top of the motor when I took the tank off. No idea what it is or where it goes. Anyone know about this piece? I can’t post a picture but it’s a bkack round knob with a hole on tge bottom about 1/8″ or so in diameter.
My 2006 vtx1800 keeps blowing the main fuse or fuel pump fuse replaced fuel pump replaced tip over censor also every time I plug tip over censor up the fuses blow still need help
Bought a 2002 VTX 1800C model about two months ago May, 2023 . Started looking into any common issues with these Bikes and ran into your article. Great article checked all off the connections. Yup!, sure enough they were all located exactly where you pointed out. Had to correct all three ground locations. Bike feels amazing now, it will get up and move! Thanks for all the information.
Found a loose battery hot wire causing lag performance and bucking now totally great